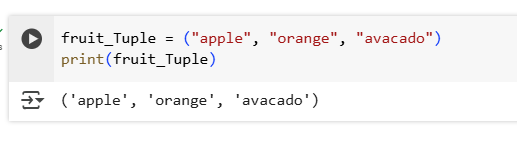
1.Create a tuple containing the names of three fruits. Print the tuple and its type.
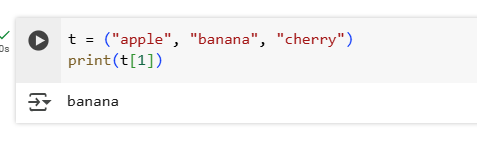
2.Given a tuple t = ("apple", "banana", "cherry"), access and print the second element.
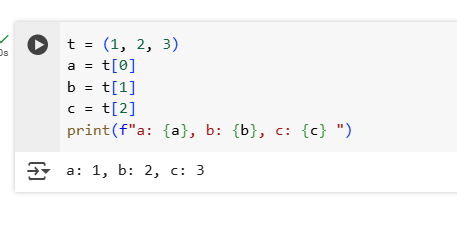
3.Unpack the tuple t = (1, 2, 3) into variables a, b, and c, and print the variables.
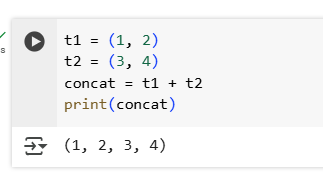
4.Concatenate two tuples t1 = (1, 2) and t2 = (3, 4) and print the result.
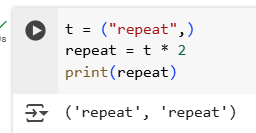
5.Create a tuple t = ("repeat",) and repeat it three times. Print the resulting tuple.
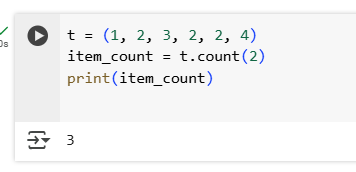
6.Given a tuple t = (1, 2, 3, 2, 2, 4), count the number of times the number 2 appears.
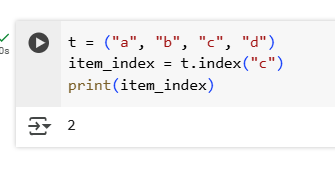
7.Given a tuple t = ("a", "b", "c", "d"), find the index of the element "c".
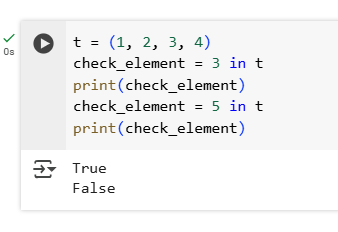
8.Check if the element 5 is present in the tuple t = (1, 2, 3, 4)
9.Find and print the length of the tuple t = ("one", "two", "three").
10.Slice the tuple t = (0, 1, 2, 3, 4, 5) to obtain a sub-tuple containing only the elements from index 2 to 4.
11.Create a nested tuple representing a 2D point (x, y) = ((1, 2), (3,
4)). Access and print the second coordinate of the second point.
12.Try to change the value of the first element in the tuple t = (1, 2, 3) and observe what happens.
13.Convert a list l = [1, 2, 3] to a tuple and print the result. Then convert a tuple t = (4, 5, 6) to a list and print the result.
14.Create a tuple with a single item 5 and verify its type is a tuple.
15.Iterate over the tuple t = ("ParottaSalna", "is", "good") and print each element.
16.Convert the string "hello" into a tuple of characters.
17.Convert a dictionary d = {"one": 1, "two": 2} into a tuple of its items.
18.Write a function that takes a tuple of numbers and returns the sum of the numbers.
19.Use tuples as keys in a dictionary to represent points on a grid. For example, grid = {(0, 0): "origin", (1, 2): "point A"}.
1.Write a function greet that takes a name as an argument and prints a greeting message.
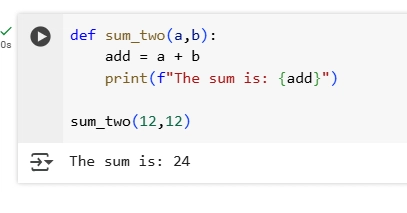
2.Write a function sum_two that takes two numbers as arguments and returns their sum.
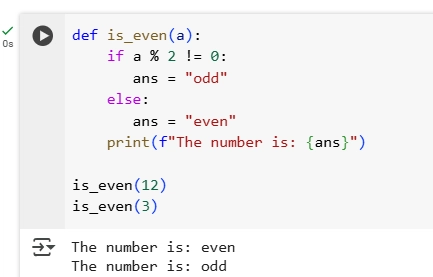
3.Write a function is_even that takes a number as an argument and returns True if the number is even, and False if it is odd.
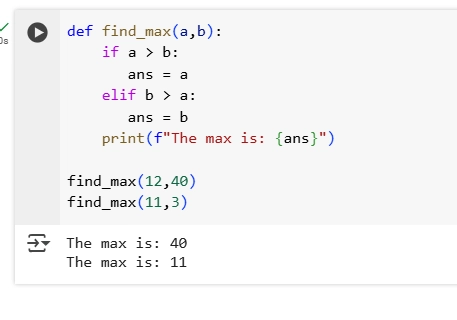
4.Write a function find_max that takes two numbers as arguments and returns the larger one.
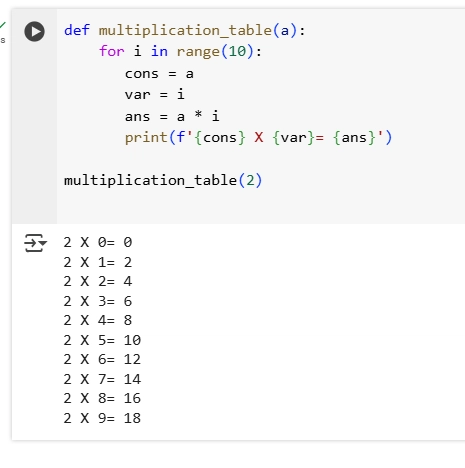
5.Write a function multiplication_table that takes a number n and prints the multiplication table for n from 1 to 10.
6.Write a function celsius_to_fahrenheit that takes a temperature in Celsius and returns the temperature in Fahrenheit.
7.Write a function power that takes two arguments, a number and an exponent, and returns the number raised to the given exponent. The exponent should have a default value of 2.
1.Write a function that takes a string and returns a new string consisting of its first and last character.
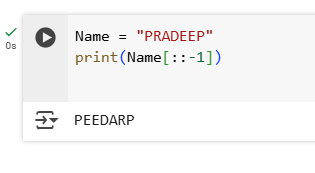
2.Write a function that reverses a given string.
3.Given a string, extract and return a substring from the 3rd to the 8th character (inclusive).
4.Write a function that returns every second character from a given string.
5.Write a function that replaces the middle third of a string with asterisks. If the length of the string is not divisible by 3, adjust the middle third accordingly.
6.Write a function that checks if a given string is a palindrome (reads the same backward as forward).
7.Given an email address, extract and return the domain.
Ans: How to find incase there are multiple occurrences? Loop?
8.Write a function that returns every third character from a given string.
9.Write a function that extracts and returns characters at even indices from a given string.
10.Write a function that skips every second character and then reverses the resulting string.
1.Create a variable named name and assign your name to it. Then print the value of the variable.
2.Create a variable age and assign your age to it. Later, reassign the variable with a new value and print the new value.
3.Assign the values 5, 10, and 15 to three variables a, b, and c in a single line. Print their values.
Ans:TypeError on 4th statement, because we're trying to concatenate integers (a, b, c) with strings
4.Swap the values of two variables x and y without using a third variable. Print their values before and after swapping.
5.Define constants PI with appropriate values and print them.
Ans: constants are typically written in all uppercase letters with underscores separating words. However, Python does not enforce this, so constants are not truly immutable. You can still override.
6.Write a program that calculates the area of a circle using the constant PI and a variable radius. Print the area.
Ans: ** is Squared
7.Define constants for the length and width of a rectangle. Calculate and print the area.
8.Define a constant for π (pi) and a variable for the radius. Calculate and print the circumference of the circle.
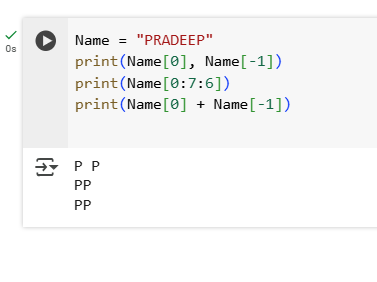
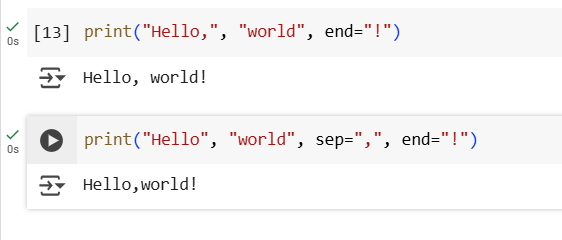
1.How do you print the string “Hello, world!” to the screen?
Ans: Using sep and end Parameters is preferred way.
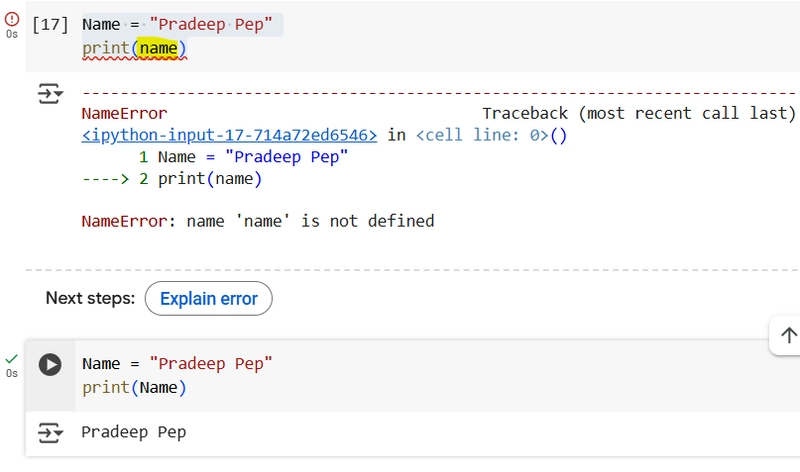
2.How do you print the value of a variable name which is set to “Syed Jafer” or Your name?
Ans: Note the Variable is case sensitive
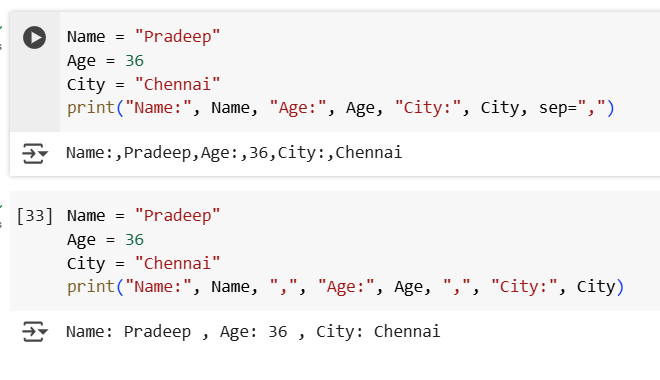
3.How do you print the variables name, age, and city with labels “Name:”, “Age:”, and “City:”?
Ans: Using keyword sep="," brings in , between the Variable Name and Value itself, so avoid
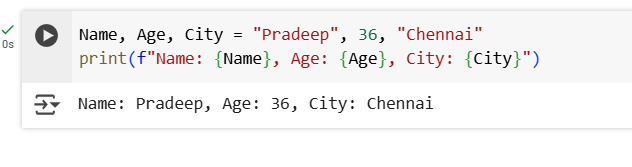
4.How do you use an f-string to print name, age, and city in the format “Name: …, Age: …, City: …”?
Ans: To insert variables directly into the string used f-string
Also, you can assign values to multiple variables in a single line as seen in 1st line
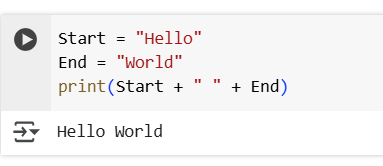
5.How do you concatenate and print the strings greeting (“Hello”) and target (“world”) with a space between them?
Ans: + is used to concat the items
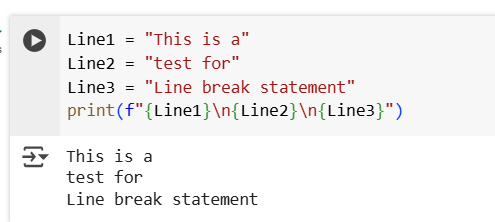
6.How do you print three lines of text with the strings “Line1”, “Line2”, and “Line3” on separate lines?****
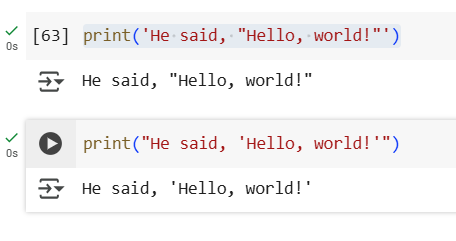
7.How do you print the string He said, "Hello, world!" including the double quotes?
Ans: To print quotes inside a string, you can use either single or double quotes to enclose the string and the other type of quotes inside it.
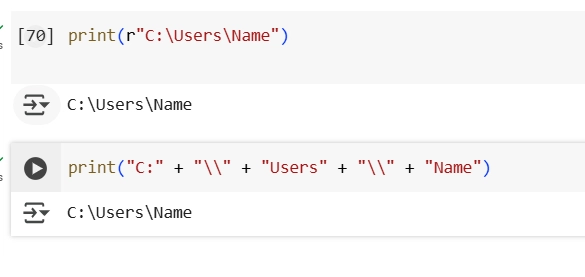
8.How do you print the string C:\Users\Name without escaping the backslashes?
Ans: you can also use a literal backslash "\" when using Concat or Try with 'r' to treat backslashes as literal characters
9.How do you print the result of the expression 5 + 3?
10.How do you print the strings “Hello” and “world” separated by a hyphen -?
11.How do you print the string “Hello” followed by a space, and then print “world!” on the same line?
12.How do you print the value of a boolean variable is_active which is set to True?
13.How do you print the string “Hello ” three times in a row?
14.How do you print the sentence The temperature is 22.5 degrees Celsius. using the variable temperature?
15.How do you print name, age, and city using the .format() method in the format “Name: …, Age: …, City: …”?
16.How do you print the value of pi (3.14159) rounded to two decimal places in the format The value of pi is approximately 3.14?
Ans: pi is the variable & .2f formats it as a floating-point number with 2 digits after the decimal
17.How do you print the words “left” and “right” with “left” left-aligned and “right” right-aligned within a width of 10 characters each?
Cron jobs are a fundamental part of automating tasks in Unix-based systems. However, one common problem with cron jobs is multiple executions, where overlapping job runs can cause serious issues like data corruption, race conditions, or unexpected system load.
In this blog, we’ll explore why multiple executions happen, the potential risks, and how flock provides an elegant solution to ensure that a cron job runs only once at a time.
The Problem: Multiple Executions of Cron Jobs
Cron jobs are scheduled to run at fixed intervals, but sometimes a new job instance starts before the previous one finishes.
This can happen due to
Long-running jobs: If a cron job takes longer than its interval, a new instance starts while the old one is still running.
System slowdowns: High CPU or memory usage can delay job execution, leading to overlapping runs.
Simultaneous executions across servers: In a distributed system, multiple servers might execute the same cron job, causing duplication.
Example of a Problematic Cron Job
Let’s say we have the following cron job that runs every minute:
* * * * * /path/to/script.sh
If script.sh takes more than a minute to execute, a second instance will start before the first one finishes.
This can lead to:
Duplicate database writes → Inconsistent data
Conflicts in file processing → Corrupt files
Overloaded system resources → Performance degradation
Real-World Example
Imagine a job that processes user invoices and sends emails
If the script takes longer than a minute to complete, multiple instances might start running, causing
Users to receive multiple invoices.
The database to get inconsistent updates.
Increased server load due to excessive email sending.
The Solution: Using flock to Prevent Multiple Executions
flock is a Linux utility that manages file locks to ensure that only one instance of a process runs at a time. It works by locking a specific file, preventing other processes from acquiring the same lock.
Open another terminal and try to run the same command. You’ll see that the second attempt exits immediately because the lock is already acquired.
Preventing multiple executions of cron jobs is essential for maintaining data consistency, system stability, and efficiency. By using flock, you can easily enforce single execution without complex logic.
Simple & efficient solution. No external dependencies required. Works seamlessly with cron jobs.
So next time you set up a cron job, add flock and sleep peacefully knowing your tasks won’t collide.
OpenCV stands for Open Source Computer Vision. It is a library used for computer vision and machine learning tasks. It provides many functions to process images and videos.
Computer Vision
Computer vision is the process of extracting information from images or videos. For example, it can be used for object detection, face recognition, and more.
Databases power the backbone of modern applications, and PostgreSQL is one of the most powerful open-source relational databases trusted by top companies worldwide. Whether you’re a beginner or a developer looking to sharpen your database skills, this FREE bootcamp will take you from Zero to Hero in PostgreSQL!
This intensive hands on bootcamp is designed for developers, DBAs, and tech enthusiasts who want to master PostgreSQL from scratch and apply it in real-world scenarios.
Who Should Attend?
Beginners eager to learn databases Developers & Engineers working with PostgreSQL Anyone looking to optimize their SQL skills
Date: March 22, 23 -> (Moved to April 5, 6) Time: Will be finalized later. Location: Online Cost:100% FREE
Spike testing is a type of performance testing that evaluates how a system responds to sudden, extreme increases in load. Unlike stress testing, which gradually increases the load, spike testing simulates abrupt surges in traffic to identify system vulnerabilities, such as crashes, slow response times, and resource exhaustion.
In this blog, we will explore spike testing in detail, covering its importance, methodology, and full implementation using K6.
Why Perform Spike Testing?
Spike testing helps you
Determine system stability under unexpected traffic surges.
Identify bottlenecks that arise due to rapid load increases.
Assess auto-scaling capabilities of cloud-based infrastructures.
Measure response time degradation during high-demand spikes.
Ensure system recovery after the sudden load disappears.
http_req_duration → Measures response time impact.
vus_max → Peak virtual users during the spike.
errors → Percentage of failed requests due to overload.
Best Practices for Spike Testing
Monitor application logs and database performance during the test.
Use auto-scaling mechanisms for cloud-based environments.
Combine spike tests with stress testing for better insights.
Analyze error rates and recovery time to ensure system stability.
Spike testing is crucial for ensuring application stability under sudden, unpredictable traffic surges. Using K6, we can simulate spikes in both requests per second and concurrent users to identify bottlenecks before they impact real users.
Stress testing is a critical aspect of performance testing that evaluates how a system performs under extreme loads. Unlike load testing, which simulates expected user traffic, stress testing pushes a system beyond its limits to identify breaking points and measure recovery capabilities.
In this blog, we will explore stress testing using K6, an open-source load testing tool, with detailed explanations and full examples to help you implement stress testing effectively.
Why Stress Testing?
Stress testing helps you
Identify the maximum capacity of your system.
Detect potential failures and bottlenecks.
Measure system stability and recovery under high loads.
Ensure infrastructure can handle unexpected spikes in traffic.
K6 provides various executors to simulate different traffic patterns. For stress testing, we mainly use
ramping-vus – Gradually increases virtual users to a high level.
constant-vus – Maintains a fixed high number of virtual users.
spike – Simulates a sudden surge in traffic.
Example 1: Basic Stress Test with Ramping VUs
This script gradually increases the number of virtual users, holds a peak load, and then reduces it.
import http from 'k6/http';
import { sleep } from 'k6';

export let options = {
  stages: [
    { duration: '1m', target: 100 }, // Ramp up to 100 users in 1 min
    { duration: '3m', target: 100 }, // Stay at 100 users for 3 min
    { duration: '1m', target: 0 },   // Ramp down to 0 users
  ],
};

export default function () {
  let res = http.get('https://test-api.example.com');
  sleep(1);
}
Explanation
The test starts with 0 users and ramps up to 100 users in 1 minute.
Holds 100 users for 3 minutes.
Gradually reduces load to 0 users.
The sleep(1) function helps simulate real user behavior between requests.
Example 2: Constant High Load Test
This test maintains a consistently high number of virtual users.
import http from 'k6/http';
import { sleep } from 'k6';

export let options = {
  vus: 200, // 200 virtual users
  duration: '5m', // Run the test for 5 minutes
};

export default function () {
  http.get('https://test-api.example.com');
  sleep(1);
}
Explanation
200 virtual users are constantly hitting the endpoint for 5 minutes.
Helps evaluate system performance under sustained high traffic.
Example 3: Spike Testing (Sudden Traffic Surge)
This test simulates a sudden spike in traffic, followed by a drop.
import http from 'k6/http';
import { sleep } from 'k6';

export let options = {
  stages: [
    { duration: '10s', target: 10 },  // Start with 10 users
    { duration: '10s', target: 500 }, // Spike to 500 users
    { duration: '10s', target: 10 },  // Drop back to 10 users
  ],
};

export default function () {
  http.get('https://test-api.example.com');
  sleep(1);
}
Explanation
Starts with 10 users.
Spikes suddenly to 500 users in 10 seconds.
Drops back to 10 users.
Helps determine how the system handles sudden surges in traffic.
Analyzing Test Results
After running the tests, K6 provides detailed statistics
Stress testing is vital to ensure application stability and scalability. Using K6, we can simulate different stress scenarios like ramping load, constant high load, and spikes to identify system weaknesses before they affect users.
Load testing is essential to evaluate how a system behaves under expected and peak loads. Traditionally, we rely on metrics like requests per second (RPS), response time, and error rates. However, an insightful approach called Average Load Testing has been discussed recently. This blog explores that concept in detail, providing practical examples to help you apply it effectively.
Understanding Average Load Testing
Average Load Testing focuses on simulating real-world load patterns rather than traditional peak load tests. Instead of sending a fixed number of requests per second, this approach
Generates requests based on the average concurrency over time.
More accurately reflects real-world traffic patterns.
Helps identify performance bottlenecks in a realistic manner.
Setting Up Load Testing with K6
K6 is an excellent tool for implementing Average Load Testing. Let’s go through practical examples of setting up such tests.
The ramping-arrival-rate gradually increases requests per second over time.
The stages array defines a progression from 5 to 100 requests/sec over 6 minutes.
Logs response times to help analyze system performance.
Example 3: Load Testing with Multiple Endpoints
In real applications, multiple endpoints are often tested simultaneously. Here’s how to test different API routes
import http from 'k6/http';
import { check, sleep } from 'k6';

export let options = {
  scenarios: {
    multiple_endpoints: {
      executor: 'constant-arrival-rate',
      rate: 15, // 15 requests per second
      timeUnit: '1s',
      duration: '2m',
      preAllocatedVUs: 30,
      maxVUs: 60,
    },
  },
};

export default function () {
  let urls = [
    'https://test-api.example.com/users',
    'https://test-api.example.com/orders',
    'https://test-api.example.com/products'
  ];

  let res = http.get(urls[Math.floor(Math.random() * urls.length)]);
  check(res, {
    'is status 200': (r) => r.status === 200,
  });
  console.log(`Response time: ${res.timings.duration}ms`);
  sleep(1);
}
Explanation
The script randomly selects an API endpoint to test different routes.
Uses check to ensure status codes are 200.
Logs response times for deeper insights.
Analyzing Results
To analyze test results, you can store logs or metrics in a database or monitoring tool and visualize trends over time. Some popular options include
Prometheus for time-series data storage.
InfluxDB for handling large-scale performance metrics.
ELK Stack (Elasticsearch, Logstash, Kibana) for log-based analysis.
Average Load Testing provides a more realistic way to measure system performance. By leveraging K6, you can create flexible, real-world simulations to optimize your applications effectively.
Are you tired of slow, clunky GUI-based file managers? Do you want lightning-fast navigation and total control over your files—right from your terminal? Meet Superfile, the ultimate tool for power users who love efficiency and speed.
In this blog, we’ll take you on a deep dive into Superfile’s features, commands, and shortcuts, transforming you into a file management ninja!
Why Choose Superfile?
Superfile isn’t just another file manager it’s a game-changer.
Here’s why
Blazing Fast – No unnecessary UI lag, just pure efficiency.
Keyboard-Driven – Forget the mouse, master navigation with powerful keybindings.
Multi-Panel Support – Work with multiple directories simultaneously.
Smart Search & Sorting – Instantly locate and organize files.
Built-in File Preview & Metadata Display – See what you need without opening files.
Highly Customizable – Tailor it to fit your workflow perfectly.
Installation
Getting started is easy! Install Superfile using
# For Linux (Debian-based)
wget -qO- https://superfile.netlify.app/install.sh | bash

# For macOS (via Homebrew)
brew install superfile

# For Windows (via Scoop)
scoop install superfile
Once installed, launch it with
spf
Boom! You’re ready to roll.
Essential Commands & Shortcuts
General Operations
Launch Superfile: spf
Exit: Press q or Esc
Help Menu: ?
Toggle Footer Panel: F
File & Folder Navigation
New File Panel: n
Close File Panel: w
Toggle File Preview: f
Next Panel: Tab or Shift + l
Sidebar Panel: s
File & Folder Management
Create File/Folder: Ctrl + n
Rename: Ctrl + r
Copy: Ctrl + c
Cut: Ctrl + x
Paste: Ctrl + v
Delete: Ctrl + d
Copy Path: Ctrl + p
Search & Selection
Search: /
Select Files: v
Select All: Shift + a
Compression & Extraction
Extract Zip: Ctrl + e
Compress to Zip: Ctrl + a
Advanced Power Moves
Open Terminal Here: Shift + t
Open in Editor: e
Toggle Hidden Files: .
Pro Tip: Use Shift + p to pin frequently accessed folders for even quicker access!
Customizing Superfile
Want to make Superfile truly yours? Customize it easily by editing the config file
Superfile is the Swiss Army knife of terminal-based file managers. Whether you’re a developer, system admin, or just someone who loves a fast, efficient workflow, Superfile will revolutionize the way you manage files.
Ready to supercharge your productivity? Install Superfile today and take control like never before!
Hey everyone! Today, we had an exciting Linux installation session at our college. We expected many to do a full Linux installation, but instead, we set up dual boot on 10+ machines!
Topics Covered: Syed Jafer – FOSS, GLUGs, and open-source communities Salman – Why FOSS matters & Linux Commands Dhanasekar – Linux and DevOps Guhan – GNU and free software
Challenges We Faced
BitLocker Encryption – Had to disable BitLocker on some laptops BIOS/UEFI Problems – Secure Boot, boot order changes needed GRUB Issues – Windows not showing up, required boot-repair
IndexedDB is a powerful client-side database API for storing structured data in browsers. However, its API is complex, requiring transactions, object stores, and cursors to manage data. LocalBase simplifies IndexedDB by providing an intuitive, promise-based API.
In this blog, we’ll explore LocalBase, its features, and how to use it effectively in web applications.
What is LocalBase?
LocalBase is an easy-to-use JavaScript library that simplifies IndexedDB interactions. It provides a syntax similar to Firestore, making it ideal for developers familiar with Firebase.
Key Features
Promise based API
Simple CRUD operations
No need for manual transaction handling
Works seamlessly in modern browsers
Installation
You can install LocalBase via npm or use it directly in a script tag
Since LocalBase doesn’t support native where queries, you need to filter manually.
3. Handling Transactions
LocalBase handles transactions internally, so you don’t need to worry about opening and closing them. However, you should use .then() to ensure operations complete before the next action.
The Web storage api is a set of mechanisms that enable browsers to store key-value pairs. Before HTML5, application data had to be sorted in cookies, included in every server request. Its intended to be far more user-friendly than using cookies.
Web storage is more secure, and large amounts of data can be stored locally, without affecting website performance.
There are 2 types of web storage,
Local Storage
Session Storage
We already have cookies. Why additional objects?
Unlike cookies, web storage objects are not sent to server with each request. Because of that, we can store much more. Most modern browsers allow at least 5 megabytes of data (or more) and have settings to configure that.
Also unlike cookies, the server can’t manipulate storage objects via HTTP headers. Everything’s done in JavaScript.The storage is bound to the origin (domain/protocol/port triplet). That is, different protocols or subdomains infer different storage objects, they can’t access data from each other.
In this guide, you will learn/refresh about LocalStorage.
LocalStorage
The localStorage is property of the window (browser window object) interface allows you to access a Storage object for the Document’s origin; the stored data is saved across browser sessions.
Data is kept for a longtime in local storage (with no expiration date.). This could be one day, one week, or even one year as per the developer preference ( Data in local storage maintained even if the browser is closed).
Local storage only stores strings. So, if you intend to store objects, lists or arrays, you must convert them into a string using JSON.stringfy()
Local storage will be available via the window.localstorage property.
What’s interesting about them is that the data survives a page refresh (for sessionStorage) and even a full browser restart (for localStorage).
Functionalities
// setItem normal strings
window.localStorage.setItem("name", "goku");

// getItem
const name = window.localStorage.getItem("name");
console.log("name from localstorage, "+name);

// Storing an Object without JSON stringify

const data = {
  "commodity":"apple",
  "price":43
};
window.localStorage.setItem('commodity', data);
var result = window.localStorage.getItem('commodity');
console.log("Retrived data without jsonified, "+ result);

// Storing an object after converting to JSON string.
var jsonifiedString = JSON.stringify(data);
window.localStorage.setItem('commodity', jsonifiedString);
var result = window.localStorage.getItem('commodity');
console.log("Retrived data after jsonified, "+ result);

// remove item
window.localStorage.removeItem("commodity");
var result = window.localStorage.getItem('commodity');
console.log("Data after removing the key "+ result);

//length
console.log("length of local storage " + window.localStorage.length);

// clear
window.localStorage.clear();
console.log("length of local storage - after clear " + window.localStorage.length);
When to use Local Storage
Data stored in Local Storage can be easily accessed by third party individuals.
So its important to know that any sensitive data must not sorted in Local Storage.
Local Storage can help in storing temporary data before it is pushed to the server.
Always clear local storage once the operation is completed.
The majority of local storage’s drawbacks aren’t really significant. You may still not use it, but your app will run a little slower and you’ll experience a tiny developer inconvenience. Security, however, is distinct. Knowing and understanding the security model of local storage is crucial since it will have a significant impact on your website in ways you might not have anticipated.
Local storage also has the drawback of being insecure. In no way! Everyone who stores sensitive information in local storage, such as session data, user information, credit card information (even momentarily! ), and anything else you wouldn’t want shared publicly on social media, is doing it incorrectly.
The purpose of local storage in a browser for safe storage was not intended. It was intended to be a straightforward key/value store for strings only that programmers could use to create somewhat more complicated single page apps.
General Preventions
For example, if we are using third party JavaScript libraries and they are injected with some scripts which extract the storage objects, our storage data won’t be secure anymore. Therefore it’s not recommended to save sensitive data as
Username/Password
Credit card info
JWT tokens
API keys
Personal info
Session ids
Do not use the same origin for multiple web applications. Instead, use subdomains since otherwise, the storage will be shared with all. Reason is, for each subdomain it will have an unique localstorage; and they can’t communicate between subdomain instances.
Once some data are stored in Local storage, the developers don’t have any control over it until the user clears it. If you want the data to be removed once the session ends, use SessionStorage.
Validate, encode and escape data read from browser storage