What is constructor?
A constructor is a special type of method it used to initialize objects.
It has same name as the class and does not have a return type.(why do not return type because constructor is initialize the object .not to return value).
Called automatically when an object is created using new keyword.
Constructor:-
- Java constructor is special type of method that are used to initialize object when it is created
- It has the same name as its class and is syntactically similar to a method ,however constructors have no explicit return type include void .
You will use a constructor to give initial values to the instance variables defined by the class or to perform any other star-up procedures required to create a fully formed object.
All classes have constructor , whether you define one or not because java automatically provides a default constructor that initializes all member variables to zero.once you define your constructor , the default constructor is no longer used.
Constructors in Java are called automatically when you create an object to initialize objects attributes(instance variable 0r data).
Constructors in Java are used only to initialize instance variables, not static variables(just try to static variable for initialize ,no came error but not recommend ). Each object get its own copy of the variables,they are stored in different memory locations.you can have only one constructor with the same parameter list(signature)
,you can create many objects using that constructor.
Why Constructors Can’t Be Inherited?
Constructors are not inherited: Sub-classes don't get super class constructors by default. or You cannot inherit (or override) a constructor from a parent class in a child class.But you can call the constructor of the parent class using super().
What does “inherited” really mean?
when a child class gets access to the parent class's and variables automatically-without writing again in the child class
Note: just they are inherited , does not automatically called (You get access automatically, but you use them manually), you still need call them like any normal method or variables.
when a child class extends a parent class ,it inherits method and variables , but not constructors.
The child class must to explicitly call the parts's constructor using super();
Example:-
public class Parent_Child {

    String var="Parent_variable";
Parent_Child
{
        System.out.println("Parent Constructor");
}

    void show()
    {
        System.out.println("Parent_instacemethod");
    }

}


public class Child_parent  extends Parent_Child{

Child_parent {
        super(); //  You must call it, not inherited
        System.out.println("Child Constructor");
    }


    public static void main(String[] args) {
        // TODO Auto-generated method stub
    //    // Child class doesn't define 'var' or 'show()' but it gets them from Parent
        Child_parent obj1 = new Child_parent();
        obj1.show(); // You’re calling the inherited method
        System.out.println(obj1.var); // You’re accessing the inherited variable.


    }

}
Constructor cannot be overridden
Overriding means redefining a method in a child class with the same signature.
But constructor are not inherited , so you can not override them.Also constructor are not normal methods, so overriding does not apply.
finally constructor can not to be inherited and overriding .
class Parent {
    Parent() {
        System.out.println("Parent Constructor");
    }
}

class Child extends Parent {
    // This is not overriding
    Child() {
        System.out.println("Child Constructor");
    }
}
Rules for creating java Constructor:-
- The name of the constructor must be the same as the class name.
- Java constructors do not have a return type include void.
- In a class can be multiple constructors in the same class ,this concept is known as constructor overloading.
- You can use the access modifier in the constructor ,if you want to change the visibility/accessibility of constructors.
- Java provides a default constructor that is invoked during the time of object creation . if you create any type of constructor, the default constructor (provide by java) is not invoked(called).
Cannot be called like normal methods (c.Parent() calls the method, not constructor)
do not define two constructor with same parameter type even if parameter names are different ,java can not accept.
Example:
class Student {
Student() {
System.out.println("Constructor called!");
}
}
public class Test {
public static void main(String[] args) {
Student s = new Student(); // Constructor is called automatically here
}
}
output:-
Constructor called!
You do not call the constructor like a method (s.Student()).
You just create the object, and Java will automatically call the constructor.
Creating constructor:-
Syntax
Class ClassName{


Classname()
{
}
}
Types of Java Constructors:-
- Default constructor(implicit Default constructor) => No parameters and invisible.
- No-args Constructor.(explicit Default constructor) => No parameters
- Parameterized Constructor => with parameters
multiple constructor with different parameters.Used to initialize object with specific values.
Default constructor
If you do not create any constructor in the class, java provides a default constructor that initializes the variables to default values like 0,null,false.
public class DefaultConstructor {
    String name ;
    int age;
    String jobRole;
    public static void main(String[] args) {
        // TODO Auto-generated method stub

        DefaultConstructor obj1 = new DefaultConstructor();
        obj1.name="R.prasanth";
        obj1.age=25;
        obj1.jobRole="JavaDeveloper";
        System.out.println("Name: "+obj1.name+", Age: "+obj1.age+", JobRole: "+obj1.jobRole);

    }
}
Example:2
public class DefaultConstructor1 {
    int id;
    String name;
    public static void main(String[] args) {

        DefaultConstructor1 s1 =new DefaultConstructor1();
        System.out.println("ID: "+s1.id);
        System.out.println("Name: "+s1.name);

    }
}
No-args Constructor.
The No-Argument constructor does not accept any argument,By using the no-args constructor you can initialize the class data members(fields or global variable) and perform various activities that you want on object creation.
Example:-
public class SimpleConstructor {
    //Explicitly you created constructor now ,no more invoked java provide default constructor
    SimpleConstructor()
    {
        System.out.println("Vankam da mapla Thiruttani irunthu");
    }
    public static void main(String[] args) {
        System.out.println("The main() method ");
        //creating a class's object, that will invoke the constructor.
        SimpleConstructor obj1 = new  SimpleConstructor();

    }
}
Example;1
public class NoArgsConstructor {
    int id;
    String name;

    NoArgsConstructor()
    {
        id =101;
        name ="Jhon";

    }

    void show ()
    {
        System.out.println("ID: "+id+", Name: "+name);
    }
    public static void main(String[] args) {
        System.out.println("NoArgs-constructor");

        NoArgsConstructor s1 = new NoArgsConstructor();
        s1.show();
    }
}
3. Parameterized Constructor
A constructor with one or more arguments is called a parameterized constructor.
use when you need to initialize different objects with different data.
Use with this keyword to avoid confusion between parameter and instance variable
Example:1
public  class Parmet_Constructor {

    String name,jobStatus,jobFinding;
    static int age;

    Parmet_Constructor (String name,int age,String jobStatus,String jobFinding)
    { //this.varName → refers to current object's variable.
     this.name=name;
     this.age=age;
     this.jobStatus=jobStatus;
     this.jobFinding=jobFinding;
    }
    public void  studentDetails()
    {
        System.out.println("name: "+ name+", age: "+age+",jobStatus: "+jobStatus+",jobfinding: "+jobFinding);
    }

    public static void main(String[] args) {
        Parmet_Constructor  obj1 = new Parmet_Constructor ("Prasanth",25,"Job_seeker","Java_Developer");
        obj1.studentDetails();
    }
}
Example:2
public class ParameterizedConstructor {
   int experience ;
   int salary;
   String jobVacancy, name;
   // Parameterized constructor
   ParameterizedConstructor(String name, String jobVacancy, int salary,int experience) {
       this.name = name;
       this.jobVacancy = jobVacancy;
       this.salary = salary;
       this.experience= experience;
   }
   void candidateInfo() {
       System.out.println("Candidate Name: " + name);
       System.out.println("Job Vacancy: " + jobVacancy);
       System.out.println("Salary: " + salary);
       System.out.println("Experience: " + experience);
       System.out.println("-------------------------------");
   }
   public static void main(String[] args) {
       ParameterizedConstructor candidate1 = new ParameterizedConstructor("Prasanth", "Java Developer", 25000,1);
       ParameterizedConstructor candidate2 = new ParameterizedConstructor("Vignesh", "Frontend Developer", 26000,1);
       candidate1.candidateInfo();
       candidate2.candidateInfo();
   }
}
Constructor Overloading:-
Constructor overloading means multiple constructors in a class.when you have multiple constructor with different parameters listed, then it will be known as constructor overloading.
Example:
/constructor overloading
public class StudentData_ConstructorOverloading {
    //fields or globalvariable
   String name, gender, class_section, DOB, BloodGroup;
   float height;
   int id;
   // Constructor 1
   StudentData_ConstructorOverloading(int id, String name, String gender, String class_section, String BloodGroup) {
//this used to refer to current object's variable:
       this.id = id; //local variable opposite side global variable
       this.name = name;
       this.gender = gender;
       this.class_section = class_section;
       this.BloodGroup = BloodGroup;
   }
   // Constructor 2
   StudentData_ConstructorOverloading(int id, String name, String gender, String class_section, String DOB, float height) {
       this.id = id;
       this.name = name;
       this.gender = gender;
       this.class_section = class_section;
       this.DOB = DOB;
       this.height = height;
   }
   // Constructor 3
   StudentData_ConstructorOverloading(int id, String name, String gender, String class_section) {
       this.id = id;
       this.name = name;
       this.gender = gender;
       this.class_section = class_section;
   }
   void studentData() {
       System.out.println("ID: " + id);
       System.out.println("Name: " + name);
       System.out.println("Gender: " + gender);
       System.out.println("Class Section: " + class_section);
       System.out.println("DOB: " + DOB);
       System.out.println("Blood Group: " + BloodGroup);
       System.out.println("Height: " + height);
       System.out.println("-----------------------------");
   }
   public static void main(String[] args) {
       StudentData_ConstructorOverloading student1 = new StudentData_ConstructorOverloading(1, "Mukesh", "Male", "A", "B+");
       StudentData_ConstructorOverloading student2 = new StudentData_ConstructorOverloading(2, "Prasanth", "Male", "C", "03/06/2000", 5.10f);
       StudentData_ConstructorOverloading student3 = new StudentData_ConstructorOverloading(3, "Shivan", "Male", "B");
       student1.studentData();
       student2.studentData();
       student3.studentData();
   }
}
// global/field(static/non-static)  if do not initialize variable value it will provide default value.
/*
* int byte shrot long-> 0
* float double -. 0.0
* String  null
* boolean  default value is false
*
*
*
*/
Example:-
public class Student_Constructor_DoandDonot {

    int id;
    String name,department;
    char gender;

    Student_Constructor_DoandDonot(int id, String name,String department)
    {
        this.id=id;
        this.name=name;
        this.department=department;
    }
    // do not define  two constructor with  same  parameter type even if parameter names are different ,java can not accept
    /*
    Student_Constructor_DoandDonot(int id, String name,String department)
    {
        this.id=id;
        this.name=name;
        this.department=department;
    }
*/
    /*
    Student_Constructor_DoandDonot(int Id, String Name,String Department)
    {
        this.id=id;
        this.name=name;
        this.department=department;
    }
    */
    Student_Constructor_DoandDonot(int id, String name,char gender,String department)
    {
        this.id=id;
        this.name=name;
        this.department=department;
        this.gender=gender;
    }

    public static void main(String[] args) {
        // TODO Auto-generated method stub
    //do's
        Student_Constructor_DoandDonot student1 =new Student_Constructor_DoandDonot(101,"Prasanth","ComputerScience");
        Student_Constructor_DoandDonot student2 =new Student_Constructor_DoandDonot(102,"shivan","History");
        Student_Constructor_DoandDonot student3 =new Student_Constructor_DoandDonot(103,"Parvathi",'F',"History");
        student1.infoStudent();
        student2.infoStudent();
        student3.infoStudent3();

    }
    public void infoStudent() {
   System.out.println("id: "+id+", Name: "+name+", Department:" +department);
    }
    public void infoStudent3() {
        System.out.println("id: "+id+", Name: "+name+", Gender:"+gender+", Department:" +department);
        }
}
- Constructors cannot be inherited, but you can call superclass constructor using super().
- You cannot inherit (or override) a constructor from a parent class in a child class.
- Constructors can use this keyword to refer to the current object.
=>this()
- This refers current class object
- This used to call another constructor in same class
- this() Only use to inside constructor not any others
- Must be the first line in the constructor.
- not allowed in normal methods.
- Does not work with static methods or variables.
- can not be used with super() in same constructor. helps when may constructor share common values.
- To access current class instance variable (to avoid confusion with parameter name)
- To call instance method of same class
What this does not do:
- Not for inheritance
- Not for typecasting
- Not used for calling parent constructor (use super() for that
=>super()
- Used to call parent class constructor.
- you can use super() inside the first line of the
child class constructor to call parent constructor.
(when you create a child object, the parent part must to initialized first , because the child inherits from the parent,so parent constructor must be called before the child constructor runs).
why to initialize parent class fields? (or)
Used to initialize parent class properties.
In child classes to call parent constructor (especially if the parent class has a parameterized constructor). you access instance variable and can call parents instance methods and constructor using super().
- Every child constructor must call a parent constructor (either explicitly with super() for parametrized constructor or implicitly (java automatically call ) if parent has no-args constructor). otherwise compilation error.
why? Because java needs to create the parent part of the object first.even if yo did not write extends your class still extends object class,this class parent of all custom class in java.
if the parent only has parameterized constructors, you must explicitly call super(args) in the child constructor.if the parent has no-args constructor, and do not write super(), java add it automatically.
To access parent class variables/methods (if child class has same name).You cannot inherit constructors – Only call them using super()
Why?
A constructor name = class name, so it’s always specific to its own class.
Explain constructor overloading with example?
Constructor overloading means creating multiple constructor with the same class name but different parameter(number,type,order),purpose to initialize objects different ways.
What happens if both this() and super() are used?
you can not use both this() and super() in the same constructor, because both must be the first statement in the constructor.
Why constructors can’t be inherited?
comment me in the blog.
hint: inheritance is allows a child class it inherit properties(fields) and behavior(method) from parent class.
How do this and super differ?

When is constructor called in real life?
Constructors are automatically called when an object is created using new keyword.
Real-time Use Cases:
When reading user data (like name, age) into an object.

When fetching data from a database and storing in object (e.g., Employee, Product).

While creating objects in Java applications, games, or backed APIs.
can we create object in instance method?
yes we can create object in instance method.
Allowed Modifiers/Keywords for Constructors
Allowed
1.public - unrestricted Access
2.protected - subclass(is-relationship(extends)+ same package access.
3.default(package-private) - only accessible within the same package.
4.private - only usable within the class,
not Allowed (use-case Singletons & factory methods)
Not Allowed
5.final - constructors are implicitly final
why constructor are not inherited or overridden
6.static - constructor are always instance-related(used to initialize objects). static keyword use for constructor useless, static is class specific .
- abstract -
abstract class can not create it's object directly,if you have abstract method must to be implemented child class.that's why does not work with constructors.
simply:-
abstract means:
- No implementation (no body).
- Child classes must provide the logic.
8.Synchronized
Constructor Programme:
this() using constructor:
super() using construtor:-
package inheritence;

public class Vehicle {
int speed;


 Vehicle(int speed)
 {
     this.speed=speed;
     System.out.println("Vehicle constructor: speed set to "+speed);


    }

}

package inheritence;

public class Car extends Vehicle{
    String model;
    Car (int speed,String model)
    {
        super(speed);
        this.model=model;
        System.out.println("Car constructor: model set to " + model);
    }

    void display()
    {
        System.out.println("Car speed: " + speed + ", Model: " + model);
    }

    public static void main(String[] args) {

        Car c1 = new Car(100,"Honda");
        c1.display();
    }

}
output:-
Vehicle constructor: speed set to 100
Car constructor: model set to Honda
Car speed: 100, Model: Honda
this() Example Program
public class Student {

    int id;
    String name;

    Student()
    {
        this(101,"Default");
        System.out.println("No-arg constructor");
    }
    Student(int id,String name)
    {
        this.id=id;
        this.name=name;

  System.out.println("Parameterized constructor");
    }

    void infoDisplay()
    {
        System.out.println(this.id + " " + this.name);
    }

    public static void main(String[] args) {

        Student student = new Student();
        student.infoDisplay();
    }

}
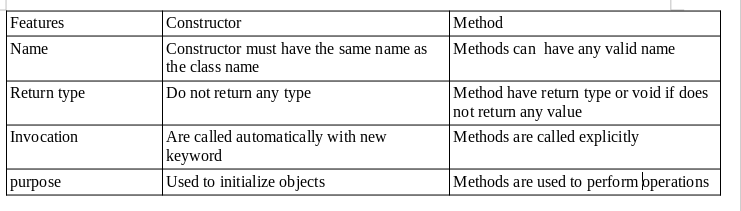
Constructor vs Method
copy constructor:-
A copy constructor is a constructor that creates new object by copying another object of the same class.
java does not provide default copy constructor you can create manually.
why to use copy constructor?
To create a duplicate(copy) of exiting object with the same values (copy data from one object to another).
what is clone() method?
It is method in java built in object class
it creates a copy(duplicate) of the object.
Example:-
Myclass obj1 = new Myclass();
Myclass obj1 =  (Myclass) obj1.clone();
clone () is complex to use correctly and it needs to implements cloneable and can cause errors.
recommended is copy constructor.
Important:-
what is mutable and immutable in java?
Mutable:
can be changed after the object is created.
If you class contains:
mutable fields( like arrays.lists,String Builder)
copy constructor must create new copies of those fields. This is called a deep copy. it each object independent data.No shared references.
Immutable:-
can not be changed once the object is created.
If you class contains:
Immutable fields Like String,Integer,Double,Boolean..etc
safe to just copy reference , no need to clone. This is called a shallow copy.
Example:
public class Example_Mutable_Immutable {


    public static void main(String[] args)
    {
        String s1 ="Java";
        String s2=s1 ;
        s1=s1+ "Programming";
        System.out.println("Immutable");
        System.out.println("s1 = "+s1);
        System.out.println("s2 = "+s2);
        StringBuilder sb1 = new StringBuilder("java");
        StringBuilder sb2= sb1;
        sb1.append("Programming");
        System.out.println("\nMutable:");
        System.out.println("sb1 = " + sb1);
        System.out.println("sb2 = " + sb2);

    }

}
Output:
Immutable
s1 = JavaProgramming
s2 = Java
Mutable:
sb1 = javaProgramming
sb2 = javaProgramming