Design a command-line-based Library Management System that simulates the basic operations of a library for both users and administrators. It should manage books, user accounts, borrowing/returning of books, and enforce library rules like book limits per member.
Goals
Allow members to search, borrow, and return books.
Allow admins to manage the library’s inventory.
Track book availability.
Prevent double borrowing of a book.
Actors
Admin
Member
Suggested Classes
Book: ID, title, author, genre, is_available
User: username, role, user_id
Member(User): borrowed_books (max 3 at a time)
Admin(User): can add/remove books
Library: manages collections of books and users
Features
Admin:
Add a book with metadata
Remove a book by ID or title
List all books
Member:
Register or login
View available books
Borrow a book (limit 3)
Return a book
Library:
Handles storage, availability, and user-book mappings
OOP Concepts
Inheritance: Admin and Member inherit from User
Encapsulation: Book’s availability status and member’s borrow list
Polymorphism: Different view_dashboard() method for Admin vs Member
Optional Extensions
Track borrowing history (borrow date, return date)
Redis is famously known as an in-memory data structure store, often used as a database, cache, and message broker. The simplest and most fundamental data type in Redis is the string. This blog walks through everything you need to know about Redis strings with practical examples.
What Are Redis Strings?
In Redis, a string is a binary-safe sequence of bytes. That means it can contain any kind of data text, integers, or even serialized objects.
Maximum size: 512 MB
Default behavior: key-value pair storage
Common String Commands
Let’s explore key-value operations you can perform on Redis strings using the redis-cli.
1. SET – Assign a Value to a Key
SET user:1:name "Alice"
This sets the key user:1:name to the value "Alice".
2. GET – Retrieve a Value by Key
GET user:1:name
# Output: "Alice"
3. EXISTS – Check if a Key Exists
EXISTS user:1:name
# Output: 1 (true)
4. DEL – Delete a Key
DEL user:1:name
5. SETEX – Set Value with Expiry (TTL)
SETEX session:12345 60 "token_xyz"
This sets session:12345 with value token_xyz that expires in 60 seconds.
6. INCR / DECR – Numeric Operations
SET views:homepage 0
INCR views:homepage
INCR views:homepage
DECR views:homepage
GET views:homepage
# Output: "1"
7. APPEND – Append to Existing String
SET greet "Hello"
APPEND greet ", World!"
GET greet
# Output: "Hello, World!"
In the rapidly evolving landscape of Large Language Models (LLMs), effective prompt engineering has become a crucial skill. While much attention is given to the art of crafting effective prompts, less focus has been placed on how to efficiently manage these prompts programmatically. Python, with its rich set of built-in features, offers powerful tools to dynamically construct, optimize, and manage LLM prompts.
This article explores how Python's built-in features can transform your approach to LLM prompt engineering, making your code more efficient, maintainable, and powerful.
1. Using locals() for Dynamic Context Injection
The Problem
When working with LLMs, we often need to inject contextual information into our prompts. The traditional approach involves manual string formatting:
def generate_response(user_name, user_query, previous_context):
    prompt = f"""
    User name: {user_name}
    User query: {user_query}
    Previous context: {previous_context}

    Please respond to the user's query considering the context above.
    """

    return call_llm_api(prompt)
This works well for simple cases, but becomes unwieldy as the number of variables increases. It's also error-prone – you might forget to include a variable or update a variable name.
The Solution with locals()
Python's locals() function returns a dictionary containing all local variables in the current scope. We can leverage this to automatically include all relevant context:
def generate_response(user_name, user_query, previous_context, user_preferences=None, user_history=None):
    # All local variables are now accessible
    context_dict = locals()

    # Build a dynamic prompt section with all available context
    context_sections = []
    for key, value in context_dict.items():
        if value is not None:  # Only include non-None values
            context_sections.append(f"{key}: {value}")

    context_text = "\n".join(context_sections)

    prompt = f"""
    Context information:
    {context_text}

    Please respond to the user's query considering the context above.
    """

    return call_llm_api(prompt)
Benefits:
Automatic variable inclusion: If you add a new parameter to your function, it's automatically included in the context.
Reduced errors: No need to manually update string formatting when variables change.
Cleaner code: Separates the mechanism of context injection from the specific variables.
2. Using inspect for Function Documentation
The Problem
When creating LLM prompts that involve function execution or code generation, providing accurate function documentation is crucial:
def create_function_prompt(func_name, params):
    prompt = f"""
    Create a Python function named '{func_name}' with the following parameters:
    {params}
    """
    return prompt
This approach requires manually specifying function details, which can be tedious and error-prone.
The Solution with inspect
Python's inspect module allows us to extract rich metadata from functions:
import inspect

def create_function_prompt(func_reference):
    # Get the function signature
    signature = inspect.signature(func_reference)

    # Get the function docstring
    doc = inspect.getdoc(func_reference) or "No documentation available"

    # Get source code if available
    try:
        source = inspect.getsource(func_reference)
    except:
        source = "Source code not available"

    prompt = f"""
    Function name: {func_reference.__name__}

    Signature: {signature}

    Documentation:
    {doc}

    Original source code:
    {source}

    Please create an improved version of this function.
    """

    return prompt

# Example usage
def example_func(a, b=10):
    """This function adds two numbers together."""
    return a + b

improved_function_prompt = create_function_prompt(example_func)
# Send to LLM for improvement
This dynamically extracts all relevant information about the function, making the prompt much more informative.
3. Context Management with Class Attributes
The Problem
Managing conversation history and context with LLMs often leads to repetitive code:
conversation_history = []

def chat_with_llm(user_input):
    # Manually build the prompt with history
    prompt = "Previous conversation:\n"
    for entry in conversation_history:
        prompt += f"{entry['role']}: {entry['content']}\n"

    prompt += f"User: {user_input}\n"
    prompt += "Assistant: "

    response = call_llm_api(prompt)

    # Update history
    conversation_history.append({"role": "User", "content": user_input})
    conversation_history.append({"role": "Assistant", "content": response})

    return response
The Solution with Class Attributes and dict
We can create a conversation manager class that uses Python's object attributes:
class ConversationManager:
    def __init__(self, system_prompt=None, max_history=10):
        self.history = []
        self.system_prompt = system_prompt
        self.max_history = max_history
        self.user_info = {}
        self.conversation_attributes = {
            "tone": "helpful",
            "style": "concise",
            "knowledge_level": "expert"
        }

    def add_user_info(self, **kwargs):
        """Add user-specific information to the conversation context."""
        self.user_info.update(kwargs)

    def set_attribute(self, key, value):
        """Set a conversation attribute."""
        self.conversation_attributes[key] = value

    def build_prompt(self, user_input):
        """Build a complete prompt using object attributes."""
        prompt_parts = []

        # Add system prompt if available
        if self.system_prompt:
            prompt_parts.append(f"System: {self.system_prompt}")

        # Add conversation attributes
        prompt_parts.append("Conversation attributes:")
        for key, value in self.conversation_attributes.items():
            prompt_parts.append(f"- {key}: {value}")

        # Add user info if available
        if self.user_info:
            prompt_parts.append("\nUser information:")
            for key, value in self.user_info.items():
                prompt_parts.append(f"- {key}: {value}")

        # Add conversation history
        if self.history:
            prompt_parts.append("\nConversation history:")
            for entry in self.history[-self.max_history:]:
                prompt_parts.append(f"{entry['role']}: {entry['content']}")

        # Add current user input
        prompt_parts.append(f"\nUser: {user_input}")
        prompt_parts.append("Assistant:")

        return "\n".join(prompt_parts)

    def chat(self, user_input):
        """Process a user message and get response from LLM."""
        prompt = self.build_prompt(user_input)

        response = call_llm_api(prompt)

        # Update history
        self.history.append({"role": "User", "content": user_input})
        self.history.append({"role": "Assistant", "content": response})

        return response

    def get_state_as_dict(self):
        """Return a dictionary of the conversation state using __dict__."""
        return self.__dict__

    def save_state(self, filename):
        """Save the conversation state to a file."""
        import json
        with open(filename, 'w') as f:
            json.dump(self.get_state_as_dict(), f)

    def load_state(self, filename):
        """Load the conversation state from a file."""
        import json
        with open(filename, 'r') as f:
            state = json.load(f)
            self.__dict__.update(state)```


Using this approach:

# Create a conversation manager
convo = ConversationManager(system_prompt="You are a helpful assistant.")

# Add user information
convo.add_user_info(name="John", expertise="beginner", interests=["Python", "AI"])

# Set conversation attributes
convo.set_attribute("tone", "friendly")

# Chat with the LLM
response = convo.chat("Can you help me understand how Python dictionaries work?")
print(response)

# Later, save the conversation state
convo.save_state("conversation_backup.json")

# And load it back
new_convo = ConversationManager()
new_convo.load_state("conversation_backup.json")
4. Using dir() for Object Exploration
The Problem
When working with complex objects or APIs, it can be challenging to know what data is available to include in prompts:
def generate_data_analysis_prompt(dataset):
    # Manually specifying what we think is available
    prompt = f"""
    Dataset name: {dataset.name}
    Number of rows: {len(dataset)}

    Please analyze this dataset.
    """
    return prompt
The Solution with dir()
Python's dir() function lets us dynamically discover object attributes and methods:
def generate_data_analysis_prompt(dataset):
    # Discover available attributes
    attributes = dir(dataset)

    # Filter out private attributes (those starting with _)
    public_attrs = [attr for attr in attributes if not attr.startswith('_')]

    # Build metadata section
    metadata = []
    for attr in public_attrs:
        try:
            value = getattr(dataset, attr)
            # Only include non-method attributes with simple values
            if not callable(value) and not hasattr(value, '__dict__'):
                metadata.append(f"{attr}: {value}")
        except:
            pass  # Skip attributes that can't be accessed

    metadata_text = "\n".join(metadata)

    prompt = f"""
    Dataset metadata:
    {metadata_text}

    Please analyze this dataset based on the metadata above.
    """

    return prompt
This approach automatically discovers and includes relevant metadata without requiring us to know the exact structure of the dataset object in advance.
5. String Manipulation for Prompt Cleaning
The Problem
User inputs and other text data often contain formatting issues that can affect LLM performance:
def process_document(document_text):
    prompt = f"""
    Document:
    {document_text}

    Please summarize the key points from this document.
    """
    return call_llm_api(prompt)
The Solution with String Methods
Python's rich set of string manipulation methods can clean and normalize text:
def process_document(document_text):
    # Remove excessive whitespace
    cleaned_text = ' '.join(document_text.split())

    # Normalize line breaks
    cleaned_text = cleaned_text.replace('\r\n', '\n').replace('\r', '\n')

    # Limit length (many LLMs have token limits)
    max_chars = 5000
    if len(cleaned_text) > max_chars:
        cleaned_text = cleaned_text[:max_chars] + "... [truncated]"

    # Replace problematic characters
    for char, replacement in [('\u2018', "'"), ('\u2019', "'"), ('\u201c', '"'), ('\u201d', '"')]:
        cleaned_text = cleaned_text.replace(char, replacement)

    prompt = f"""
    Document:
    {cleaned_text}

    Please summarize the key points from this document.
    """

    return call_llm_api(prompt)
Conclusion
Python's built-in features offer powerful capabilities for enhancing LLM prompts:
Dynamic Context: Using locals() and dict to automatically include relevant variables Introspection: Using inspect and dir() to extract rich metadata from objects and functions String Manipulation: Using Python's string methods to clean and normalize text
By leveraging these built-in features, you can create more robust, maintainable, and dynamic LLM interactions. The techniques in this article can help you move beyond static prompt templates to create truly adaptive and context-aware LLM applications.
Most importantly, these approaches scale well as your LLM applications become more complex, allowing you to maintain clean, readable code while supporting sophisticated prompt engineering techniques.
Whether you're building a simple chatbot or a complex AI assistant, Python's built-in features can help you create more effective LLM interactions with less code and fewer errors.
Today, I want to share something unexpected. To be honest, if someone had told me a month ago that I could do this, I wouldn’t have believed them. But here we are — I’ve finally released a Python package and dataset called TamilKavi. I still can’t believe I pulled it off, but it’s real!
I’d love to share the whole story with you. Many of you already know me — I write Tamil poetry and have even published two books. However, I faced font issues when trying to release them on Amazon and Kindle. Frustrated, I reached out to my community friend, Hari, and I asked them: “Bro, I want to release my Tamil poetry book on Amazon, but I’m stuck with font issues. Do you know anyone who can solve it?”
Hari referred me to Ayyanar Bro, and to me it’s a surprise, he was from Madurai — what a coincidence! We spoke almost four times a week for different reasons. I had already written about him and his portfolio website, which he built using Emacs & Org, so I won’t go into more details — you guys might find it repetitive.
Through Ayyanar Bro, I learned about the Tamil Kanchilung community and FreeTamilBooks, where I finally found a solution to my font issue. But here’s another twist — FreeTamilBooks required more poetry for my book release. Because I like to release that in FreeTamilBooks.Then another book on Amazon. That was another headache because, with my tight schedule, I barely had time to write.
While navigating all this, I discovered Tamilrulepy, a Python package with Tamil grammar rules. I was eager to learn more, and unexpectedly, I got an opportunity to contribute to it! That’s when I met Boopalan — another passionate tech enthusiast like me. He helped me write code for TamilRulePy and even invited me to contribute to TamilString, a Python package for documentation. I accepted his invitation and started working on it.
Then, during one of our conversations, I got an idea: why not develop my own Python package? And that’s how TamilKavi was born.
I shared my idea with Boopalan and invited him to build it as a team because, honestly, I’m no expert. But it wasn’t easy — we had to overcome countless challenges, especially since we were both preparing for our model exams and semester exams (he’s an MSc student, and I’m a BSc student). It was a tough time, but I didn’t give up. I studied, understood, and gradually started coding — not entirely on my own, of course.
Now, you might wonder — why build a website? Simple: to collect data from authors. But due to financial constraints, the data collected through the website idea transformed into a Google Form, and now it is a navigation button. It’s another story altogether. Since I had no time, I built a basic structure using Lovable.dev and handed it over to my juniors, Gagan & Rohith, who took care of the website.
The final result? Release of the Python package & website!
I must especially thank Praveen Bro — my community brother and mentor. Without hesitation, he offered me a subdomain. For me, that’s a huge deal, and I’m incredibly grateful!
“Okay thambi, enough of this English talk — why did you release the dataset?” When you ask me likewise.
Well, there’s a reason for that, too. I’ve seen Selvakumar Duraipandian Bro on LinkedIn about their post of numerous Tamil datasets on Hugging Face, including Thirukkural, Tholkappiyam, and more. I was truly inspired by his work. So, I release that as a Dataset.
Now, you might ask, “So, thambi, after all this talk, what does your package actually do?”
It’s simple — TamilKavi helps discover new Tamil poems. That’s all. Now your mind is
“Edhuka evalo seenu?”
Well, I’m not just a developer. The person who is are Tamil poet & tech enthusiast, it’s a crazy project. Through this journey, I’ve learned so much, especially about GitHub workflows.
When you feel this content is valuable, follow me for more upcoming Blogs.
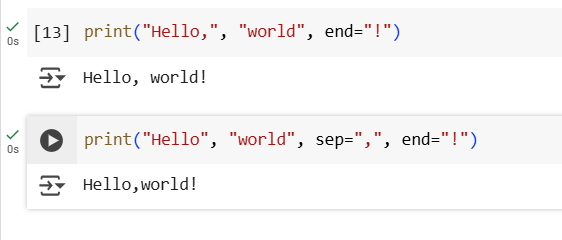
1.How do you print the string “Hello, world!” to the screen?
Ans: Using sep and end Parameters is preferred way.
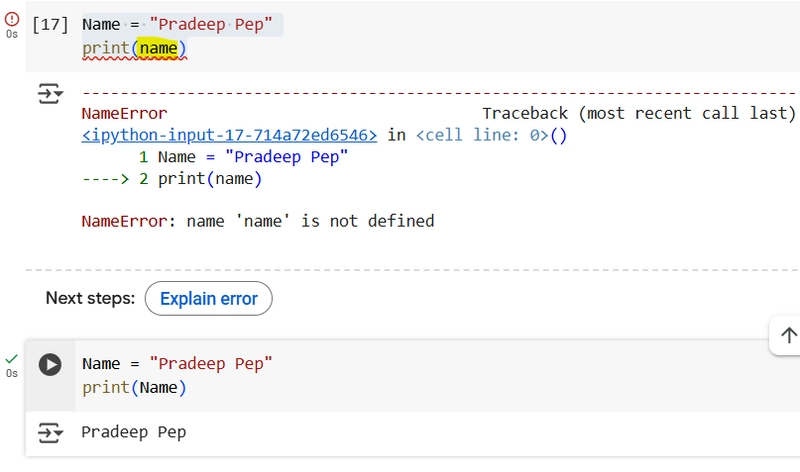
2.How do you print the value of a variable name which is set to “Syed Jafer” or Your name?
Ans: Note the Variable is case sensitive
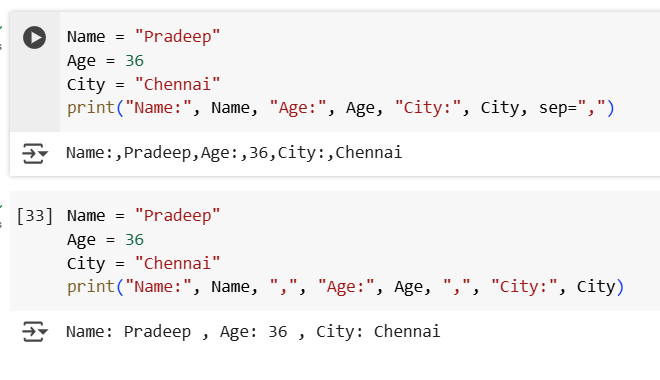
3.How do you print the variables name, age, and city with labels “Name:”, “Age:”, and “City:”?
Ans: Using keyword sep="," brings in , between the Variable Name and Value itself, so avoid
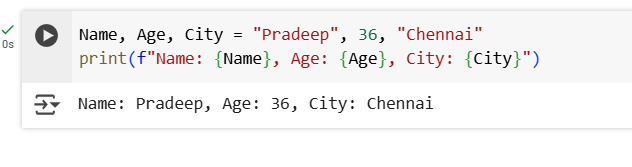
4.How do you use an f-string to print name, age, and city in the format “Name: …, Age: …, City: …”?
Ans: To insert variables directly into the string used f-string
Also, you can assign values to multiple variables in a single line as seen in 1st line
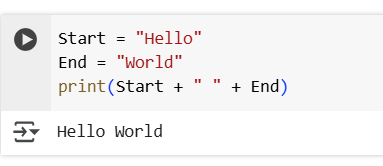
5.How do you concatenate and print the strings greeting (“Hello”) and target (“world”) with a space between them?
Ans: + is used to concat the items
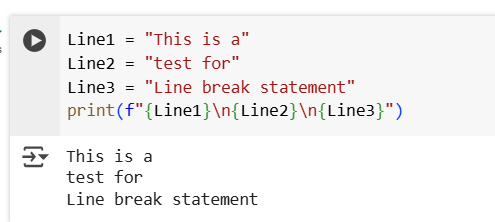
6.How do you print three lines of text with the strings “Line1”, “Line2”, and “Line3” on separate lines?****
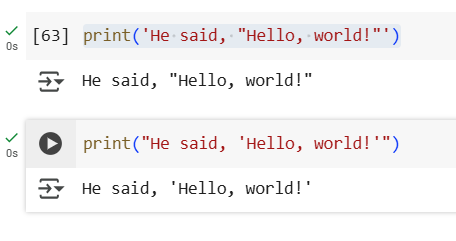
7.How do you print the string He said, "Hello, world!" including the double quotes?
Ans: To print quotes inside a string, you can use either single or double quotes to enclose the string and the other type of quotes inside it.
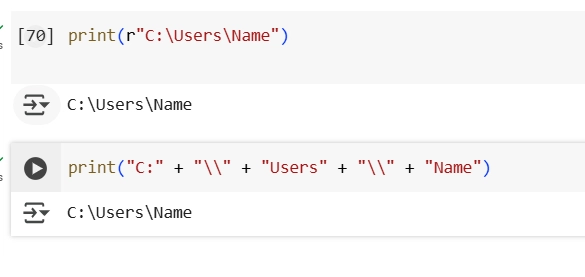
8.How do you print the string C:\Users\Name without escaping the backslashes?
Ans: you can also use a literal backslash "\" when using Concat or Try with 'r' to treat backslashes as literal characters
9.How do you print the result of the expression 5 + 3?
10.How do you print the strings “Hello” and “world” separated by a hyphen -?
11.How do you print the string “Hello” followed by a space, and then print “world!” on the same line?
12.How do you print the value of a boolean variable is_active which is set to True?
13.How do you print the string “Hello ” three times in a row?
14.How do you print the sentence The temperature is 22.5 degrees Celsius. using the variable temperature?
15.How do you print name, age, and city using the .format() method in the format “Name: …, Age: …, City: …”?
16.How do you print the value of pi (3.14159) rounded to two decimal places in the format The value of pi is approximately 3.14?
Ans: pi is the variable & .2f formats it as a floating-point number with 2 digits after the decimal
17.How do you print the words “left” and “right” with “left” left-aligned and “right” right-aligned within a width of 10 characters each?
Large Language Model (LLM) based AI agents represent a new paradigm in artificial intelligence. Unlike traditional software agents, these systems leverage the powerful capabilities of LLMs to understand, reason, and interact with their environment in more sophisticated ways. This guide will introduce you to the basics of LLM agents and their think-act-observe cycle.
What is an LLM Agent?
An LLM agent is a system that uses a large language model as its core reasoning engine to:
Process natural language instructions
Make decisions based on context and goals
Generate human-like responses and actions
Interact with external tools and APIs
Learn from interactions and feedback
Think of an LLM agent as an AI assistant who can understand, respond, and take actions in the digital world, like searching the web, writing code, or analyzing data.
The Think-Act-Observe Cycle in LLM Agents
Observe (Input Processing)
LLM agents observe their environment through:
Direct user instructions and queries
Context from previous conversations
Data from connected tools and APIs
System prompts and constraints
Environmental feedback
Think (LLM Processing)
The thinking phase for LLM agents involves:
Parsing and understanding input context
Reasoning about the task and requirements
Planning necessary steps to achieve goals
Selecting appropriate tools or actions
Generating natural language responses
The LLM is the "brain," using its trained knowledge to process information and make decisions.
Understanding Attention in Large Language Models: A Beginner's Guide
Have you ever wondered how ChatGPT or other AI models can understand and respond to your messages so well? The secret lies in a mechanism called ATTENTION - a crucial component that helps these models understand relationships between words and generate meaningful responses. Let's break it down in simple terms!
What is Attention?
Imagine you're reading a long sentence: "The cat sat on the mat because it was comfortable." When you read "it," your brain naturally connects back to either "the cat" or "the mat" to understand what "it" refers to. This is exactly what attention does in AI models - it helps the model figure out which words are related to each other.
How Does Attention Work?
The attention mechanism works like a spotlight that can focus on different words when processing each word in a sentence. Here's a simple breakdown:
For each word, the model calculates how important every other word is in relation to it.
It then uses these importance scores to create a weighted combination of all words.
This helps the model understand context and relationships between words.
Let's visualize this with an example:
In this diagram, the word "it" is paying attention to all other words in the sentence. The thickness of the arrows could represent the attention weights. The model would likely assign higher attention weights to "cat" and "mat" to determine which one "it" refers to.
Multi-Head Attention: Looking at Things from Different Angles
In modern language models, we don't just use one attention mechanism - we use several in parallel! This is called Multi-Head Attention. Each "head" can focus on different types of relationships between words.
Let's consider the sentence: The chef who won the competition prepared a delicious meal.
Head 1 could focus on subject-verb relationships (chef - prepared)
Head 2 might attend to adjective-noun pairs (delicious - meal)
Head 3 could look at broader context (competition - meal)
Here's a diagram:
This multi-headed approach helps the model understand text from different perspectives, just like how we humans might read a sentence multiple times to understand different aspects of its meaning.
Why Attention Matters
Attention mechanisms have revolutionized natural language processing because they:
Handle long-range dependencies better than previous methods.
Can process input sequences in parallel.
Create interpretable connections between words.
Allow models to focus on relevant information while ignoring irrelevant parts.
Recent Developments and Research
The field of LLMs is rapidly evolving, with new techniques and insights emerging regularly. Here are a few areas of active research:
Contextual Hallucinations
Large language models (LLMs) can sometimes hallucinate details and respond with unsubstantiated answers that are inaccurate with respect to the input context.
The Lookback Lens technique analyzes attention patterns to detect when a model might be generating information not present in the input context.
Extending Context Window
Researchers are working on extending the context window sizes of LLMs, allowing them to process longer text sequences.
Conclusion
While the math behind attention mechanisms can be complex, the core idea is simple: help the model focus on the most relevant parts of the input when processing each word. This allows language models to understand the context and relationships between words better, leading to more accurate and coherent responses.
Remember, this is just a high-level overview - there's much more to learn about attention mechanisms! Hopefully, this will give you a good foundation for understanding how modern AI models process and understand text.
Binary insertion sort is a sorting algorithm similar to insertion sort, but instead of using linear search to find the position where the element should be inserted, we use binary search.
Thus, we reduce the number of comparisons for inserting one element from O(N) (Time complexity in Insertion Sort) to O(log N).
Best of two worlds
Binary insertion sort is a combination of insertion sort and binary search.
Insertion sort is sorting technique that works by finding the correct position of the element in the array and then inserting it into its correct position. Binary search is searching technique that works by finding the middle of the array for finding the element.
As the complexity of binary search is of logarithmic order, the searching algorithm’s time complexity will also decrease to of logarithmic order. Implementation of binary Insertion sort. this program is a simple Insertion sort program but instead of the standard searching technique binary search is used.
How Binary Insertion Sort works ?
Process flow
In binary insertion sort, we divide the array into two subarrays — sorted and unsorted. The first element of the array is in the sorted subarray, and the rest of the elements are in the unsorted one.
We then iterate from the second element to the last element. For the i-th iteration, we make the current element our “key.” This key is the element that we have to add to our existing sorted subarray.
Example
Consider the array 29, 10, 14, 37, 14
First Pass
Key = 1
Since we consider the first element is in the sorted array, we will be starting from the second element. Then we apply the binary search on the sorted array.
In this scenario, we can see that the middle element in sorted array (29) is greater than the key element 10. So the position of the key element is 0. Then we can shift the remaining elements by 1 position.
Increment the value of key.
Second Pass
Key = 2
Now the key element is 14. We will apply binary search in the sorted array to find the position of the key element.
In this scenario, by applying binary search, we can see key element to be placed at index 1 (between 10 and 29). Then we can shift the remaining elements by 1 position.
Third Pass
Key = 3
Now the key element is 37. We will apply binary search in the sorted array to find the position of the key element.
In this scenario, by applying binary search, we can see key element is placed in its correct position.
Fourth Pass
Key = 4
Now the key element is 14. We will apply binary search in the sorted array to find the position of the key element.
In this scenario, by applying binary search, we can see key element to be placed at index 2 (between 14 and 29). Then we can shift the remaining elements by 1 position.
Iterate the array from the second element to the last element.
Store the current element Arr[i] in a variable key.
Find the position of the element just greater than Arr[i] in the subarray from Arr[0] to Arr[i-1] using binary search. Say this element is at index pos.
Shift all the elements from index pos to i-1 towards the right.
Arr[pos] = key.
Complexity Analysis
Worst Case
For inserting the i-th element in its correct position in the sorted, finding the position (pos) will take O(log i) steps. However, to insert the element, we need to shift all the elements from pos to i-1. This will take i steps in the worst case (when we have to insert at the starting position).
We make a total of N insertions. so, the worst-case time complexity of binary insertion sort is O(N^2).
This occurs when the array is initially sorted in descending order.
Best Case
The best case will be when the element is already in its sorted position. In this case, we don’t have to shift any of the elements; we can insert the element in O(1).
But we are using binary search to find the position where we need to insert. If the element is already in its sorted position, binary search will take (log i) steps. Thus, for the i-th element, we make (log i) operations, so its best-case time complexity is O(N log N).
This occurs when the array is initially sorted in ascending order.
Average Case
For average-case time complexity, we assume that the elements of the array are jumbled. Thus, on average, we will need O(i /2) steps for inserting the i-th element, so the average time complexity of binary insertion sort is O(N^2).
Space Complexity Analysis
Binary insertion sort is an in-place sorting algorithm. This means that it only requires a constant amount of additional space. We sort the given array by shifting and inserting the elements.
Therefore, the space complexity of this algorithm is O(1) if we use iterative binary search. It will be O(logN) if we use recursive binary search because of O(log N) recursive calls.
Is Binary Insertion Sort a stable algorithm
It is a stable sorting algorithm, the elements with the same values appear in the same order in the final array as they were in the initial array.
Cons and Pros
Binary insertion sort works efficiently for smaller arrays.
This algorithm also works well for almost-sorted arrays, where the elements are near their position in the sorted array.
However, when the size of the array is large, the binary insertion sort doesn’t perform well. We can use other sorting algorithms like merge sort or quicksort in such cases.
Making fewer comparisons is also one of the strengths of this sorting algorithm; therefore, it is efficient to use it when the cost of comparison is high.
Its efficient when the cost of comparison between keys is sufficiently high. For example, if we want to sort an array of strings, the comparison operation of two strings will be high.
Bonus Section
Binary Insertion Sort has a quadratic time complexity just as Insertion Sort. Still, it is usually faster than Insertion Sort in practice, which is apparent when comparison takes significantly more time than swapping two elements.
Managing dependencies for small Python scripts has always been a bit of a hassle.
Traditionally, we either install packages globally (not recommended) or create a virtual environment, activate it, and install dependencies manually.
But what if we could run Python scripts like standalone binaries ?
Introducing PEP 723 – Inline Script Metadata
PEP 723 (https://peps.python.org/pep-0723/) introduces a new way to specify dependencies directly within a script, making it easier to execute standalone scripts without dealing with external dependency files.
This is particularly useful for quick automation scripts or one-off tasks.
Consider a script that interacts with an API requiring a specific package,
Here, instead of manually creating a requirements.txt or setting up a virtual environment, the dependencies are defined inline. When using uv, it automatically installs the required packages and runs the script just like a binary.
Running the Script as a Third-Party Tool
With uv, executing the script feels like running a compiled binary,
$ uv run fetch-data.py
Reading inline script metadata from: fetch-data.py
Installed dependencies in milliseconds
ehind the scenes, uv creates an isolated environment, ensuring a clean dependency setup without affecting the global Python environment. This allows Python scripts to function as independent tools without any manual dependency management.
Why This Matters
This approach makes Python an even more attractive choice for quick automation tasks, replacing the need for complex setups. It allows scripts to be shared and executed effortlessly, much like compiled executables in other programming environments.
By leveraging uv, we can streamline our workflow and use Python scripts as powerful, self-contained tools without the usual dependency headaches.
In this blog, i jot down notes on what is smoke test, how it got its name, and how to approach the same in k6.
The term smoke testing originates from hardware testing, where engineers would power on a circuit or device and check if smoke appeared.
If smoke was detected, it indicated a fundamental issue, and further testing was halted. This concept was later adapted to software engineering.
What is Smoke Testing?
Smoke testing is a subset of test cases executed to verify that the major functionalities of an application work as expected. If a smoke test fails, the build is rejected, preventing further testing of a potentially unstable application. This test helps catch major defects early, saving time and effort.
Key Characteristics
Ensures that the application is not broken in major areas.
Runs quickly and is not exhaustive.
Usually automated as part of a CI/CD pipeline.
Writing a Basic Smoke Test with K6
A basic smoke test using K6 typically checks API endpoints for HTTP 200 responses and acceptable response times.
import http from 'k6/http';
import { check } from 'k6';

export let options = {
    vus: 1, // 1 virtual user
    iterations: 5, // Runs the test 5 times
};

export default function () {
    let res = http.get('https://example.com/api/health');
    check(res, {
        'is status 200': (r) => r.status === 200,
        'response time < 500ms': (r) => r.timings.duration < 500,
    });
}
Advanced Smoke Test Example
import http from 'k6/http';
import { check, sleep } from 'k6';

export let options = {
    vus: 2, // 2 virtual users
    iterations: 10, // Runs the test 10 times
};

export default function () {
    let res = http.get('https://example.com/api/login');
    check(res, {
        'status is 200': (r) => r.status === 200,
        'response time < 400ms': (r) => r.timings.duration < 400,
    });
    sleep(1);
}
Running and Analyzing Results
Execute the test using
k6 run smoke-test.js
Sample Output
checks...
 is status 200
 response time < 500ms
If any of the checks fail, K6 will report an error, signaling an issue in the application.
Smoke testing with K6 is an effective way to ensure that key functionalities in your application work as expected. By integrating it into your CI/CD pipeline, you can catch major defects early, improve application stability, and streamline your development workflow.
Function calling allows Claude to interact with external functions and tools in a structured way. This guide will walk you through implementing function calling with Claude using Python, complete with examples and best practices.
Prerequisites
To get started, you'll need:
Python 3.7+
anthropic Python package
A valid API key from Anthropic
Basic Setup
from anthropic import Anthropic
import json
# Initialize the client
anthropic = Anthropic(api_key='your-api-key')
Defining Functions
function_schema = {
    "name": "get_weather",
    "description": "Get the current weather for a specific location",
    "parameters": {
        "type": "object",
        "properties": {
            "location": {
                "type": "string",
                "description": "City name or coordinates"
            },
            "unit": {
                "type": "string",
                "enum": ["celsius", "fahrenheit"],
                "description": "Temperature unit"
            }
        },
        "required": ["location"]
    }
}
Making Function Calls
A Step-by-Step Guide to LLM Function Calling in Python
Function calling allows Claude to interact with external functions and tools in a structured way. This guide will walk you through implementing function calling with Claude using Python, complete with examples and best practices.
Prerequisites
To get started, you'll need:
Python 3.7+
anthropic Python package
A valid API key from Anthropic

Basic Setup
from anthropic import Anthropic
import json
# Initialize the client
anthropic = Anthropic(api_key='your-api-key')
Defining Functions
function_schema = {
    "name": "get_weather",
    "description": "Get the current weather for a specific location",
    "parameters": {
        "type": "object",
        "properties": {
            "location": {
                "type": "string",
                "description": "City name or coordinates"
            },
            "unit": {
                "type": "string",
                "enum": ["celsius", "fahrenheit"],
                "description": "Temperature unit"
            }
        },
        "required": ["location"]
    }
}
Making Function Calls
def get_weather(location, unit="celsius"):
    # This is a mock implementation but you can all call your API
    return {
        "location": location,
        "temperature": 22 if unit == "celsius" else 72,
        "conditions": "sunny"
    }
def process_function_call(message):
    try:
        # Parse the function call parameters
        params = json.loads(message.content)
        # Call the appropriate function
        if message.name == "get_weather":
            result = get_weather(**params)
            return json.dumps(result)
        else:
            raise ValueError(f"Unknown function: {message.name}")
    except Exception as e:
        return json.dumps({"error": str(e)})
# Example conversation with function calling
messages = [
    {
        "role": "user",
        "content": "What's the weather like in Paris?"
    }
]
while True:
    response = anthropic.messages.create(
        model="claude-3-5-haiku-latest",
        messages=messages,
        tools=[function_schema]
    )
    # Check if Claude wants to call a function
    if response.tool_calls:
        for tool_call in response.tool_calls:
            # Execute the function
            result = process_function_call(tool_call)
            # Add the function result to the conversation
            messages.append({
                "role": "tool",
                "tool_call_id": tool_call.id,
                "name": tool_call.name,
                "content": result
            })
    else:
        # Normal response - print and break
        print(response.content)
        break
Best Practices
Clear Function Descriptions
Write detailed descriptions for your functions
Specify parameter types and constraints clearly
Include examples in the descriptions when helpful
Input Validation
Validate all function inputs before processing
Return meaningful error messages
Handle edge cases gracefully
Response Formatting
Return consistent JSON structures
Include status indicators in responses
Format error messages uniformly
4 . Security Considerations
Validate and sanitize all inputs
Implement rate limiting if needed
Use appropriate authentication
Don't expose sensitive information in function descriptions
Conclusion
Function calling with Claude enables powerful integrations between the language model and external tools. By following these best practices and implementing proper error handling, you can create robust and reliable function-calling implementations.
In the evolving Python ecosystem, pyproject.toml has emerged as a pivotal configuration file, streamlining project management and enhancing interoperability across tools.
In this blog i delve deep into the significance, structure, and usage of pyproject.toml.
What is pyproject.toml?
Introduced in PEP 518, pyproject.toml is a standardized file format designed to specify build system requirements and manage project configurations. Its primary goal is to provide a unified, tool-agnostic approach to project setup, reducing the clutter of multiple configuration files.
Why Use pyproject.toml?
Standardization: Offers a consistent way to define project metadata, dependencies, and build tools.
Interoperability: Supported by various tools like Poetry, Flit, Black, isort, and even pip.
Simplification: Consolidates multiple configuration files (like setup.cfg, requirements.txt) into one.
Future-Proofing: As Python evolves, pyproject.toml is becoming the de facto standard for project configurations, ensuring compatibility with future tools and practices.
Structure of pyproject.toml
The pyproject.toml file uses the TOML format, which stands for “Tom’s Obvious, Minimal Language.” TOML is designed to be easy to read and write while being simple enough for parsing by tools.
1. [build-system]
Defines the build system requirements. Essential for tools like pip to know how to build the project.
requires: Lists the build dependencies required to build the project. These packages are installed in an isolated environment before the build process starts.
build-backend: Specifies the backend responsible for building the project. Common backends include:
setuptools.build_meta (for traditional Python projects)
flit_core.buildapi (for projects managed with Flit)
poetry.core.masonry.api (for Poetry projects)
2. [tool]
This section is used by third-party tools to store their configuration. Each tool manages its own sub-table under [tool].
This time, we’re shifting gears from theory to practice with mini projects that will help you build real-world solutions. Study materials will be shared beforehand, and you’ll work hands-on to solve practical problems building actual projects that showcase your skills.
What’s New?
Real-world mini projects Task-based shortlisting process Limited seats for focused learning Dedicated WhatsApp group for discussions & mentorship Live streaming of sessions for wider participation Study materials, quizzes, surprise gifts, and more!
How to Join?
Fill the below RSVP – Open for 20 days (till – March 2) only!
After RSVP closes, shortlisted participants will receive tasks via email.
Complete the tasks to get shortlisted.
Selected students will be added to an exclusive WhatsApp group for intensive training.
It’s a COST-FREE learning. We require your time, effort and support.
Don’t miss this chance to level up your Python skills Cost Free with hands-on projects and exciting rewards! RSVP now and be part of Python Learning 2.0!
 Overview