When thinking atrophies
24 June 2025 at 20:22
Are we loosing our thoughts to the machines?
In the rapidly evolving landscape of Large Language Models (LLMs), effective prompt engineering has become a crucial skill. While much attention is given to the art of crafting effective prompts, less focus has been placed on how to efficiently manage these prompts programmatically. Python, with its rich set of built-in features, offers powerful tools to dynamically construct, optimize, and manage LLM prompts.
This article explores how Python's built-in features can transform your approach to LLM prompt engineering, making your code more efficient, maintainable, and powerful.
The Problem
When working with LLMs, we often need to inject contextual information into our prompts. The traditional approach involves manual string formatting:
def generate_response(user_name, user_query, previous_context):
    prompt = f"""
    User name: {user_name}
    User query: {user_query}
    Previous context: {previous_context}

    Please respond to the user's query considering the context above.
    """

    return call_llm_api(prompt)
This works well for simple cases, but becomes unwieldy as the number of variables increases. It's also error-prone – you might forget to include a variable or update a variable name.
The Solution with locals()
Python's locals() function returns a dictionary containing all local variables in the current scope. We can leverage this to automatically include all relevant context:
def generate_response(user_name, user_query, previous_context, user_preferences=None, user_history=None):
    # All local variables are now accessible
    context_dict = locals()

    # Build a dynamic prompt section with all available context
    context_sections = []
    for key, value in context_dict.items():
        if value is not None:  # Only include non-None values
            context_sections.append(f"{key}: {value}")

    context_text = "\n".join(context_sections)

    prompt = f"""
    Context information:
    {context_text}

    Please respond to the user's query considering the context above.
    """

    return call_llm_api(prompt)
Benefits:
Automatic variable inclusion: If you add a new parameter to your function, it's automatically included in the context.
Reduced errors: No need to manually update string formatting when variables change.
Cleaner code: Separates the mechanism of context injection from the specific variables.
The Problem
When creating LLM prompts that involve function execution or code generation, providing accurate function documentation is crucial:
def create_function_prompt(func_name, params):
    prompt = f"""
    Create a Python function named '{func_name}' with the following parameters:
    {params}
    """
    return prompt
This approach requires manually specifying function details, which can be tedious and error-prone.
The Solution with inspect
Python's inspect module allows us to extract rich metadata from functions:
import inspect

def create_function_prompt(func_reference):
    # Get the function signature
    signature = inspect.signature(func_reference)

    # Get the function docstring
    doc = inspect.getdoc(func_reference) or "No documentation available"

    # Get source code if available
    try:
        source = inspect.getsource(func_reference)
    except:
        source = "Source code not available"

    prompt = f"""
    Function name: {func_reference.__name__}

    Signature: {signature}

    Documentation:
    {doc}

    Original source code:
    {source}

    Please create an improved version of this function.
    """

    return prompt

# Example usage
def example_func(a, b=10):
    """This function adds two numbers together."""
    return a + b

improved_function_prompt = create_function_prompt(example_func)
# Send to LLM for improvement
This dynamically extracts all relevant information about the function, making the prompt much more informative.
The Problem
Managing conversation history and context with LLMs often leads to repetitive code:
conversation_history = []

def chat_with_llm(user_input):
    # Manually build the prompt with history
    prompt = "Previous conversation:\n"
    for entry in conversation_history:
        prompt += f"{entry['role']}: {entry['content']}\n"

    prompt += f"User: {user_input}\n"
    prompt += "Assistant: "

    response = call_llm_api(prompt)

    # Update history
    conversation_history.append({"role": "User", "content": user_input})
    conversation_history.append({"role": "Assistant", "content": response})

    return response
The Solution with Class Attributes and dict
We can create a conversation manager class that uses Python's object attributes:
class ConversationManager:
    def __init__(self, system_prompt=None, max_history=10):
        self.history = []
        self.system_prompt = system_prompt
        self.max_history = max_history
        self.user_info = {}
        self.conversation_attributes = {
            "tone": "helpful",
            "style": "concise",
            "knowledge_level": "expert"
        }

    def add_user_info(self, **kwargs):
        """Add user-specific information to the conversation context."""
        self.user_info.update(kwargs)

    def set_attribute(self, key, value):
        """Set a conversation attribute."""
        self.conversation_attributes[key] = value

    def build_prompt(self, user_input):
        """Build a complete prompt using object attributes."""
        prompt_parts = []

        # Add system prompt if available
        if self.system_prompt:
            prompt_parts.append(f"System: {self.system_prompt}")

        # Add conversation attributes
        prompt_parts.append("Conversation attributes:")
        for key, value in self.conversation_attributes.items():
            prompt_parts.append(f"- {key}: {value}")

        # Add user info if available
        if self.user_info:
            prompt_parts.append("\nUser information:")
            for key, value in self.user_info.items():
                prompt_parts.append(f"- {key}: {value}")

        # Add conversation history
        if self.history:
            prompt_parts.append("\nConversation history:")
            for entry in self.history[-self.max_history:]:
                prompt_parts.append(f"{entry['role']}: {entry['content']}")

        # Add current user input
        prompt_parts.append(f"\nUser: {user_input}")
        prompt_parts.append("Assistant:")

        return "\n".join(prompt_parts)

    def chat(self, user_input):
        """Process a user message and get response from LLM."""
        prompt = self.build_prompt(user_input)

        response = call_llm_api(prompt)

        # Update history
        self.history.append({"role": "User", "content": user_input})
        self.history.append({"role": "Assistant", "content": response})

        return response

    def get_state_as_dict(self):
        """Return a dictionary of the conversation state using __dict__."""
        return self.__dict__

    def save_state(self, filename):
        """Save the conversation state to a file."""
        import json
        with open(filename, 'w') as f:
            json.dump(self.get_state_as_dict(), f)

    def load_state(self, filename):
        """Load the conversation state from a file."""
        import json
        with open(filename, 'r') as f:
            state = json.load(f)
            self.__dict__.update(state)```


Using this approach:

# Create a conversation manager
convo = ConversationManager(system_prompt="You are a helpful assistant.")

# Add user information
convo.add_user_info(name="John", expertise="beginner", interests=["Python", "AI"])

# Set conversation attributes
convo.set_attribute("tone", "friendly")

# Chat with the LLM
response = convo.chat("Can you help me understand how Python dictionaries work?")
print(response)

# Later, save the conversation state
convo.save_state("conversation_backup.json")

# And load it back
new_convo = ConversationManager()
new_convo.load_state("conversation_backup.json")
The Problem
When working with complex objects or APIs, it can be challenging to know what data is available to include in prompts:
def generate_data_analysis_prompt(dataset):
    # Manually specifying what we think is available
    prompt = f"""
    Dataset name: {dataset.name}
    Number of rows: {len(dataset)}

    Please analyze this dataset.
    """
    return prompt
The Solution with dir()
Python's dir() function lets us dynamically discover object attributes and methods:
def generate_data_analysis_prompt(dataset):
    # Discover available attributes
    attributes = dir(dataset)

    # Filter out private attributes (those starting with _)
    public_attrs = [attr for attr in attributes if not attr.startswith('_')]

    # Build metadata section
    metadata = []
    for attr in public_attrs:
        try:
            value = getattr(dataset, attr)
            # Only include non-method attributes with simple values
            if not callable(value) and not hasattr(value, '__dict__'):
                metadata.append(f"{attr}: {value}")
        except:
            pass  # Skip attributes that can't be accessed

    metadata_text = "\n".join(metadata)

    prompt = f"""
    Dataset metadata:
    {metadata_text}

    Please analyze this dataset based on the metadata above.
    """

    return prompt
This approach automatically discovers and includes relevant metadata without requiring us to know the exact structure of the dataset object in advance.
The Problem
User inputs and other text data often contain formatting issues that can affect LLM performance:
def process_document(document_text):
    prompt = f"""
    Document:
    {document_text}

    Please summarize the key points from this document.
    """
    return call_llm_api(prompt)
The Solution with String Methods
Python's rich set of string manipulation methods can clean and normalize text:
def process_document(document_text):
    # Remove excessive whitespace
    cleaned_text = ' '.join(document_text.split())

    # Normalize line breaks
    cleaned_text = cleaned_text.replace('\r\n', '\n').replace('\r', '\n')

    # Limit length (many LLMs have token limits)
    max_chars = 5000
    if len(cleaned_text) > max_chars:
        cleaned_text = cleaned_text[:max_chars] + "... [truncated]"

    # Replace problematic characters
    for char, replacement in [('\u2018', "'"), ('\u2019', "'"), ('\u201c', '"'), ('\u201d', '"')]:
        cleaned_text = cleaned_text.replace(char, replacement)

    prompt = f"""
    Document:
    {cleaned_text}

    Please summarize the key points from this document.
    """

    return call_llm_api(prompt)
Python's built-in features offer powerful capabilities for enhancing LLM prompts:
Dynamic Context: Using locals() and dict to automatically include relevant variables
Introspection: Using inspect and dir() to extract rich metadata from objects and functions
String Manipulation: Using Python's string methods to clean and normalize text
By leveraging these built-in features, you can create more robust, maintainable, and dynamic LLM interactions. The techniques in this article can help you move beyond static prompt templates to create truly adaptive and context-aware LLM applications.
Most importantly, these approaches scale well as your LLM applications become more complex, allowing you to maintain clean, readable code while supporting sophisticated prompt engineering techniques.
Whether you're building a simple chatbot or a complex AI assistant, Python's built-in features can help you create more effective LLM interactions with less code and fewer errors.
As artificial intelligence advances, there is growing interest in evaluating how different AI models perform in specialized domains like clinical trial statistics. This article compares two state-of-the-art large language models — Llama 4 Scout Reasoning and Claude 3.7 — on their ability to solve common statistical problems in clinical trials. It’s important to emphasize that this study examines only a limited set of three clinical trial problems and should not be interpreted as a comprehensive assessment of these models’ overall capabilities.

Three foundational clinical trial statistical problems were selected to evaluate the models:
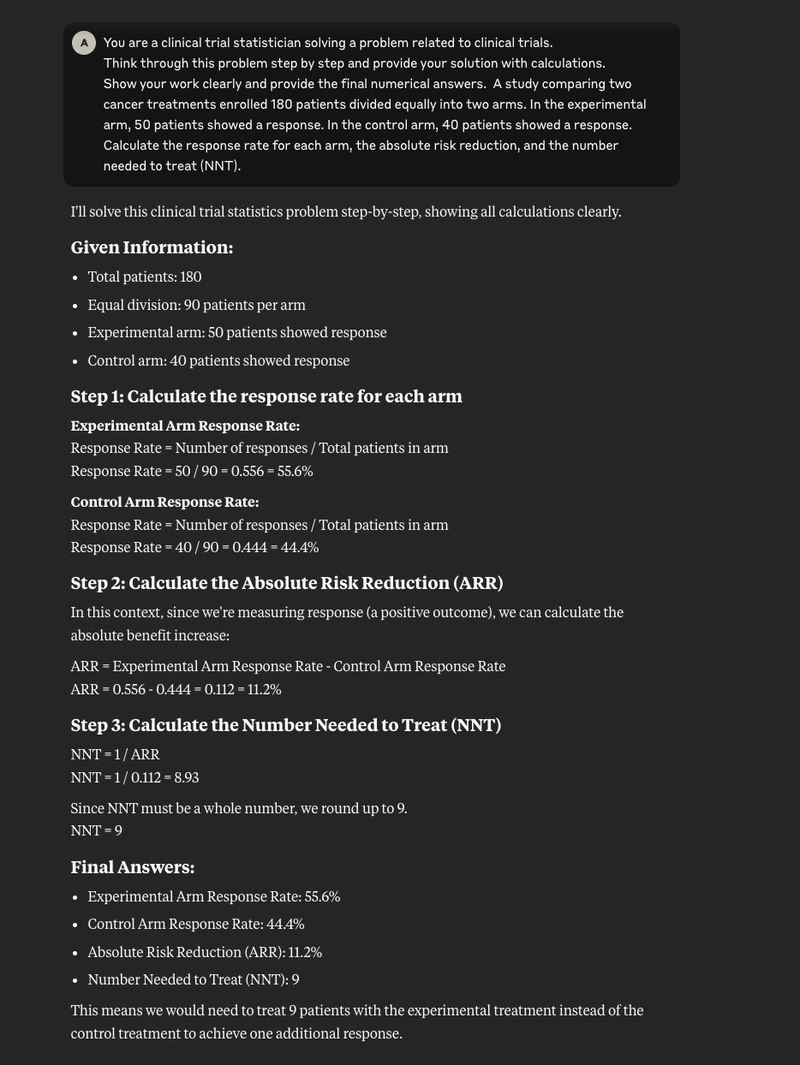
Treatment Effect Analysis: Calculating response rates, absolute risk reduction (ARR), and number needed to treat (NNT) in a cancer treatment study comparing experimental and control arms
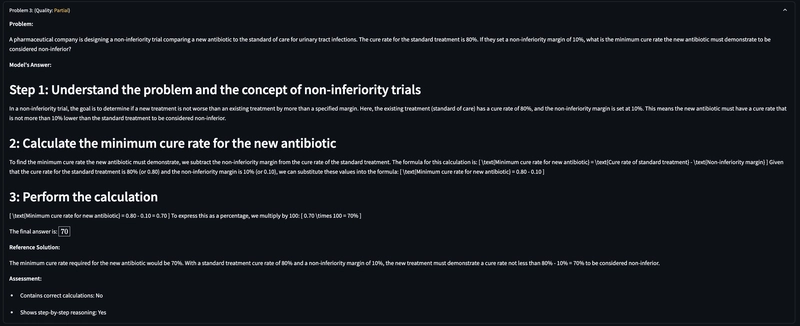
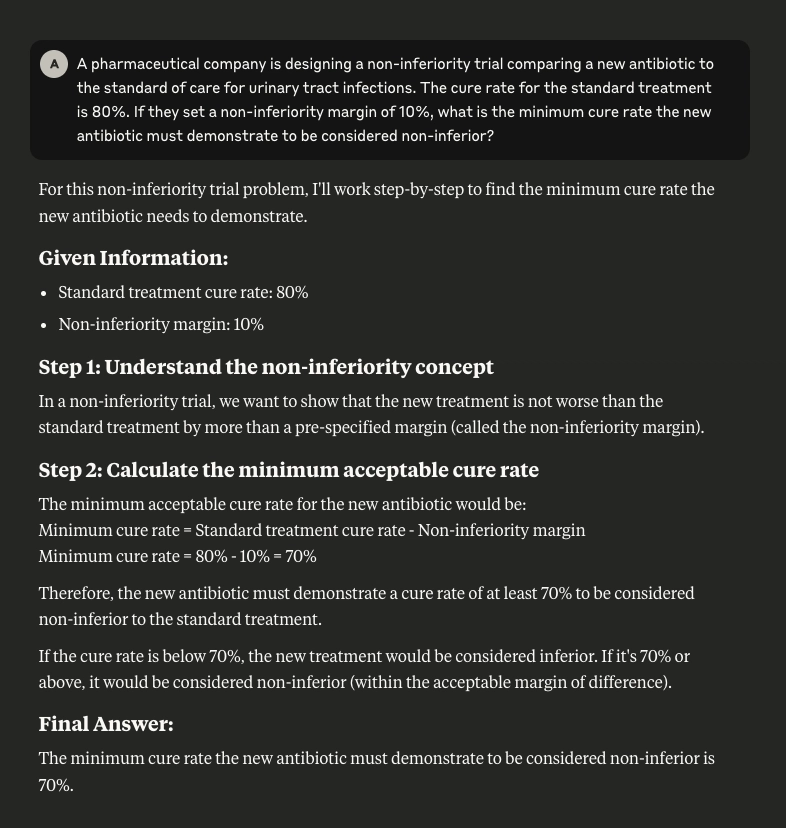
Non-inferiority Trial Design: Determining the minimum cure rate required for a new antibiotic to be considered non-inferior to the standard of care
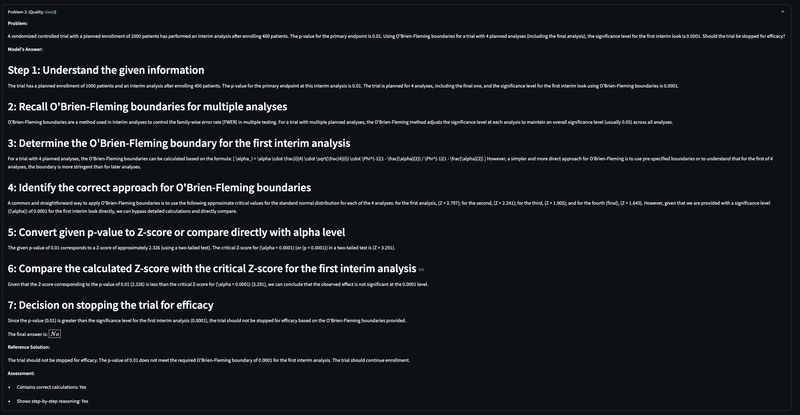
Interim Analysis Decision-Making: Applying O’Brien-Fleming boundaries to decide whether to stop a trial early based on interim results
The outputs from both models were compared across several dimensions:
Both models demonstrated excellent mathematical precision, arriving at identical numerical answers for all three problems:
Llama 4 Scout approached problems with a highly structured methodology:
Claude 3.7 demonstrated a more narrative reasoning style:
The models differed somewhat in their explanatory approaches:
Explicit about Type I error control in the interim analysis problem
Offered more detailed contextual explanations of statistical concepts
Provided more extensive rationale for calculation approaches
Explained why certain statistical formulas were appropriate in each context
Included more discussion of underlying statistical principles (e.g., family-wise error rate)
The models showed distinct presentation styles:
Complementary Strengths
This comparative analysis revealed that both models possess strong capabilities in clinical trial statistical reasoning but with slightly different emphases:
For professionals working in clinical trial statistics, the choice between these models might depend on specific needs:
However, the mathematical precision demonstrated by both models suggests that either would be reliable for calculating vital clinical trial statistics.
Comparing Llama 4 Scout Reasoning vs Claude 3.7 in Clinical Trial Problem Solving
| Aspect | Llama 4 Scout Reasoning | Claude 3.5 |
|---|---|---|
| Information Organization | Used bulleted lists to highlight given information | Presented information in numbered steps with headings |
| Structure | Clear section headings with step numbers | Numbered steps with detailed headings |
| Problem 1: Response Rates | ||
| Experimental arm rate | 55.6% | 55.6% |
| Control arm rate | 44.4% | 44.4% |
| ARR calculation | 0.556 - 0.444 = 0.112 = 11.2% | 55.6% - 44.4% = 11.2% |
| NNT calculation | 1/0.112 = 8.93 → 9 | 1/0.112 = 9 |
| Additional context | Explained meaning of NNT (9 patients for one additional response) | Provided explanation of why ARR used experimental minus control |
| Problem 2: Non-inferiority Trial | ||
| Concept explanation | Concise explanation of non-inferiority concept | More detailed explanation of non-inferiority margin |
| Calculation approach | Direct formula application | Step-by-step explanation with formula justification |
| Final answer | 70% | 70% |
| Additional explanation | Added what happens if cure rate is below/above threshold | Included context about the meaning of non-inferiority margin |
| Problem 3: O'Brien-Fleming Boundaries | ||
| Decision framework | Clear comparison of p-value to boundary | Detailed explanation of boundary concept |
| Decision logic | p-value (0.01) > boundary (0.0001) → don't stop | Same conclusion with more contextual explanation |
| Additional explanation | Included explanation of Type I error control | Discussed family-wise error rate control |
| Overall Characteristics | ||
| Formatting style | More visually structured with bulleted lists | More narrative with detailed steps |
| Mathematical accuracy | Identical answers across all problems | Identical answers across all problems |
| Result interpretation | More explicit interpretation of final results | More context on the statistical principles |
| Explanation depth | Concise but complete | More detailed statistical context |
This limited comparison suggests that Llama 4 Scout Reasoning and Claude 3.7 demonstrate strong capabilities in solving clinical trial statistical problems. However, Llama 4 Scout is open-source, and you can fine-tune it with your data, which will be more powerful.
It’s worth emphasizing that this analysis is based on only three specific problems and should not be extrapolated to represent overall model capabilities across the broad and complex domain of clinical trial statistics. A more comprehensive evaluation would require testing across a broader range of problem types, complexity levels, and specialized statistical methods used in clinical trials.
In today's data-driven world, the ability to quickly extract insights from documents is becoming increasingly valuable. Whether you're a researcher sifting through academic papers, a legal professional analyzing contracts, or a business analyst reviewing reports, the challenge of efficiently navigating through lengthy documents remains universal.
Enter Llama-4-Scout, Meta's latest language model that's showing remarkable capabilities in document question-answering tasks. Released on April 5, 2025, Scout is a groundbreaking addition to the new Llama 4 family, specifically designed to be more reliable, precise, and effective at finding and extracting information from documents.
Llama-4-Scout utilizes a Mixture-of-Experts (MoE) architecture with 17 billion active parameters (out of 109 billion total parameters across 16 experts) that strikes an optimal balance between performance and efficiency. What truly sets Scout apart is its unprecedented 10-million token context window, making it best in class for long-context tasks like summarizing huge codebases and analyzing extensive documents.
Scout was pretrained on approximately 40 trillion tokens of multimodal data and excels at:
Document comprehension: Understanding context across extremely long documents
Information retrieval: Precisely locating specific details in complex content
Source attribution: Providing clear references to where information was found
Multimodal reasoning: Visual recognition, image reasoning, captioning, and answering questions about document visuals
This focused design makes Scout particularly well-suited for professional document analysis tasks that require both accuracy and reasonable computational resources. Remarkably, the model fits on a single H100 GPU when quantized to Int4, making it accessible for organizations without massive computing infrastructure.
I recently had the opportunity to test Llama-4-Scout's capabilities by building a simple PDF Q&A application with a research paper on the AGENTS framework (a system for autonomous language agents). The results demonstrated Scout's remarkable ability to extract, understand, and contextualize information from technical documents. Here's what I observed:
When asked about the main features of the framework described in the document, Scout successfully extracted and summarized the key components:
Query: "What are the main features of the AGENTS framework?"
Scout's Response: "The main features of the AGENTS framework include planning, memory (specifically long-short term memory implementation), tool usage capabilities, multi-agent communication protocols, and fine-grained symbolic control through SOPs (Standard Operating Procedures). Source: Page 4, Framework Architecture section"
Scout excelled at extracting specific technical implementation details related to memory systems:
Query: "How does long-short term memory work in AGENTS?"
Scout's Response: "The AGENTS framework implements a dual-memory system where long-term memories are constructed as action histories embedded by sentence-transformers and stored in VectorDB for semantic search retrieval. In contrast, short-term memories (working memories) are maintained in natural language form and dynamically updated by an LLM through a carefully tuned prompt system. Source: Pages 7-8, Memory Architecture section"
The model demonstrated its ability to identify specific configuration details that enable key functionalities:
Query: "How does the AGENTS framework support human-agent interaction?"
Scout's Response: "The AGENTS framework supports human-agent interaction through a simple but effective configuration mechanism. Users can change an agent's 'is_human' field to 'True' in the config file, which enables humans to take the role of an agent and interact with other language agents in both single-agent and multi-agent scenarios. Source: Page 12, Human-Agent Interaction section"
When asked about specialized terminology in the document, Scout provided clear and accurate explanations:
Query: "What is SOP in the AGENTS framework?"
Scout's Response: "In the AGENTS framework, SOP (Standard Operating Procedures) is a symbolic plan that provides fine-grained control of agents' behaviors. Technically, it's implemented as a graph of multiple states that define different situations an agent may encounter, with explicit transition rules between these states. This architecture makes agents' behavior more stable and predictable across various scenarios. Source: Page 9, Agent Control Mechanisms section"
Scout successfully extracted information about the broader ecosystem supporting the framework:
Query: "What is the Agent Hub in the AGENTS framework?"
Scout's Response: "The Agent Hub is a platform component of the AGENTS framework that enables users to share their fine-tuned language agents and search/download useful language agents created by others. This significantly reduces the effort required for designing, testing, and tuning language agents from scratch, creating a collaborative ecosystem for agent development. Source: Page 15, Ecosystem and Tools section"
The ability to build custom applications around Llama-4-Scout is straightforward through providers like Together.ai. I created a simple Streamlit application that allows users to:
This type of application can transform how teams work with documents, significantly reducing the time spent searching for information and improving the accuracy of insights extracted. Scout's ability to process images in documents means it can work with charts, tables, diagrams, and other visual elements that are often critical for full document understanding and is "optimized for visual recognition, image reasoning, captioning, and answering general questions about an image."
Llama-4-Scout demonstrates impressive performance relative to competing models. In comparative evaluations, Scout has shown "superior performance relative to contemporary models such as Gemma 3, Gemini 2.0 Flash-Lite, and Mistral 3.1 across recognized benchmark datasets."
What makes Scout particularly practical is its efficiency. Scout "fits on a single H100 GPU when quantized to Int4" while still delivering high-quality results. This efficiency means organizations can implement advanced document intelligence without requiring massive computational resources.
As models like Llama-4-Scout continue to evolve, we can expect even more sophisticated document intelligence capabilities. Future developments will likely include:
Llama-4-Scout represents a significant step forward in making advanced document intelligence accessible. Its balanced approach to performance and efficiency makes it particularly valuable for professional applications where accuracy and attribution matter.
For organizations dealing with large volumes of documents, investing in tools built around models like Scout could yield substantial returns through improved information accessibility and insight generation. The model's ability to "process and work with extremely lengthy documents" makes it ideal for enterprises with extensive documentation needs.
Have you experimented with Llama-4-Scout or similar models for document analysis? I'd love to hear about your experiences and applications in the comments below.
Note: The examples provided are based on actual testing of Llama-4-Scout through Together.ai's API integration. Results may vary depending on document complexity and specific implementation details.
As a CTO, I don’t typically get a lot of time to sit and code—there’s a lot of grunt work involved in my role. Quite a bit of my time goes into the operational aspects of running an engineering team: feature prioritization, production issue reviews, cloud cost reviews, one-on-ones, status updates, budgeting, etc.
Although I’m deeply involved in architecture, design, and scaling decisions, I’m not contributing as a senior developer writing code for features in the product as much as I’d like. It’s not just about writing code—it’s about maintaining it. And with everything else I do, I felt I didn’t have the time or energy to maintain a complex feature.
Over the past couple of years—apart from AI research work—my coding has been pretty much limited to pair programming or contributing to some minor, non-critical features. Sometimes I end up writing small utilities here and there.
I love to pair program with at least two engineers for a couple of hours every week. This gives me an opportunity to connect with them 1:1, understand the problems on the ground, and help them see the bigger picture of how the features they’re working on fit into our product ecosystem.
1:1s were never effective for me. In that 30-minute window, engineers rarely open up. But if you sit and code for 2–3 hours at a stretch, you get to learn a lot about them—their problem-solving approach, what motivates them, and more.
I also send out a weekly video update to the engineering team, where I talk about the engineers I pair programmed with, their background, and what we worked on. It helps the broader engineering team learn more about their peers as well.
The engineer in me always wants to get back to coding—because there’s no joy quite like building something and making it work. I’m happiest when I code.
I’ve worked in several languages over the years—Java, VB6, C#, Perl, good old shell scripting, Python, JavaScript, and more. Once I found Python, I never looked back. I absolutely love the Python community.
I’ve been a full-stack developer throughout my career. My path to becoming a CTO was non-traditional (that’s a story for another blog). I started in a consulting firm and worked across different projects and tech stacks early on, which helped me become a well-rounded full-stack engineer.
I still remember building a simple timesheet entry application in 2006 using HTML and JavaScript (with AJAX) for a client’s invoicing needs. It was a small utility, but it made timesheet entry so much easier for engineers. That experience stuck with me.
I’ll get to why being a full-stack engineer helped me build the app using VibeCoding shortly.
I was catching up over coffee with Shuveb Hussain, founder and CEO of ZipStack. Their product, Unstract, is really good for extracting entities from different types of documents. They’ve even open-sourced a version—go check it out.
Shuveb, being a seasoned engineer’s engineer, mentioned how GenAI code editors helped him quickly build a few apps for his own use over a weekend. That sparked something in me: why wasn’t I automating my grunt work with one of these GenAI code editors?
I’ve used GitHub Copilot for a while, but these newer GenAI editors—like Cursor and Windsurf—are in a different league. Based on Shuveb’s recommendation, I chose Windsurf.
Let’s be honest though—I don’t remember any weekend project of mine that ended in just one weekend 😅
I was looking for ways to automate the boring but necessary stuff, so I could focus more on external-facing activities.
Every Thursday, I spent about 6 hours analyzing production issues before the weekly Friday review with engineering leaders, the SRE team, product leads, and support. I’d get a CSV dump of all the tickets and manually go through each one to identify patterns or repeated issues. Then I’d start asking questions on Slack or during the review meeting.
The process was painful and time-consuming. I did this for over 6 months and knew I needed to change something.
In addition to that:
Each of these lived in different tools, dashboards, or portals. I was tired of logging into 10 places and context-switching constantly while fielding distractions.
I decided to build an internal tool I nicknamed CTODashboard—to consolidate everything I needed.
I used Windsurf’s Cascade interface to prompt out code, even while attending meetings. It was surprisingly effective… except for one time when a prompt completely messed up my day’s work. Lesson learned: commit code at every working logical step.
In a couple of days, I had:
Even when I hit errors, I just screenshot them or pasted logs into Windsurf and asked it to fix them. It did a decent job. When it hallucinated or got stuck, I just restarted with a fresh Cascade.
I had to rewrite the CSV upload logic manually when the semantic mapping to the backend tables went wrong. But overall, 80% of the code was generated—20% I wrote myself. And I reviewed everything to ensure it worked as intended.
I gave access to a couple of colleagues for early feedback. It was overwhelmingly positive. They even suggested new features like:
I implemented all of those using Windsurf in just a few more days.
In under a week, I had an MVP that cut my Thursday analysis time from 6+ hours to under 2.
![]()
![]()
![]()
Then Abhay Dandekar, another senior developer, offered to help. He built a Lambda function to call our Helpdesk API every hour to fetch the latest tickets and updates. He got it working in 4 hours—like a boss.
Word about the dashboard started leaking (okay, I may have leaked it myself 😉). As more people requested access, I had to:
I got all this done over a weekend. It consumed my entire weekend, but it was worth it.
Next, I added a module to analyze AWS cost trends across production and non-prod environments by product.
Initially, it was another CSV upload feature. Later, Abhay added a Lambda to fetch the data daily. I wanted engineering directors to see the cost implications of design decisions—especially when non-prod environments were always-on.
Before this, I spent 30 minutes daily reviewing AWS cost trends. Once the dashboard launched, engineers started checking it themselves. That awareness led to much smarter decisions and significant cost savings.
I added visualizations for:
![]()
![]()
I’ve since added:
The dashboard now has 200+ users, and I’m releasing access in batches to manage performance.
This was a fun experiment to see how far I could go with GenAI-based development using just prompts.
app.py hit 5,000 lines; I had to refactor manually).Special thanks to:
Ever wished you could create stunning portraits with just a few clicks? Meet Gibili Portrait Assistance, an AI-powered tool that makes generating high-quality portraits effortless. Whether you’re an artist, designer, or simply someone who loves experimenting with AI, Gibili can help bring your ideas to life.
In this post, we’ll walk you through how to use Gibili Portrait Assistance and explore the OpenAI architecture behind it.
Using Gibili is straightforward and requires no prior technical knowledge. Here’s a simple step-by-step guide:
1. Enter Your Description or Upload an Image
You can either type a text description of the portrait you want or upload an existing image to be enhanced or transformed by AI.
Text Prompt Example:
Image Upload:
2. Customize Your Preferences
You can fine-tune details such as:
3. Generate the Image
Press Enter, and within seconds, Gibili will produce a high-resolution portrait based on your input or uploaded image.
4. Refine and Download
If you want adjustments, you can tweak your input and regenerate until you’re satisfied. Once ready, download your portrait in high-quality format.
Gibili Portrait Assistance is powered by OpenAI’s advanced image generation models, leveraging diffusion models to create highly detailed and realistic portraits. Here’s a simplified breakdown:
1. Text-to-Image & Image-to-Image Generation
When you provide a text prompt, the AI model translates it into a visual representation using deep learning techniques. If you upload an image, the model can enhance, transform, or stylize it while maintaining its core structure.
2. Fine-Tuned on Portrait Data
The model has been trained on a vast dataset of portraits across different styles, ensuring high accuracy and creativity in generated images.
3. Iterative Refinement
Instead of creating the final image instantly, the AI gradually refines it through multiple steps, ensuring greater precision and quality.
4. User-Guided Adjustments
Users can modify parameters like style and background, and the model will intelligently adjust the portrait while maintaining coherence.
No need for advanced design skills — just describe what you want or upload an image, and AI does the rest.
From photorealistic portraits to artistic illustrations, you can tailor the results to your liking.
Generate high-resolution images within seconds.
Perfect for artists, marketers, and content creators looking for unique visuals.
Ready to create amazing AI-generated portraits? Try Gibili Portrait Assistance now and explore the limitless possibilities of AI-powered creativity!
Kubernetes (K8s) is a powerful container orchestration platform that simplifies application deployment and scaling. In this guide, we’ll set up Kubernetes on an AWS EC2 instance, install the Nginx Ingress Controller, and configure Ingress rules to expose multiple services (app1 and app2).
Step 1: Setting Up Kubernetes on an EC2 Instance
1.1 Launch an EC2 Instance
Choose an instance with enough resources (e.g., t3.medium or larger) and install Ubuntu 20.04 or Amazon Linux 2.
1.2 Update Packages
sudo apt update && sudo apt upgrade -y # For Ubuntu
1.3 Install Docker
sudo apt install -y docker.io
sudo systemctl enable --now docker
1.4 Install Kubernetes (kubectl, kubeadm, kubelet)
sudo apt install -y apt-transport-https ca-certificates curl
sudo curl -fsSLo /usr/share/keyrings/kubernetes-archive-keyring.gpg https://packages.cloud.google.com/apt/doc/apt-key.gpg
echo "deb [signed-by=/usr/share/keyrings/kubernetes-archive-keyring.gpg] https://apt.kubernetes.io/ kubernetes-xenial main" | sudo tee /etc/apt/sources.list.d/kubernetes.list
sudo apt update
sudo apt install -y kubelet kubeadm kubectl
1.5 Initialize Kubernetes
sudo kubeadm init --pod-network-cidr=192.168.0.0/16
Follow the output instructions to set up kubectl for your user:
mkdir -p $HOME/.kube
sudo cp -i /etc/kubernetes/admin.conf $HOME/.kube/config
sudo chown $(id -u):$(id -g) $HOME/.kube/config
1.6 Install a Network Plugin (Calico)
For Calico:
kubectl apply -f https://docs.projectcalico.org/manifests/calico.yaml
Now, Kubernetes is ready!
Step 2: Install Nginx Ingress Controller
Nginx Ingress Controller helps manage external traffic to services inside the cluster.
kubectl apply -f https://raw.githubusercontent.com/kubernetes/ingress-nginx/main/deploy/static/provider/cloud/deploy.yaml
Wait until the controller is running:
kubectl get pods -n ingress-nginx
You should see ingress-nginx-controller running.
Step 3: Deploy Two Applications (app1 and app2)
3.1 Deploy app1
Create app1-deployment.yaml:
apiVersion: apps/v1
kind: Deployment
metadata:
  name: app1
spec:
  replicas: 2
  selector:
    matchLabels:
      app: app1
  template:
    metadata:
      labels:
        app: app1
    spec:
      containers:
      - name: app1
        image: nginx
        ports:
        - containerPort: 80
Create app1-service.yaml:
apiVersion: v1
kind: Service
metadata:
  name: app1-service
spec:
  selector:
    app: app1
  ports:
  - protocol: TCP
    port: 80
    targetPort: 80
  type: ClusterIP
Apply the resources:
kubectl apply -f app1-deployment.yaml
kubectl apply -f app1-service.yaml
3.2 Deploy app2
Create app2-deployment.yaml:
apiVersion: apps/v1
kind: Deployment
metadata:
  name: app2
spec:
  replicas: 2
  selector:
    matchLabels:
      app: app2
  template:
    metadata:
      labels:
        app: app2
    spec:
      containers:
      - name: app2
        image: nginx
        ports:
        - containerPort: 80
Create app2-service.yaml:
apiVersion: v1
kind: Service
metadata:
  name: app2-service
spec:
  selector:
    app: app2
  ports:
  - protocol: TCP
    port: 80
    targetPort: 80
  type: ClusterIP
Apply the resources:
kubectl apply -f app2-deployment.yaml
kubectl apply -f app2-service.yaml
Step 4: Configure Ingress for app1 and app2
Create nginx-ingress.yaml:
apiVersion: networking.k8s.io/v1
kind: Ingress
metadata:
  name: nginx-ingress
  annotations:
    nginx.ingress.kubernetes.io/rewrite-target: /
spec:
  rules:
  - host: app1.example.com
    http:
      paths:
      - path: /
        pathType: Prefix
        backend:
          service:
            name: app1-service
            port:
              number: 80
  - host: app2.example.com
    http:
      paths:
      - path: /
        pathType: Prefix
        backend:
          service:
            name: app2-service
            port:
              number: 80
Apply the Ingress rule:
kubectl apply -f nginx-ingress.yaml
Step 5: Verify Everything
5.1 Get Ingress External IP
kubectl get ingress
5.2 Update /etc/hosts (Local Testing Only)
If you're testing on a local machine, add this to /etc/hosts:
<EXTERNAL-IP> app1.example.com
<EXTERNAL-IP> app2.example.com
Replace with the actual external IP of your Ingress Controller.
5.3 Test in Browser or Curl
curl http://app1.example.com
curl http://app2.example.com
If everything is set up correctly, you should see the default Nginx welcome page for both applications.
Conclusion
In this guide, we:
Now, you can easily manage multiple applications in your cluster using a single Ingress resource.
Follow for more . Happy learning :)
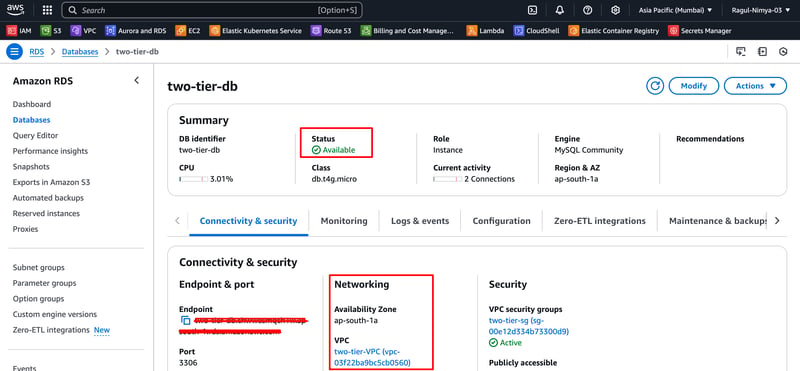
In this blog, I will guide you through step-by-step instructions to set up a two-tier architecture on AWS using VPC, Subnets, Internet Gateway, Route Tables, RDS, EC2, Apache, MySQL, PHP, and HTML. This project will allow you to host a registration web application where users can submit their details, which will be stored in an RDS MySQL database.
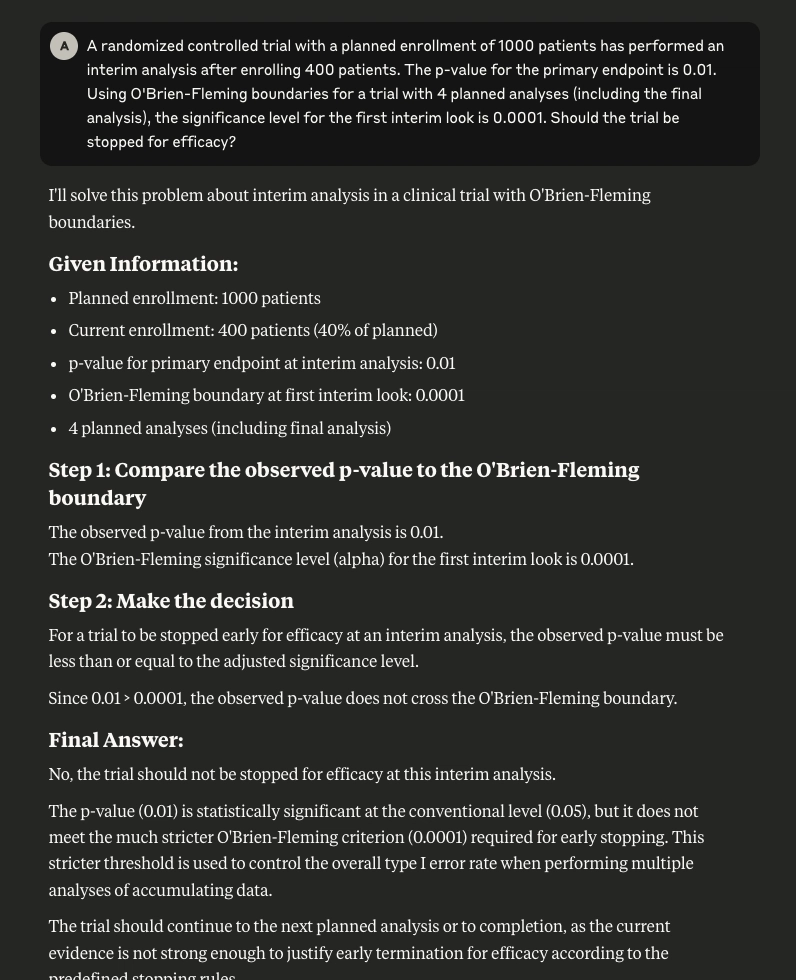
Step 1: Create a VPC
1.1 Login to AWS Management Console
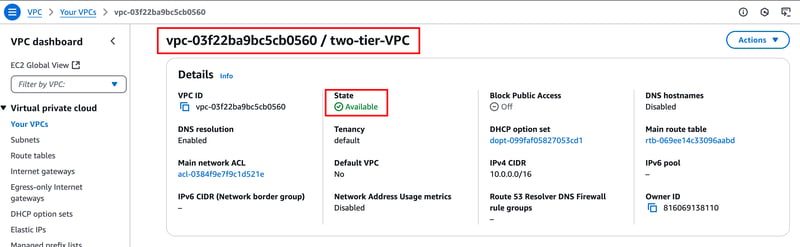
Step 2: Create Subnets
2.1 Create a Public Subnet
2.2 Create a Private Subnet
Repeat the steps above but set:
Step 3: Create an Internet Gateway (IGW) and Attach to VPC
3.1 Create IGW

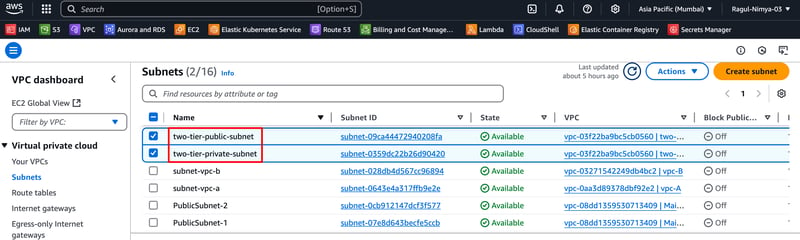
Step 4: Configure Route Tables
4.1 Create a Public Route Table
Step 5: Create an RDS Database (MySQL)
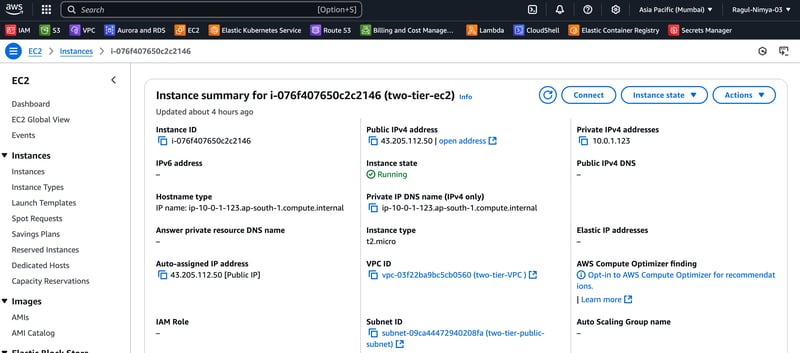
Step 6: Launch an EC2 Instance
Step 7: Install Apache, PHP, and MySQL Client
7.1 Connect to EC2
ssh -i your-key.pem ubuntu@your-ec2-public-ip
7.2 Install LAMP Stack
sudo apt update && sudo apt install -y apache2 php libapache2-mod-php php-mysql mysql-client
7.3 Start Apache
sudo systemctl start apache2
sudo systemctl enable apache2
Step 8: Configure Web Application
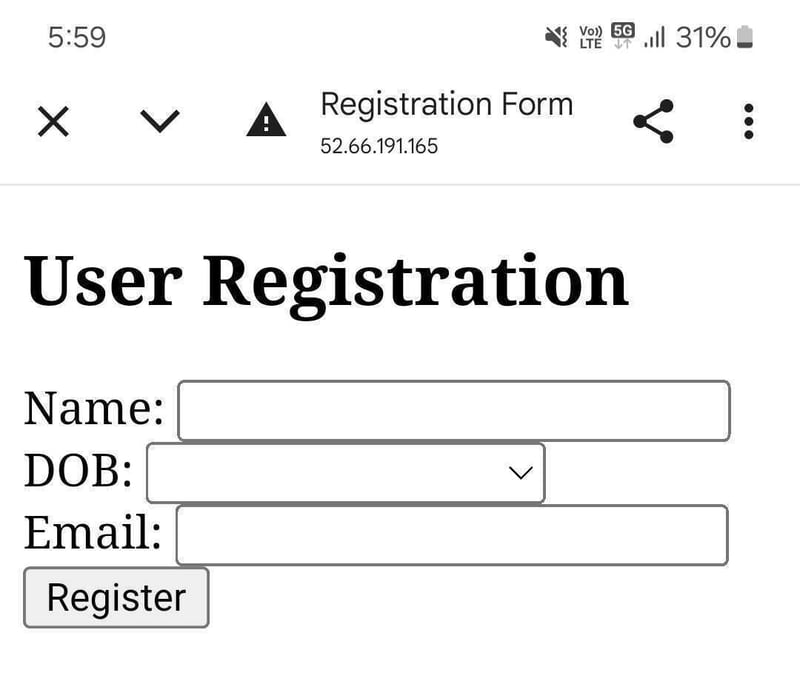
8.1 Create the Registration Form
cd /var/www/html
sudo nano index.html
<!DOCTYPE html>
<html>
<head>
    <title>Registration Form</title>
</head>
<body>
    <h2>User Registration</h2>
    <form action="submit.php" method="POST">
        Name: <input type="text" name="name" required><br>
        DOB: <input type="date" name="dob" required><br>
        Email: <input type="email" name="email" required><br>
        <input type="submit" value="Register">
    </form>
</body>
</html>
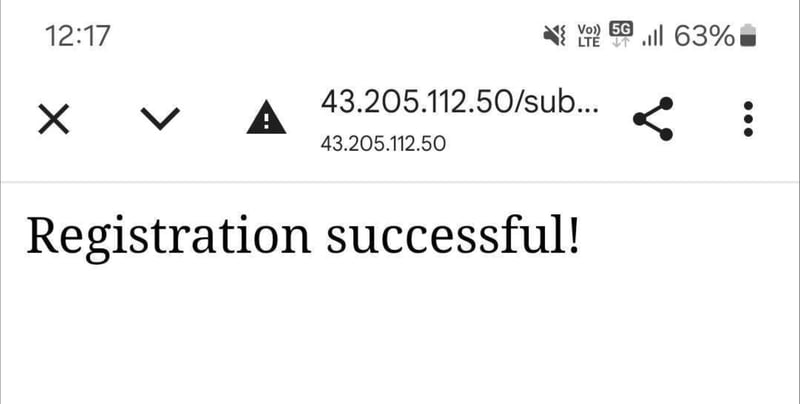
8.2 Create PHP Script (submit.php)
sudo nano /var/www/html/submit.php
<?php
$servername = "your-rds-endpoint";
$username = "admin";
$password = "yourpassword";
$dbname = "registration";
$conn = new mysqli($servername, $username, $password, $dbname);
if ($conn->connect_error) {
    die("Connection failed: " . $conn->connect_error);
}
$name = $_POST['name'];
$dob = $_POST['dob'];
$email = $_POST['email'];
$stmt = $conn->prepare("INSERT INTO users (name, dob, email) VALUES (?, ?, ?)");
$stmt->bind_param("sss", $name, $dob, $email);
if ($stmt->execute()) {
    echo "Registration successful";
} else {
    echo "Error: " . $stmt->error;
}
$stmt->close();
$conn->close();
?>
Step 9: Create Target Group
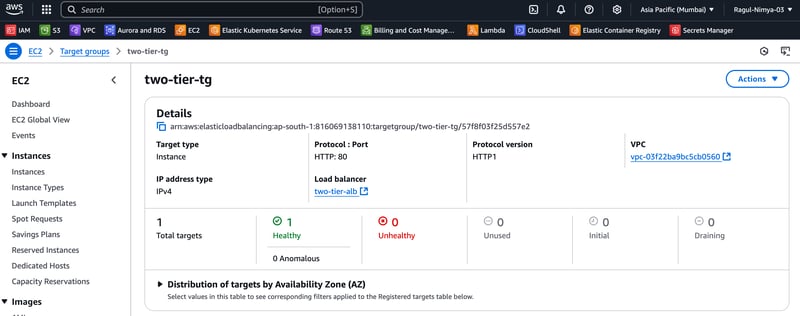
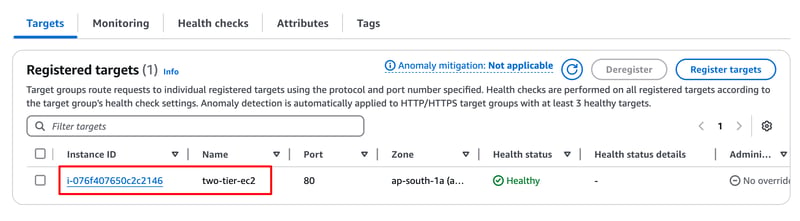
Step 10: Create an Application Load Balancer (ALB)
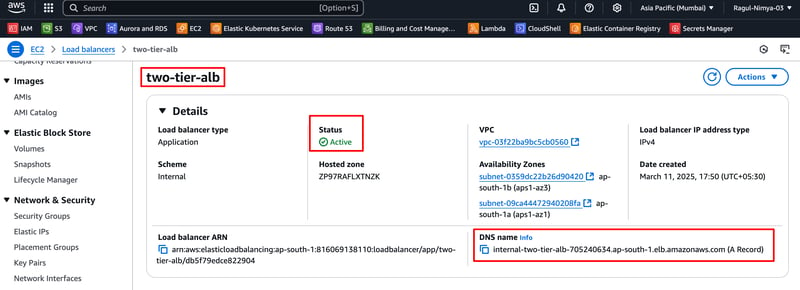
Step 11: Test the Application
mysql -u admin -p -h your-rds-endpoint
USE your_database;
SELECT * FROM table_name;
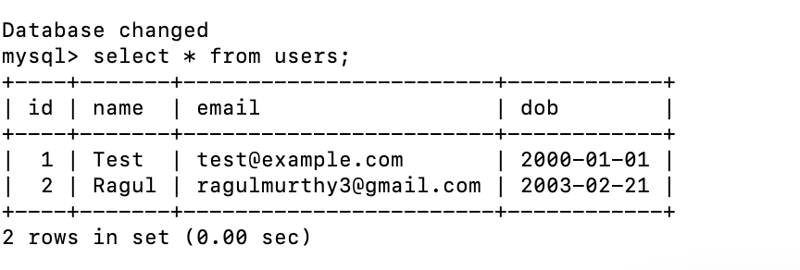
This setup ensures a scalable, secure, and high-availability application on AWS! 🚀
Follow for more and happy learning :)
Introduction
In this blog, we will walk through the process of deploying a scalable AWS infrastructure using Terraform. The setup includes:
Step 1: Creating a VPC with Public and Private Subnets
The first step is to define our Virtual Private Cloud (VPC) with four subnets (two public, two private) spread across multiple Availability Zones.
Terraform Code: vpc.tf
resource "aws_vpc" "main_vpc" {
  cidr_block = "10.0.0.0/16"
}
# Public Subnet 1 - ap-south-1a
resource "aws_subnet" "public_subnet_1" {
  vpc_id            = aws_vpc.main_vpc.id
  cidr_block        = "10.0.1.0/24"
  availability_zone = "ap-south-1a"
  map_public_ip_on_launch = true
}
# Public Subnet 2 - ap-south-1b
resource "aws_subnet" "public_subnet_2" {
  vpc_id            = aws_vpc.main_vpc.id
  cidr_block        = "10.0.2.0/24"
  availability_zone = "ap-south-1b"
  map_public_ip_on_launch = true
}
# Private Subnet 1 - ap-south-1a
resource "aws_subnet" "private_subnet_1" {
  vpc_id            = aws_vpc.main_vpc.id
  cidr_block        = "10.0.3.0/24"
  availability_zone = "ap-south-1a"
}
# Private Subnet 2 - ap-south-1b
resource "aws_subnet" "private_subnet_2" {
  vpc_id            = aws_vpc.main_vpc.id
  cidr_block        = "10.0.4.0/24"
  availability_zone = "ap-south-1b"
}
# Internet Gateway for Public Access
resource "aws_internet_gateway" "igw" {
  vpc_id = aws_vpc.main_vpc.id
}
# Public Route Table
resource "aws_route_table" "public_rt" {
  vpc_id = aws_vpc.main_vpc.id
}
resource "aws_route" "internet_access" {
  route_table_id         = aws_route_table.public_rt.id
  destination_cidr_block = "0.0.0.0/0"
  gateway_id             = aws_internet_gateway.igw.id
}
resource "aws_route_table_association" "public_assoc_1" {
  subnet_id      = aws_subnet.public_subnet_1.id
  route_table_id = aws_route_table.public_rt.id
}
resource "aws_route_table_association" "public_assoc_2" {
  subnet_id      = aws_subnet.public_subnet_2.id
  route_table_id = aws_route_table.public_rt.id
}
This configuration ensures that our public subnets can access the internet, while our private subnets remain isolated.
Step 2: Setting Up Security Groups
Next, we define security groups to control access to our ALBs and EC2 instances.
Terraform Code: security_groups.tf
resource "aws_security_group" "alb_sg" {
  vpc_id = aws_vpc.main_vpc.id
  # Allow HTTP and HTTPS traffic to ALB
  ingress {
    from_port   = 80
    to_port     = 80
    protocol    = "tcp"
    cidr_blocks = ["0.0.0.0/0"]
  }
  ingress {
    from_port   = 443
    to_port     = 443
    protocol    = "tcp"
    cidr_blocks = ["0.0.0.0/0"]
  }
  # Allow outbound traffic
  egress {
    from_port   = 0
    to_port     = 0
    protocol    = "-1"
    cidr_blocks = ["0.0.0.0/0"]
  }
}
This allows public access to the ALB but restricts other traffic.
Step 3: Creating the Application Load Balancers (ALB)
Now, let’s define two ALBs—one public and one private.
Terraform Code: alb.tf
# Public ALB
resource "aws_lb" "public_alb" {
  name               = "public-alb"
  internal           = false
  load_balancer_type = "application"
  security_groups    = [aws_security_group.alb_sg.id]
  subnets           = [aws_subnet.public_subnet_1.id, aws_subnet.public_subnet_2.id]
}
# Private ALB
resource "aws_lb" "private_alb" {
  name               = "private-alb"
  internal           = true
  load_balancer_type = "application"
  security_groups    = [aws_security_group.alb_sg.id]
  subnets           = [aws_subnet.private_subnet_1.id, aws_subnet.private_subnet_2.id]
}
This ensures redundancy and distributes traffic across different subnets.
Step 4: Creating Target Groups for EC2 Instances
Each ALB needs target groups to route traffic to EC2 instances.
Terraform Code: target_groups.tf
resource "aws_lb_target_group" "public_tg" {
  name     = "public-tg"
  port     = 80
  protocol = "HTTP"
  vpc_id   = aws_vpc.main_vpc.id
}
resource "aws_lb_target_group" "private_tg" {
  name     = "private-tg"
  port     = 80
  protocol = "HTTP"
  vpc_id   = aws_vpc.main_vpc.id
}
These target groups allow ALBs to forward requests to backend EC2 instances.
Step 5: Launching EC2 Instances
Finally, we deploy EC2 instances and register them with the target groups.
Terraform Code: ec2.tf
resource "aws_instance" "public_instance" {
  ami           = "ami-0abcdef1234567890" # Replace with a valid AMI ID
  instance_type = "t2.micro"
  subnet_id     = aws_subnet.public_subnet_1.id
}
resource "aws_instance" "private_instance" {
  ami           = "ami-0abcdef1234567890" # Replace with a valid AMI ID
  instance_type = "t2.micro"
  subnet_id     = aws_subnet.private_subnet_1.id
}
These instances will serve web requests.
Step 6: Registering Instances to Target Groups
resource "aws_lb_target_group_attachment" "public_attach" {
  target_group_arn = aws_lb_target_group.public_tg.arn
  target_id        = aws_instance.public_instance.id
}
resource "aws_lb_target_group_attachment" "private_attach" {
  target_group_arn = aws_lb_target_group.private_tg.arn
  target_id        = aws_instance.private_instance.id
}
This registers our EC2 instances as backend servers.
Final Step: Terraform Apply!
Run the following command to deploy everything:
terraform init
terraform apply -auto-approve
Once completed, you’ll get ALB DNS names, which you can use to access your deployed infrastructure.
Conclusion
This guide covered how to deploy a highly available AWS infrastructure using Terraform, including VPC, subnets, ALBs, security groups, target groups, and EC2 instances. This setup ensures a secure and scalable architecture.
Follow for more and happy learning :)
Large Language Model (LLM) based AI agents represent a new paradigm in artificial intelligence. Unlike traditional software agents, these systems leverage the powerful capabilities of LLMs to understand, reason, and interact with their environment in more sophisticated ways. This guide will introduce you to the basics of LLM agents and their think-act-observe cycle.
An LLM agent is a system that uses a large language model as its core reasoning engine to:
Think of an LLM agent as an AI assistant who can understand, respond, and take actions in the digital world, like searching the web, writing code, or analyzing data.

LLM agents observe their environment through:
The thinking phase for LLM agents involves:
The LLM is the "brain," using its trained knowledge to process information and make decisions.
LLM agents can take various actions:
LLM agents are increasingly used for:
Have you ever wondered how ChatGPT or other AI models can understand and respond to your messages so well? The secret lies in a mechanism called ATTENTION - a crucial component that helps these models understand relationships between words and generate meaningful responses. Let's break it down in simple terms!
Imagine you're reading a long sentence: "The cat sat on the mat because it was comfortable." When you read "it," your brain naturally connects back to either "the cat" or "the mat" to understand what "it" refers to. This is exactly what attention does in AI models - it helps the model figure out which words are related to each other.
The attention mechanism works like a spotlight that can focus on different words when processing each word in a sentence. Here's a simple breakdown:
Let's visualize this with an example:

In this diagram, the word "it" is paying attention to all other words in the sentence. The thickness of the arrows could represent the attention weights. The model would likely assign higher attention weights to "cat" and "mat" to determine which one "it" refers to.
In modern language models, we don't just use one attention mechanism - we use several in parallel! This is called Multi-Head Attention. Each "head" can focus on different types of relationships between words.
Let's consider the sentence: The chef who won the competition prepared a delicious meal.
Here's a diagram:

This multi-headed approach helps the model understand text from different perspectives, just like how we humans might read a sentence multiple times to understand different aspects of its meaning.
Attention mechanisms have revolutionized natural language processing because they:
The field of LLMs is rapidly evolving, with new techniques and insights emerging regularly. Here are a few areas of active research:
Large language models (LLMs) can sometimes hallucinate details and respond with unsubstantiated answers that are inaccurate with respect to the input context.
The Lookback Lens technique analyzes attention patterns to detect when a model might be generating information not present in the input context.
Researchers are working on extending the context window sizes of LLMs, allowing them to process longer text sequences.
While the math behind attention mechanisms can be complex, the core idea is simple: help the model focus on the most relevant parts of the input when processing each word. This allows language models to understand the context and relationships between words better, leading to more accurate and coherent responses.
Remember, this is just a high-level overview - there's much more to learn about attention mechanisms! Hopefully, this will give you a good foundation for understanding how modern AI models process and understand text.