Reading view
GIT configure in VSCode
Create a Github account:
https://github.com/pradeep-xxx
Create a repository and choose the generated link:
https://github.com/pradeep-xxx/python_workouts.git
Use in VS code Terminal:
PS C:\Users\para\Documents\PYTHON> git init
PS C:\Users\para\Documents\PYTHON> git config --global user.name "Pradeep xxx"
PS C:\Users\para\Documents\PYTHON> git config --global user.email "pradeep.xxxx@gmail.com"
PS C:\Users\para\Documents\PYTHON> git remote add origin https://github.com/pradeep-xxx/python_works.git
PS C:\Users\para\Documents\PYTHON> git add . [OR]
git add ToDoList.py ToDoList2.py todotask.txt todotask2.txt
PS C:\Users\para\Documents\PYTHON> git commit -m "Initial Commit" [OR]
PS C:\Users\para\Documents\PYTHON> git commit -m "Add selected Python and text files" [OR]
PS C:\Users\para\Documents\PYTHON> git commit -m "Add ToDoList.py, ToDoList2.py, todotask.txt, and todotask2.txt"
PS C:\Users\para\Documents\PYTHON> git push --set-upstream origin master [OR -1st time]
PS C:\Users\para\Documents\PYTHON> git push
Redis for Python - via Docker - No direct WSL
Redis doesn’t officially support native Windows installations anymore. Instead of setting up WSL (Windows Subsystem for Linux), Docker is the easier and more modern way to run Redis on a Windows machine.
Installing Docker Desktop gives you a full environment where you can run Redis (and many other tools) without friction.
🔹 Step 1: Install Docker Desktop
Download and install Docker Desktop from:
https://www.docker.com/products/docker-desktop/
Once installed:
Make sure Docker is running (look for the whale icon in your system tray).
Enable WSL2 integration if prompted during installation.
🔹 Step 2: Pull and Run Redis
Open PowerShell or Command Prompt and run:
docker run --name my-redis -p 6379:6379 -d redis
docker ps
🔹 Step 3: Connect to Redis
docker exec -it my-redis redis-cli
set name "DockerRedis"
get name
ping
Install RedisInsight and connect to:
https://redis.io/insight/
Host: localhost
Port: 6379
To find out whether your Windows PC uses an ARM64 or AMD64 (also called x64) architecture, follow these
from Command Prompt you can run:
C:\Users\pepsara>echo %PROCESSOR_ARCHITECTURE%
AMD64
C:\Users\pepsara>docker version
Client:
Version: 28.0.4
API version: 1.48
Go version: go1.23.7
Git commit: b8034c0
Built: Tue Mar 25 15:07:48 2025
OS/Arch: windows/amd64
Context: desktop-linux
Server: Docker Desktop 4.40.0 (187762)
Engine:
Version: 28.0.4
API version: 1.48 (minimum version 1.24)
Go version: go1.23.7
Git commit: 6430e49
Built: Tue Mar 25 15:07:22 2025
OS/Arch: linux/amd64
Experimental: false
containerd:
Version: 1.7.26
GitCommit: 753481ec61c7c8955a23d6ff7bc8e4daed455734
runc:
Version: 1.2.5
GitCommit: v1.2.5-0-g59923ef
docker-init:
Version: 0.19.0
GitCommit: de40ad0
C:\Users\pepsara>docker info
✅ Step-by-Step: Use Redis with Python in VS Code
🔧 1. Install Redis client for Python
In your terminal (inside VS Code), run:
pip install redis
🧪 2. Test Redis Connection in Python
Create a new Python file, e.g., redis_test.py, and add the following code:
import redis
Connect to Redis
r = redis.Redis(host='localhost', port=6379, db=0)
Set a key
r.set('mykey', 'Hello Redis!')
Get the key
value = r.get('mykey')
print(value.decode('utf-8')) # Output: Hello Redis!
Then run it: python redis_test.py
You should see: Hello Redis!
Financial Freedom is a long-term game. Why?

Imagine working hard for years, and then, after some time, reaching a point where you no longer need to work for the rest of your life. You can choose to work if you enjoy it, but otherwise, there’s no obligation. Sounds cool, right?
That is financial freedom. Today, I want to share my insights on financial freedom — why it’s important, how to train the mind psychologically for it, and why it’s a long-term game.
So, without wasting any time, let’s dive in.
What is Financial Freedom?
As I’ve already explained, financial freedom means living life without the need to work when you don’t want to.
Why is it Important?
We all have dreams. I do too. But can we achieve them easily? TBH, no. And why is that?
Because money isn’t readily available to us in the way we need it. However, once you achieve financial freedom, these dreams become possible.
So, how do you achieve it? If you ask me that, here’s what I’d say:
Training the Mind Psychologically
How do we train our minds psychologically, and why should we?
We need to condition our minds to avoid spending money unnecessarily. Many people, including myself, wonder: “I keep saving, but I see no results.”
Hold on — I’m not telling you to just save money aimlessly.
There are various saving and investing strategies, like the 60–40 rule, but I don’t follow them. Instead, I prefer a different approach:
Step 1: Build an Emergency Fund
Imagine your health suddenly declines, and you’re unable to work. What happens to your family if they depend on your salary? That’s why you need an emergency fund.
Personal Advice: Don’t save money just as cash. Instead, buy gold.
Many might think, “Okay, Anand, then I’ll buy gold jewelry.” But no, you need to buy gold coins or biscuits, depending on the amount you can invest. Your emergency fund should cover at least one year of expenses.
Why gold? Because of inflation, currency depreciation, and more. TBH, if I were to write about it, it would take at least two or more blogs. But to keep it simple, buy gold and store it safely for emergency situations.
Step 2: Get Insurance
Once you’ve secured an emergency fund, you’re slightly safe. Even if you face job loss or an unexpected crisis, you won’t be in immediate financial trouble.
The next step is taking out insurance for yourself and your family.
But TBH, insurance can be a headache. Choosing the wrong one becomes an unnecessary financial burden. So, do your research — watch YouTube videos, compare policies, and make an informed decision.
Step 3: Investing in Stocks and Bonds
At this stage, you now have an emergency fund + insurance, so you’re financially safer for the time being.
Now, it’s time to learn about the stock market and bonds and start investing.
Alert: I am not a SEBI-registered financial advisor; I am only sharing my personal thoughts.
Study stocks — understand their book value, integrity, and overall market behavior before investing. If you’re wondering where to learn about this, I recommend checking out Almost Everything, Animated Book Show, and Money Pechu — they provide great book summaries on stock market investing and psychology.
If you have extra money, don’t put it all in an FD (Fixed Deposit) because FD returns don’t even match inflation. Instead, consider bonds.
Salary Breakdown
Your salary should be distributed as follows:
Salary = Insurance + Investment + Expenses
Pay for insurance and investments first, then spend on expenses. If you spend first, you’ll struggle to invest. It’s human nature, boss.
Other Important Financial Practices
1. Practice Delayed Gratification:
Whenever you want to buy something, don’t purchase it immediately — even if you have the money. Stop yourself.
Wait for days, weeks, or even months. If, after a month, you still genuinely need it, then buy it.
Trust me, when you follow this method, you’ll notice that most of the things you initially wanted weren’t necessary. I am 100% sure about this.
2. Follow Your Mother’s Budgeting Practices:
Your mother is an excellent guide for financial management. TBH, I was shocked to realize that, despite studying personal finance extensively, my mother was already applying many smart financial practices — except investing.
Learn from her in areas like expense tracking, monthly budgeting, and financial discipline.
3. Avoid Spending via UPI Payments:
If you make transactions using UPI, even spending ₹10,000 won’t feel like a big deal. But when you pay in cash, you will hesitate — and that hesitation helps control spending.
Psychology Matters in Investing
Whenever you study investment-related content — whether through books, podcasts, or videos — also listen to at least one book on psychology.
Psychology plays a huge role in financial decisions.
Financial Freedom: A Long-Term Game
If you follow these principles for 10 to 20 years, your returns will be unbelievable.
Some may react by saying, “Are you kidding me? What will I do after achieving financial freedom in 10–20 years?”
Here’s my reply: Even Warren Buffett, one of the greatest investors in the world, became a billionaire at age 55.
Just think about it. I don’t want to scare you, but this is reality. Many jobs aren’t permanent, and financial security ensures an enjoyable life, not just for you but for your entire family.
TBF, following all these steps is tough — even for me. I’m still a beginner, like you. But compared to most people, I might be on step 5 or 10.
Final Thoughts
As already said, when you feel this content is valuable, follow me for more upcoming Blogs.
Connect with Me:
- LinkedIn: Anand Sundaramoorthy
- Instagram: @anandsundaramoorthysa
- Email: sanand03072005@gmail.com
Weekly report 19 2025
- Last weekend, Kids had their talent show at Tamil school. Happy to see all the kids in school, participated and performed well.
- Spring is here in Canada. Its time for Cherry Blossoms. We visited High park and Kariya Park. Happy to see the trees with pink/rose colors. Read more here about it. https://en.wikipedia.org/wiki/Cherry_blossom
- Attended KanchiLUG meet on sunday morning. If you know tamil and in Tech, dont miss the thoughtful discussions at KanchiLUG meet, every sunday. Check the calendar here – https://kaniyam.com/events/
- At the meet, we discussed collecting open data for tamil. After the meet, wrote a code for scrapping for wordpress code and started to scrap the contents in CC license. Working on adding more features like resuming when stopped, alerts etc. Will share code and data soon.
- Gave a online Talk on Tamil data collection on 05.05.2025. Will share the video soon.
- Released few videos on GenAI in tamil, by Nithya. Watch them here – https://www.youtube.com/nithyaduraisamy
- I am using facebook in computer. Annoyed by the short videos, advertisements, was looking for a way to get cleaner content. I want only the content from my friends, the pages I follow and the groups I am in. I dont want any other thing. Fortunately, found a nice firefox plugin. fbcleaner – https://addons.mozilla.org/en-US/firefox/addon/fbcleaner/
With this plugin, the timeline is a breeze. It is available only for computer. Use this and save time. - By using computer, to access social media, I am more mindful. Not spending too much time there.
- Completed reading two books. I am enjoying reading the physical books nowadays.
1. எம்டன் செல்வரத்தினம், சென்னையர் கதைகள்
2. நரகத்தில் இருந்து ஒரு குரல் – சாரு நிவேதிதா - Took G1 test for car driving. It is like LLR in india. After getting G1, we can learn driving car. After some 8 months, we can get G2 license, to drive car alone. Will learn car driving soon.
Weekly notes 16-17 2025
Last two weeks went super busy with office work, reading, library visits and few events.
Reading:
Completed reading the original book and rewritten version of “பெண் ஏன் அடிமையானாள்?” “Why women became slave?” by originally written by Periyar. That book describes why Indian women are still slaves of family, society due to various reasons like marriage, childcare etc.
The sad part is, even though that book was written few decades ago, it is still relevant.
Like any other devotional books/stories are retold for every generation, this book should also be rewritten,
once in every 10-20 years and it should be told on all modern formats like audio books, drama, shortfilms, shorts etc.
Reviewing and editing that rewritten version is one of the most satisfying action I did this year.
Hope we can release this as a print edition and free ebook edition. Checking with few contacts to publish this. Will share the progress soon.
Still reading the book “Attention Span”. May take few weeks to complete.
Easter:
Kids got some 4 days holidays due to Easter. They all went for a Easter egg hunting event.
HeartComonos:
At HeartComonos, a social non profit organization, is conducting many free events here. Participated on a Bollywood dance event with family. Celebrated its lead Hardy’s birthday, along with fun filled dancing.
Helped to capture the wonderful moments with Camera.
Library visit:
On the weekend, we visited Mississauga Central Library. It is one of the best places, as a family, we like to go anytime. Just being surrounded by million books itself a great feeling. Viyan is reading a lot. Iyal is still trying to read. Paari is yet to learn reading, but he can turn pages of books one by one for many hours. There are good comics books available. Both Iyal and Paari are creating their own stories, just by seeing and turning the pages. What else we need for kid’s mind to be filled with imagination?
Upcoming talk on Open Licensed Tamil dataset collection:
On May 05 2025, I will be giving an online talk on curation of open licensed tamil dataset.
Preparing for the talk along with collecting open data in Tamil.
KanchiLUG meets:
Every sunday IST evening hours, ( my mornings) are going useful with interesting discussions on Linux,
Free/Open Source software etc.
check https://kaniyam.com/events and subscribe to the calendar there for more interesting events.
Tamil Skills contest for kids:
Last saturday, attended a contest for kids with viyan. Good to see that around 100+ kids participated on the contest on Skills for Tamil reading,writing and speaking. viyan participated with last min preparation.
Next year, hope all three kids will attend. Happy to see many friends like Natkeeran, Suba, Kent, Selvanayaki madam.Took care of capturing some wonderful moments of the events.
After the event, spent few hours in a library at Toronto Downtown. I skimmed on few books on black/white photography, Instagram posting, video making and Toronto Photographers collection etc. Discussing many things with viyan is one of my favourite things. When we travel along, we talk about many things like world history, war, mythology, comics, manga, atheism, Tamilnadu political history etc.
ComicCon Mississauga:
Sunday, attended an event for Comics and Toy Collections. Around 100 sellers were selling old comics books, unopened hero toys. There were many kids buying those stuffs. I was wondering to see, there were many adults standing in line, exploring the old comics and toys, and buying them with wide open eyes.
First they create a cha rector, then bring as comic books, then toys, then computer games, then graphic novel, then text novel, then movies. This is how all the childhood characters are becoming immortal. The business behind this is very huge. Thinking why we the Indians can not bring such huge cycle of business, even though we have tons of stories. Among all the mythological stories, there are very little for children. We have to create more stories and do business with them.
Nithya’s Video series on GenAI
Nithya started text series on GenAI at Kaniyam.com and a video series on her youtube channel, in Tamil. We had some good outdoor shooting for the intro video. Released the first video here

Task 6: Tuple
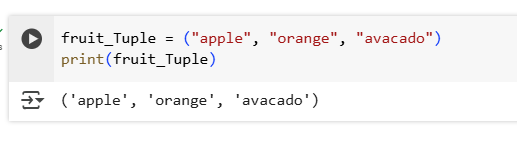
1.Create a tuple containing the names of three fruits. Print the tuple and its type.
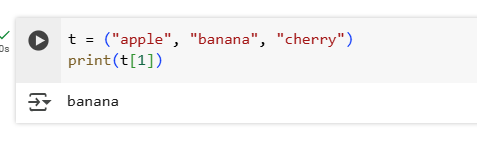
2.Given a tuple t = ("apple", "banana", "cherry"), access and print the second element.
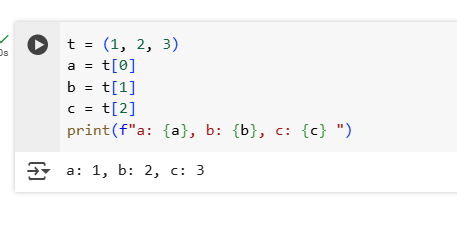
3.Unpack the tuple t = (1, 2, 3) into variables a, b, and c, and print the variables.
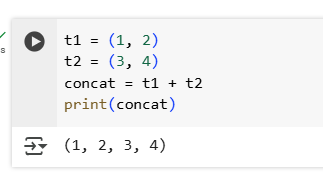
4.Concatenate two tuples t1 = (1, 2) and t2 = (3, 4) and print the result.
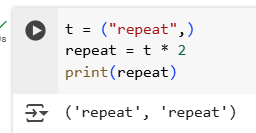
5.Create a tuple t = ("repeat",) and repeat it three times. Print the resulting tuple.
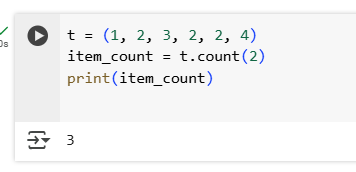
6.Given a tuple t = (1, 2, 3, 2, 2, 4), count the number of times the number 2 appears.
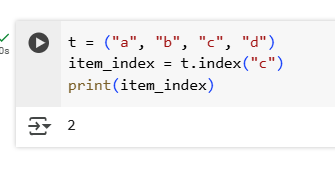
7.Given a tuple t = ("a", "b", "c", "d"), find the index of the element "c".
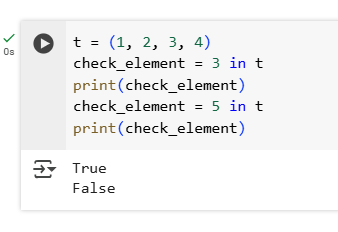
8.Check if the element 5 is present in the tuple t = (1, 2, 3, 4)
9.Find and print the length of the tuple t = ("one", "two", "three").

10.Slice the tuple t = (0, 1, 2, 3, 4, 5) to obtain a sub-tuple containing only the elements from index 2 to 4.

11.Create a nested tuple representing a 2D point (x, y) = ((1, 2), (3,
4)). Access and print the second coordinate of the second point.

12.Try to change the value of the first element in the tuple t = (1, 2, 3) and observe what happens.

13.Convert a list l = [1, 2, 3] to a tuple and print the result. Then convert a tuple t = (4, 5, 6) to a list and print the result.

14.Create a tuple with a single item 5 and verify its type is a tuple.

15.Iterate over the tuple t = ("ParottaSalna", "is", "good") and print each element.
16.Convert the string "hello" into a tuple of characters.
17.Convert a dictionary d = {"one": 1, "two": 2} into a tuple of its items.
18.Write a function that takes a tuple of numbers and returns the sum of the numbers.
19.Use tuples as keys in a dictionary to represent points on a grid. For example, grid = {(0, 0): "origin", (1, 2): "point A"}.
Task 5: Python Function
1.Write a function greet that takes a name as an argument and prints a greeting message.

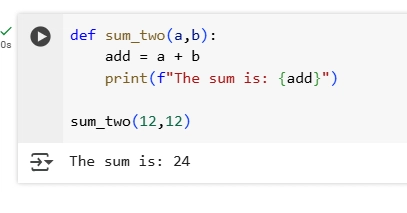
2.Write a function sum_two that takes two numbers as arguments and returns their sum.
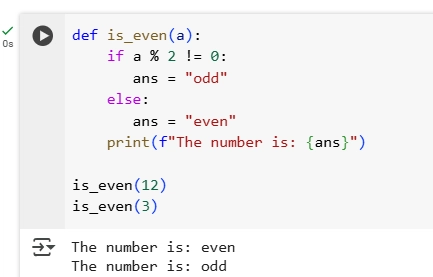
3.Write a function is_even that takes a number as an argument and returns True if the number is even, and False if it is odd.
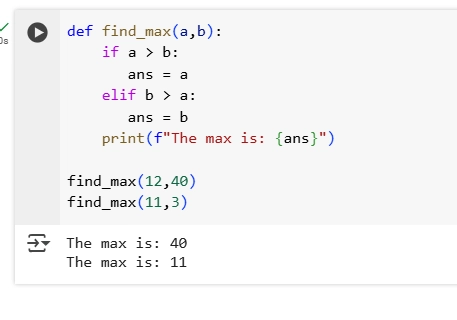
4.Write a function find_max that takes two numbers as arguments and returns the larger one.
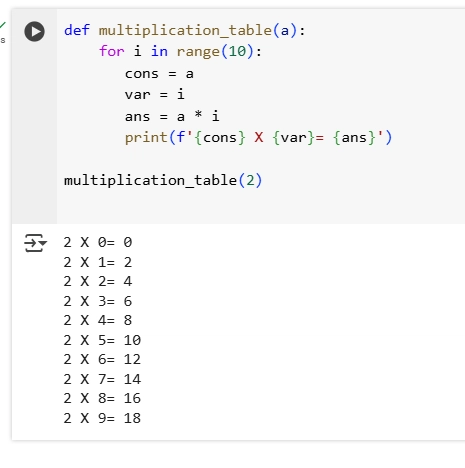
5.Write a function multiplication_table that takes a number n and prints the multiplication table for n from 1 to 10.

6.Write a function celsius_to_fahrenheit that takes a temperature in Celsius and returns the temperature in Fahrenheit.

7.Write a function power that takes two arguments, a number and an exponent, and returns the number raised to the given exponent. The exponent should have a default value of 2.

TASK 4: Python Lists
1.Create a list of five delivery items and print the third item in the list. eg: [“Notebook”, “Pencil”, “Eraser”, “Ruler”, “Marker”]

2.A new delivery item “Glue Stick” needs to be added to the list. Add it to the end of the list and print the updated list.

3.Insert “Highlighter” between the second and third items and print the updated list.

4.One delivery was canceled. Remove “Ruler” from the list and print the updated list.

5.The delivery man needs to deliver only the first three items. Print a sublist containing only these items.

6.The delivery man has finished his deliveries. Convert all item names to uppercase using a list comprehension and print the new list.

7.Check if “Marker” is still in the list and print a message indicating whether it is found.

8.Print the number of delivery items in the list.

9.Sort the list of items in alphabetical order and print the sorted list.

10.The delivery man decides to reverse the order of his deliveries. Reverse the list and print it.

11.Create a list where each item is a list containing a delivery item and its delivery time. Print the first item and its time.
12.Count how many times “Ruler” appears in the list and print the count.

13.Find the index of “Pencil” in the list and print it.

14.Extend the list items with another list of new delivery items and print the updated list.

15.Clear the list of all delivery items and print the list.

16.Create a list with the item “Notebook” repeated three times and print the list.

17.Using a nested list comprehension, create a list of lists where each sublist contains an item and its length, then print the new list.

18.Filter the list to include only items that contain the letter “e” and print the filtered list.

19.Remove duplicate items from the list and print the list of unique items.

TamilKavi: Release of Python Package & Dataset
Hi guys 👋
Today, I want to share something unexpected. To be honest, if someone had told me a month ago that I could do this, I wouldn’t have believed them. But here we are — I’ve finally released a Python package and dataset called TamilKavi. I still can’t believe I pulled it off, but it’s real!
I’d love to share the whole story with you. Many of you already know me — I write Tamil poetry and have even published two books. However, I faced font issues when trying to release them on Amazon and Kindle. Frustrated, I reached out to my community friend, Hari, and I asked them:
“Bro, I want to release my Tamil poetry book on Amazon, but I’m stuck with font issues. Do you know anyone who can solve it?”
Hari referred me to Ayyanar Bro, and to me it’s a surprise, he was from Madurai — what a coincidence! We spoke almost four times a week for different reasons. I had already written about him and his portfolio website, which he built using Emacs & Org, so I won’t go into more details — you guys might find it repetitive.
Through Ayyanar Bro, I learned about the Tamil Kanchilung community and FreeTamilBooks, where I finally found a solution to my font issue. But here’s another twist — FreeTamilBooks required more poetry for my book release. Because I like to release that in FreeTamilBooks.Then another book on Amazon. That was another headache because, with my tight schedule, I barely had time to write.
While navigating all this, I discovered Tamilrulepy, a Python package with Tamil grammar rules. I was eager to learn more, and unexpectedly, I got an opportunity to contribute to it! That’s when I met Boopalan — another passionate tech enthusiast like me. He helped me write code for TamilRulePy and even invited me to contribute to TamilString, a Python package for documentation. I accepted his invitation and started working on it.
Then, during one of our conversations, I got an idea: why not develop my own Python package? And that’s how TamilKavi was born.

I shared my idea with Boopalan and invited him to build it as a team because, honestly, I’m no expert. But it wasn’t easy — we had to overcome countless challenges, especially since we were both preparing for our model exams and semester exams (he’s an MSc student, and I’m a BSc student). It was a tough time, but I didn’t give up. I studied, understood, and gradually started coding — not entirely on my own, of course.
Now, you might wonder — why build a website? Simple: to collect data from authors. But due to financial constraints, the data collected through the website idea transformed into a Google Form, and now it is a navigation button. It’s another story altogether. Since I had no time, I built a basic structure using Lovable.dev and handed it over to my juniors, Gagan & Rohith, who took care of the website.
The final result? Release of the Python package & website!
I must especially thank Praveen Bro — my community brother and mentor. Without hesitation, he offered me a subdomain. For me, that’s a huge deal, and I’m incredibly grateful!
“Okay thambi, enough of this English talk — why did you release the dataset?” When you ask me likewise.
Well, there’s a reason for that, too. I’ve seen Selvakumar Duraipandian Bro on LinkedIn about their post of numerous Tamil datasets on Hugging Face, including Thirukkural, Tholkappiyam, and more. I was truly inspired by his work. So, I release that as a Dataset.
Now, you might ask, “So, thambi, after all this talk, what does your package actually do?”
It’s simple — TamilKavi helps discover new Tamil poems. That’s all. Now your mind is
“Edhuka evalo seenu?”
Well, I’m not just a developer. The person who is are Tamil poet & tech enthusiast, it’s a crazy project. Through this journey, I’ve learned so much, especially about GitHub workflows.
When you feel this content is valuable, follow me for more upcoming Blogs.
Connect with Me:
- LinkedIn: Anand Sundaramoorthy
- Instagram: @anandsundaramoorthysa
- Email: sanand03072005@gmail.com
TASK 3: Slicing & Indexing
1.Write a function that takes a string and returns a new string consisting of its first and last character.
2.Write a function that reverses a given string.
3.Given a string, extract and return a substring from the 3rd to the 8th character (inclusive).

4.Write a function that returns every second character from a given string.

5.Write a function that replaces the middle third of a string with asterisks. If the length of the string is not divisible by 3, adjust the middle third accordingly.
6.Write a function that checks if a given string is a palindrome (reads the same backward as forward).
7.Given an email address, extract and return the domain.
Ans: How to find incase there are multiple occurrences? Loop?


8.Write a function that returns every third character from a given string.

9.Write a function that extracts and returns characters at even indices from a given string.

10.Write a function that skips every second character and then reverses the resulting string.

TASK 2: Constants and Variables
1.Create a variable named name and assign your name to it. Then print the value of the variable.

2.Create a variable age and assign your age to it. Later, reassign the variable with a new value and print the new value.

3.Assign the values 5, 10, and 15 to three variables a, b, and c in a single line. Print their values.
Ans:TypeError on 4th statement, because we're trying to concatenate integers (a, b, c) with strings

4.Swap the values of two variables x and y without using a third variable. Print their values before and after swapping.

5.Define constants PI with appropriate values and print them.
Ans: constants are typically written in all uppercase letters with underscores separating words. However, Python does not enforce this, so constants are not truly immutable. You can still override.

6.Write a program that calculates the area of a circle using the constant PI and a variable radius. Print the area.
Ans: ** is Squared

7.Define constants for the length and width of a rectangle. Calculate and print the area.

8.Define a constant for π (pi) and a variable for the radius. Calculate and print the circumference of the circle.

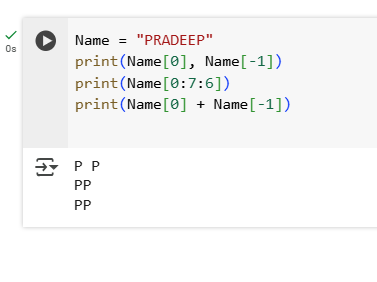
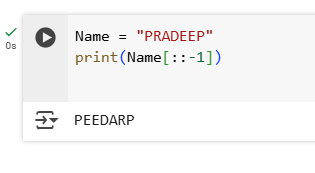
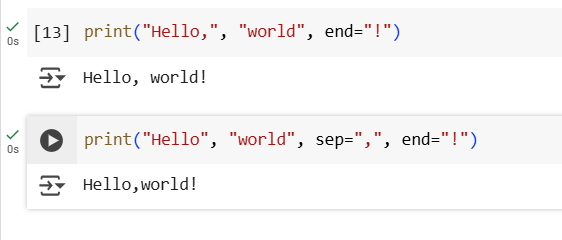
TASK 1: Python – Print exercises
1.How do you print the string “Hello, world!” to the screen?
Ans: Using sep and end Parameters is preferred way.
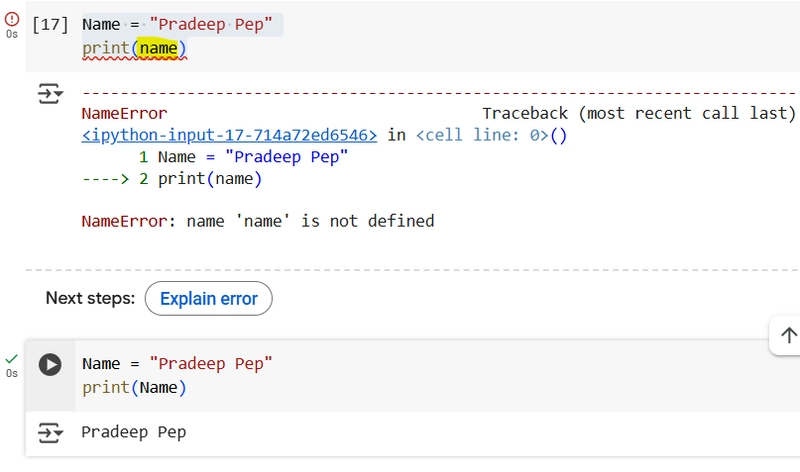
2.How do you print the value of a variable name which is set to “Syed Jafer” or Your name?
Ans: Note the Variable is case sensitive
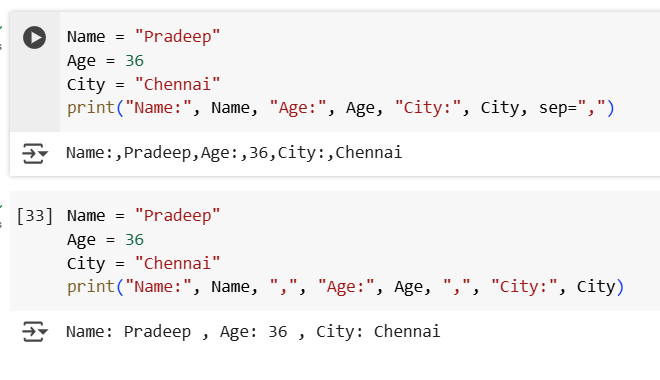
3.How do you print the variables name, age, and city with labels “Name:”, “Age:”, and “City:”?
Ans: Using keyword sep="," brings in , between the Variable Name and Value itself, so avoid
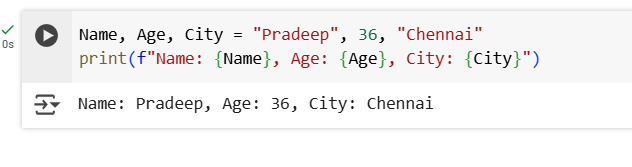
4.How do you use an f-string to print name, age, and city in the format “Name: …, Age: …, City: …”?
Ans: To insert variables directly into the string used f-string
Also, you can assign values to multiple variables in a single line as seen in 1st line
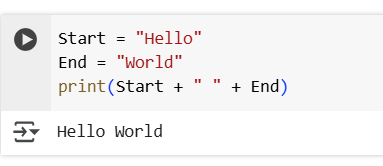
5.How do you concatenate and print the strings greeting (“Hello”) and target (“world”) with a space between them?
Ans: + is used to concat the items
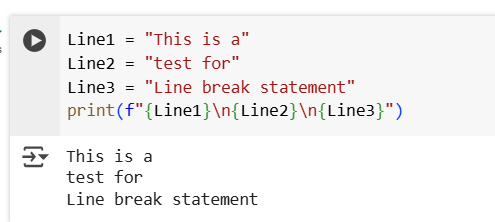
6.How do you print three lines of text with the strings “Line1”, “Line2”, and “Line3” on separate lines?****
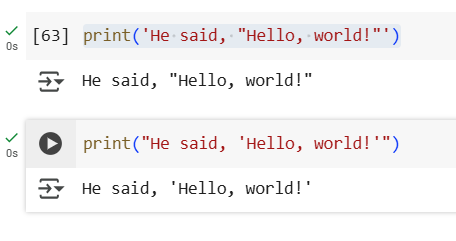
7.How do you print the string He said, "Hello, world!" including the double quotes?
Ans: To print quotes inside a string, you can use either single or double quotes to enclose the string and the other type of quotes inside it.
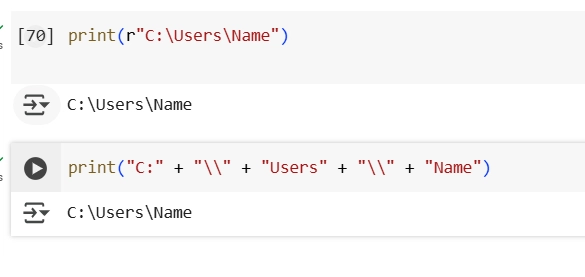
8.How do you print the string C:\Users\Name without escaping the backslashes?
Ans: you can also use a literal backslash "\" when using Concat or Try with 'r' to treat backslashes as literal characters
9.How do you print the result of the expression 5 + 3?

10.How do you print the strings “Hello” and “world” separated by a hyphen -?

11.How do you print the string “Hello” followed by a space, and then print “world!” on the same line?

12.How do you print the value of a boolean variable is_active which is set to True?

13.How do you print the string “Hello ” three times in a row?

14.How do you print the sentence The temperature is 22.5 degrees Celsius. using the variable temperature?

15.How do you print name, age, and city using the .format() method in the format “Name: …, Age: …, City: …”?

16.How do you print the value of pi (3.14159) rounded to two decimal places in the format The value of pi is approximately 3.14?
Ans: pi is the variable & .2f formats it as a floating-point number with 2 digits after the decimal

17.How do you print the words “left” and “right” with “left” left-aligned and “right” right-aligned within a width of 10 characters each?

Spring boot annotation used in entity class
Class based Annotation:
- @Entity – used to indicates the class is below to JPA entites.
- @Table – is used to indicates the table name.
- @MappedSuperClass – is used to parent entity, which can be inherited by many entities, but it won’t be mapped to its own table. we cannot use @Entity annotation on this class.
@MappedSuperclass
public abstract class BaseEntity implements Serializable {

    @Id
    @GeneratedValue(strategy = GenerationType.IDENTITY)
    private Long id;

    // Getters and setters
    public Long getId() {
        return id;
    }

    public void setId(Long id) {
        this.id = id;
    }
}

@Entity
@Table(name = "employees")
public class Employee extends BaseEntity {

    private String firstName;
    private String lastName;

    // Constructors, getters, setters, other fields...
}
- In this example, the
BaseEntityclass is annotated with@MappedSuperclass. It contains the common fields that you want to share across multiple entity classes. - The
Employeeclass inherits fromBaseEntity, effectively inheriting theidfield from the superclass. - By using
@MappedSuperclass, you’re able to create a common base class for your entity hierarchy while allowing each subclass to include additional fields and annotations specific to their needs. - This promotes code reusability and maintains a clean and structured entity hierarchy.
Primary Keys
- Define a primary key using @Id.
- Use @GeneratedValue with appropriate strategy for generating primary key values (e.g., GenerationType.IDENTITY, GenerationType.SEQUENCE)
@Entity
public class Product {
    @Id
    @GeneratedValue(strategy = GenerationType.IDENTITY)
    private Long id;
    // other fields, getters, setters
}
Associations
It says the relationship between two entity class.
- Use @OneToOne, @OneToMany, @ManyToOne, and @ManyToMany to define relationships between entities.
- Use fetch attribute to control loading behavior (e.g., LAZY or EAGER).
- Utilize mappedBy to define the owning side of bidirectional relationships.
@Entity
public class Department {
    @Id
    @GeneratedValue(strategy = GenerationType.IDENTITY)
    private Long id;
    private String name;

    @OneToMany(mappedBy = "department",cascade=CascadeType.ALL)
    private List<Employee> employees;

    // Constructors, getters, setters, other fields...
}

@Entity
public class Employee {
    @Id
    @GeneratedValue(strategy = GenerationType.IDENTITY)
    private Long id;
    private String firstName;
    private String lastName;

    @ManyToOne
    @JoinColumn(name = "department_id")
    private Department department;

    // Constructors, getters, setters, other fields...
}
Cascading Operations
- Use cascade attribute to specify cascading operations (e.g., CascadeType.ALL, CascadeType.PERSIST).
- Be cautious with cascading DELETE to avoid unintentional data loss.
import javax.persistence.*;
import java.util.List;

@Entity
public class Author {
    @Id
    @GeneratedValue(strategy = GenerationType.IDENTITY)
    private Long id;
    private String name;

    @OneToMany(mappedBy = "author", cascade = CascadeType.ALL, orphanRemoval = true)
    private List<Book> books;

    // Constructors, getters, setters, other fields...
}

@Entity
public class Book {
    @Id
    @GeneratedValue(strategy = GenerationType.IDENTITY)
    private Long id;
    private String title;

    @ManyToOne
    @JoinColumn(name = "author_id")
    private Author author;

    // Constructors, getters, setters, other fields...
}
- CascadeType.ALL: This option specifies that all operations (e.g., persist, merge, remove) should be cascaded from the parent entity (
Author) to the child entity (Book). - orphanRemoval = true: This option specifies that when an
Authorentity’s reference to aBookentity is removed from thebookscollection, the orphanedBookentity should also be removed from the database
When you perform a cascading operation on the Author entity, the corresponding operation will cascade to the associated Book entities. For instance.
Author author = new Author();
author.setName("J.K. Rowling");

Book book1 = new Book();
book1.setTitle("Harry Potter and the Sorcerer's Stone");
book1.setAuthor(author);

Book book2 = new Book();
book2.setTitle("Harry Potter and the Chamber of Secrets");
book2.setAuthor(author);

author.setBooks(Arrays.asList(book1, book2));

// Cascading persist: Saving the author will also save both associated books.
entityManager.persist(author);
Likewise, cascading operations work for merge, remove, and other entity operations, reducing the need for explicitly managing related entities persistence.
Validation
Use validation annotations (@NotNull, @Size, etc.) to enforce data integrity constraints directly in the entity class.
Combine JPA validation with Spring’s @Valid annotation to automatically validate incoming data.
@Entity
public class Post {
    @Id
    @GeneratedValue(strategy = GenerationType.IDENTITY)
    private Long id;

    @NotBlank(message = "Title is required")
    @Size(max = 100, message = "Title must be at most 100 characters")
    private String title;

    @OneToMany(mappedBy = "post", cascade = CascadeType.ALL)
    private List<Comment> comments;

    // Constructors, getters, setters, other fields...
}

@Entity
public class Comment {
    @Id
    @GeneratedValue(strategy = GenerationType.IDENTITY)
    private Long id;

    @NotBlank(message = "Text is required")
    @Size(max = 500, message = "Text must be at most 500 characters")
    private String text;

    @ManyToOne
    @JoinColumn(name = "post_id")
    private Post post;

    // Constructors, getters, setters, other fields...
}
Auditing
- Implement entity auditing by adding fields like @CreatedBy, @CreatedDate, @LastModifiedBy, and @LastModifiedDate for tracking who created or modified an entity and when.
- Utilize Spring’s @EntityListeners to manage the auditing behavior.
@EntityListeners(AuditingEntityListener.class)
@MappedSuperclass
public abstract class Auditable {
    @CreatedBy
    protected String createdBy;

    @CreatedDate
    @Column(nullable = false, updatable = false)
    protected LocalDateTime createdDate;

    @LastModifiedBy
    protected String lastModifiedBy;

    @LastModifiedDate
    protected LocalDateTime lastModifiedDate;

    // Getters and setters...
}
- @EntityListeners(AuditingEntityListener.class): This annotation specifies that this entity should be audited using the provided entity listener class. Spring Data JPA will automatically update the auditing fields before persisting or updating the entity.
- @MappedSuperclass: This annotation indicates that this class is not an entity itself but serves as a base class for other entities. It allows attributes and behaviors to be inherited by other entities.
- @CreatedBy: This annotation specifies the field to store the username of the user who created the entity.
- @CreatedDate: This annotation marks the field to store the timestamp when the entity was created. The nullable and updatable properties are set to false to ensure that this field is populated during creation and not updated afterwards.
- @LastModifiedBy: This annotation specifies the field to store the username of the user who last modified the entity.
- @LastModifiedDate: This annotation marks the field to store the timestamp when the entity was last modified.
By implementing auditing, you can track who created or modified entities and when those actions occurred. This information can be invaluable for monitoring and maintaining your application’s data.
Enums and Enumerated Types
- Use Java enums for fields with predefined values.
- Annotate enum fields with @Enumerated(EnumType.STRING) to store enum values as strings in the database.
@Entity
public class Task {
    @Id
    @GeneratedValue(strategy = GenerationType.IDENTITY)
    private Long id;

    @Enumerated(EnumType.STRING)
    private TaskStatus status;
    // other fields, getters, setters
}

public enum TaskStatus {
    TODO, IN_PROGRESS, DONE
}
Reference:
- https://medium.com/@bubu.tripathy/best-practices-entity-class-design-with-jpa-and-spring-boot-6f703339ab3d
- https://medium.com/@bubu.tripathy/best-practices-entity-class-design-with-jpa-and-spring-boot-6f703339ab3d
To-Do Application on Spring boot
I am going to create To-do list.
Spring boot dependencies.
- spring boot web
- jdbc postgreSQl driver
- spring- JPA
- Thyme-leaf
Entities
I am going to create two entities. They are task and Todo. It has one to many, It means todo has many task. Create the field and getter and setter methods.
TodoList class
It has id, name and List<Task>. Create getter and setter method.
Then we create bidirectional relationship between todo have task. so we create mappedBy the todo object on task. so task can create foreign key for todo list.
@Entity
public class TodoList {
	@Id
	@GeneratedValue(strategy = GenerationType.IDENTITY)
	private Integer id;
	private String name;

	@OneToMany(mappedBy = "todoList", cascade = CascadeType.ALL, orphanRemoval = true,fetch = FetchType.EAGER)
	private List<Task> taskList= new ArrayList<>();

	@ManyToOne
	@JoinColumn(name = "user_idn")
	private Users users;
	// no-arg constructor and getter and setter
}
Task class
It has id and name and todo object. Then we create getter and setter method.
The foreign key create in this table, because we mapped this todo object is mapped on that class. joinColumn name is the foreign key name.
@Entity
public class Task {
	@Id
	@GeneratedValue(strategy = GenerationType.IDENTITY)
	private Integer id;
	private String name;
	private boolean status;
//	private Locale locale; // date and time

	@ManyToOne
	@JoinColumn(name = "todo_list_id")
	private TodoList todoList;
}
Repository Interface
Simple that create two interface one for task and todo which can extend the JPARepository.
public interface TaskRepository extends JpaRepository<Task, Long> {
     }

     public interface TaskRepository extends JpaRepository<Task, Long> {
     }
DB and JPA configuations
 spring.datasource.url=jdbc:postgresql://localhost:5432/login
spring.datasource.username=progres
spring.datasource.password=1234
spring.datasource.driver-class-name=org.postgresql.Driver

spring.jpa.hibernate.ddl-auto=update
spring.jpa.show-sql=true
spring.jpa.properties.hibernate.format_sql=true
spring.jpa.database-platform= org.hibernate.dialect.PostgreSQLDialect
Controller class with html
We are going to create 7 task with frontend html with thyme leaf. Map the class with “/todos” using @RequestMapping.
Click the arrow or triange (|>) to see full details.
1. show all todo list
It method is used to default page of /todos page. It have List of Todo and newlist which can return to html page.
@GetMapping
    public String listTodoLists(Model model) {
        model.addAttribute("todoLists", todoListRepository.findAll());
        model.addAttribute("newTodoList", new TodoList());
        return "todo-lists";
    }
2. create the todo list
Then we press create list button on html. we got newlist from getMapping that List pass through @modelAttribute. That list can save in repository.
  @PostMapping
    public String createTodoList(@ModelAttribute TodoList todoList) {
        todoListRepository.save(todoList);
        return "redirect:/todos";
    }
3. show tasks from todo list
Then we enter into the a list, it have many task. That can be shown by this method. we get the list by id and we pass that list of task and new task to html.
     @GetMapping("/{listId}")
    public String viewTodoList(@PathVariable Long listId, Model model) {
        TodoList todoList = todoListRepository.findById(listId)
            .orElseThrow(() -> new IllegalArgumentException("Invalid list id"));

        model.addAttribute("todoList", todoList);
        model.addAttribute("newTask", new Task());
        return "tasks";
    }
4. create the task from todo list
Then we press create task button on html. we got new task from getMapping that task pass through @modelAttribute. That list can save in repository.
  // Add task to a todo list
    @PostMapping("/{listId}/tasks")
    public String addTask(@PathVariable Long listId, @ModelAttribute Task task) {
        TodoList todoList = todoListRepository.findById(listId)
            .orElseThrow(() -> new IllegalArgumentException("Invalid list id"));

        task.setTodoList(todoList);
        taskRepository.save(task);
        return "redirect:/todos/" + listId;
    }
5. Toggle the task or not
Then we press todo checkbox it can be tick. Same find the task by taskId. That task setCompleted and save it again in task. Return redirect://todos/+listId, it redirect to getMapping or this Todo List.
     // Toggle task completion status
    @PostMapping("/{listId}/tasks/{taskId}/toggle")
    public String toggleTask(@PathVariable Long listId, @PathVariable Long taskId) {
        Task task = taskRepository.findById(taskId)
            .orElseThrow(() -> new IllegalArgumentException("Invalid task id"));

        task.setCompleted(!task.isCompleted());
        taskRepository.save(task);
        return "redirect:/todos/" + listId;
    }
6. delete the todo list
Then we press delete button from list on html. we remove from repository. Return the getMapping of current list.
     @PostMapping("/{listId}/delete")
    public String deleteTask(@PathVariable Long listId) {
        taskRepository.deleteById(taskId);
        return "redirect:/todos/" + listId;
    }
7. delete the task from task list
Then we press delete button on html. We delete task from task repository. We return and redirect to getmapping of current task list.
  @PostMapping("/{listId}/delete")
    public String deleteTodoList(@PathVariable Long listId) {
        todoListRepository.deleteById(listId);
        return "redirect:/todos";
    }
Controller full code
  @Controller
@RequestMapping("/todos")
public class TodoController {

    @Autowired
    private TodoListRepository todoListRepository;

    @Autowired
    private TaskRepository taskRepository;

    // Show all todo lists
    @GetMapping
    public String listTodoLists(Model model) {
        model.addAttribute("todoLists", todoListRepository.findAll());
        model.addAttribute("newTodoList", new TodoList());
        return "todo-lists";
    }

    // Create new todo list
    @PostMapping
    public String createTodoList(@ModelAttribute TodoList todoList) {
        todoListRepository.save(todoList);
        return "redirect:/todos";
    }

    // Show tasks from todo list
    @GetMapping("/{listId}")
    public String viewTodoList(@PathVariable Long listId, Model model) {
        TodoList todoList = todoListRepository.findById(listId)
            .orElseThrow(() -> new IllegalArgumentException("Invalid list id"));

        model.addAttribute("todoList", todoList);
        model.addAttribute("newTask", new Task());
        return "tasks";
    }

    // Add task to a todo list
    @PostMapping("/{listId}/tasks")
    public String addTask(@PathVariable Long listId, @ModelAttribute Task task) {
        TodoList todoList = todoListRepository.findById(listId)
            .orElseThrow(() -> new IllegalArgumentException("Invalid list id"));

        task.setTodoList(todoList);
        taskRepository.save(task);
        return "redirect:/todos/" + listId;
    }

    // Toggle task completion status
    @PostMapping("/{listId}/tasks/{taskId}/toggle")
    public String toggleTask(@PathVariable Long listId, @PathVariable Long taskId) {
        Task task = taskRepository.findById(taskId)
            .orElseThrow(() -> new IllegalArgumentException("Invalid task id"));

        task.setCompleted(!task.isCompleted());
        taskRepository.save(task);
        return "redirect:/todos/" + listId;
    }

    // Delete a task
    @PostMapping("/{listId}/tasks/{taskId}/delete")
    public String deleteTask(@PathVariable Long listId, @PathVariable Long taskId) {
        taskRepository.deleteById(taskId);
        return "redirect:/todos/" + listId;
    }

    // Delete a todo list
    @PostMapping("/{listId}/delete")
    public String deleteTodoList(@PathVariable Long listId) {
        todoListRepository.deleteById(listId);
        return "redirect:/todos";
    }
}
Html code
Html has two page one for todo list and another for task list.
Todo list.html
<!DOCTYPE html>
<html xmlns:th="http://www.thymeleaf.org">
<head>
    <title>Todo Lists</title>
	<link rel="icon" type="image/x-icon" href="/aaeranLogo.ico" />
    <link href="https://cdn.jsdelivr.net/npm/bootstrap@5.3.0/dist/css/bootstrap.min.css" rel="stylesheet">
</head>
<body>
<div class="container mt-4">
    <h1>My Todo Lists</h1>
	    <!-- Form to create new todo list -->
    <form th:action="@{/todos}" th:object="${newTodoList}" method="post" class="mb-4">
        <div class="input-group">
            <input type="text" th:field="*{name}" class="form-control" placeholder="New list name" required>
            <button type="submit" class="btn btn-primary">Create List</button>
        </div>
    </form>

	<!-- display the todo list -->
    <div th:each="todoList : ${todoLists}" class="card mb-3">
        <div class="card-body">

		   <h2 class="card-title">
                <a th:href="@{/todos/{id}(id=${todoList.id})}" th:text="${todoList.name}">List Name</a>
                <span class="badge bg-secondary" th:text="${todoList.taskList.size()}">0</span>
            </h2>

            <form th:action="@{/todos/{id}/delete(id=${todoList.id})}" method="post" class="d-inline">
                <button type="submit" class="btn btn-sm btn-danger">Delete List</button>
            </form>
        </div>
    </div>
</div>
</body>
</html>
Task.html
<!DOCTYPE html>
<html xmlns:th="http://www.thymeleaf.org">
<head>
    <title>Tasks</title>
    <link href="https://cdn.jsdelivr.net/npm/bootstrap@5.3.0/dist/css/bootstrap.min.css" rel="stylesheet">
</head>
<body>
<div class="container mt-4">
    <h1>Tasks for <span th:text="${todoList.name}">List Name</span></h1>
    <a href="/todos" class="btn btn-secondary mb-3">Back to Lists</a>

    <!-- Form to add new task -->
    <form th:action="@{/todos/{id}/tasks(id=${todoList.id})}" th:object="${newTask}" method="post" class="mb-4">
        <div class="input-group">
            <input type="text" th:field="*{name}" class="form-control" placeholder="New task description" required>
            <button type="submit" class="btn btn-primary">Add Task</button>
        </div>
    </form>

    <div th:each="task : ${todoList.taskList}" class="card mb-2">
        <div class="card-body d-flex align-items-center">
            <form th:action="@{/todos/{listId}/tasks/{taskId}/toggle(listId=${todoList.id}, taskId=${task.id})}"
                  method="post" class="me-3">
                <input type="checkbox"
                       th:checked="${task.status}"
                       onChange="this.form.submit()"
                       class="form-check-input"
                       style="transform: scale(1.5);">
            </form>

            <span th:class="${task.status} ? 'text-decoration-line-through text-muted' : ''"
                  th:text="${task.name}"
                  class="flex-grow-1">Task description</span>

            <form th:action="@{/todos/{listId}/tasks/{taskId}/delete(listId=${todoList.id}, taskId=${task.id})}"
                  method="post" class="ms-2">
                <button type="submit" class="btn btn-sm btn-danger">Delete</button>
            </form>
        </div>
    </div>
</div>
</body>
</html>
Reference :
- https://www.javaguides.net/2018/09/mini-todo-management-project-using-spring-boot-springmvc-springsecurity-jsp-hibernate-mysql.html
- https://www.javaguides.net/2018/09/mini-todo-management-project-using-spring-boot-springmvc-springsecurity-jsp-hibernate-mysql.html
Deploy our Spring boot application for free.
In this blog, we are going to deploy out spring boot application with PostgreSQL using to
- Web site on render.com
- PostgreSQl on neon.com
Create an Application
We can create application that can interact with html and controller layer of our application. Then, service layer that can interact with Repository layer.
Frontent (Thyme Leaf)
I am going to create html that can integrate with thyme leaf.
<!DOCTYPE html>
<html xmlns:th="http://www.thymeleaf.org">

<head>
	<title> first page </title>
</head>
<body>
	<div>
		<h1>Heading name</h1>
		<p><span th:text="${word}"></span></p>
	</div>

	<div>
			<h1>list</h1>
			<p><span th:text="${word}"></span></p>
	</div>
</body>

</html>
Create a html in spring boot
Go to template and create our html pages and Go to static from create js and CSS files. I paste above code on the index.html.
Spring boot Controller layer
I create controller class which can map the html with java class.
@Controller
public class ControllerClass {

	@GetMapping
	public String getInitialisePage(Model model) {
		String p = "ravana";
		model.addAttribute("word",p);
		return "index";
	}
}
Create a Repository Interface
we are going to do dataBase configuaration and spring JPA here.
Configuration of Database and JPA
Configure the Database and JPA on Application.Properties.
spring.datasource.url =  ${DATASOURCE_URL}
spring.datasource.username= ${DATASOURCE_USERNAME}
spring.datasource.password= ${DATASOURCE_PASSWORD}
spring.datasource.driver-class-name=org.postgresql.Driver

spring.jpa.hibernate.ddl-auto = update
spring.jpa.show-sql=true
spring.jpa.properties.hibernate.format_sql=true
spring.jpa.database-platform= org.hibernate.dialect.PostgreSQLDialect
Now, the database url, userName, password are assigned as Environment variables. So, now we want to assign as in different approach by IDE.
Using Eclipse or Spring tool suit IDE
- Right click on our project.
- Run as -> run configurations
- click the environment and set the name and value.
- Eg. name = DATASOURCE_URL and value = our jbdc url
- Eg. name = DATASOURCE_USERNAME and value = our username
- Eg. name = DATASOURCE_PASSWORD and value = our Password
Create jar file from our project
When we create Spring boot project we have .mvn file. Delete the test related dependency and class.
./mvnw clean package
If not work copy this below code. This is work on linux only
      export SPRING_DATASOURCE_URL="jdbc:postgresql://localhost:5432/login"
      export SPRING_USERNAME="postgres"
      export DATASOURCE_PASSWORD="1234"

      //don't be panic as run again to run ./mvnw clean package
      // else give this command
      // remove the test depandancy and delete src/main/test.
      // ./mvnw clean package
Create a docker file
Download docker and docker desktop on our system. Create a file on our project, named as Dockerfile.
     # Use an official Maven image to build the Spring Boot app
     FROM maven:3.8.4-openjdk-17 AS build

    # Set the working working directory
    WORKDIR /app

    # Copy the pom.xml and install dependencies
    COPY pom.xml .
    RUN mvn dependency:go-offline

    # Copy the source code and build the application
    COPY src ./src
    RUN mvn clean package -DskipTests # This will download the all depandencies

    # Use an official OpenJDK image to run the application
    FROM openjdk:17-jdk-slim

    #Set the working directory
    WORKDIR /app

    # Copy the built JAR file from the build stage
    COPY --from=build /app/target/file-name.jar .
      # my fileName is demo-0.0.1-SNAPSHOT so COPY --from=build /app/target/demo-0.0.1-SNAPSHOT.jar

    # Expose port 8080
    EXPOSE 8080

    # Specify the command to run the application
    ENTRYPOINT ["java", "-jar", "/app/notes-0.0.1-SNAPSHOT.jar"]
      # change the notes-0.0.1-SNAPSHOT.jar into fileName demo-0.0.1-SNAPSHOT
      # ENTRYPOINT ["java", "-jar", "/app/demo-0.0.1-SNAPSHOT.jar"]
Create Docker image
After create docker file. Then run the below command on terminal. It will generate a docker image. Check the image on your docker or not.
  docker build -t demo_deployment .

  docker tag demo-deployment kalaiarasan23/demo-deployment:latest

  docker push kalaiarasan23/demo-deployment:latest
Host our Database
Go to neon.tech, create account we got free 500MB space DB. Now create project and add.
Important is to get the configutation because we will use in application part.
 postgresql://username:password2@ep-shiny-butterfly-a1el75x8-pooler.ap-southeast-1.aws.neon.tech/DB?sslmode=require

    Select the environmental variable on render.com
    DATASOURCE_URL=jdbc:postgresql://ep-shiny-butterfly-a1el75x8-pooler.ap-southeast-1.aws.neon.tech/DB?sslmode=require
    DATASOURCE_USERNAME=username
    DATASOURCE_PASSWORD=password
Host the Web application
Go to render.com and open dashboard -> Click new web services ->click image. Enter the environment variable at last. Deploy our web site and verify the server online or not.