Reading view

There are new articles available, click to refresh the page.

Effortless Git Repo Switching with a Simple Bash Function!

Why I Created This Function

At first, I used an alias

alias gitdir="cd ~/Git/" (This means gitdir switches to the ~/Git/ directory, but I wanted it to switch directly to a repository.)
So, I wrote a Bash function.

Write Code to .bashrc File

The .bashrc file runs when a new terminal window is opened.
So, we need to write the function inside this file.

Code

gitrepo() {
    # Exact Match
    repoList=$(ls $HOME/Git)
    if [ -n "$(echo "$repoList" | grep -w $1)" ]; then
	cd $HOME/Git/$1
    else
	# Relevant Match
	getRepoName=$(echo "$repoList" | grep -i -m 1 $1)
	
	if [ -n "$getRepoName" ]; then
	    cd "$HOME/Git/$getRepoName"
	else
	    echo "Repository Not Founded"
	    cd $HOME/Git
	fi
	
    fi   
}

Code Explanation

The $repoList variable stores the list of directories inside the Git folder.

Function Logic Has Two Parts:

  • Exact Match
  • Relevant Match

Exact Match

if [ -n "$(echo "$repoList" | grep -w $1)" ]; then
	cd $HOME/Git/$1

If condition: The $repoList variable parses input for grep.

  • grep -w matches only whole words.
  • $1 is the function’s argument in bash.
  • -n checks if a variable is not empty. Example syntax:
    [ a != "" ] is equivalent to [ -n a ]

Relevant Match

getRepoName=$(echo "$repoList" | grep -i -m 1 $1)
	if [ -n "$getRepoName" ]; then
	    cd "$HOME/Git/$getRepoName"

Relevant search: If no Exact Match is found, this logic is executed next.

getRepoName="$repoList" | grep -i -m 1 $1
  • -i ignores case sensitivity.
  • -m 1 returns only the first match.

Example of -m with grep:
ls | grep i3
It returns i3WM and i3status, but -m 1 ensures only i3WM is selected.

No Match

If no match is found, it simply changes the directory to the Git folder.

	else
	    echo "Repository Not Founded"
	    cd $HOME/Git

What I Learned

  • Basics of Bash functions
  • How to use .bashrc and reload changes.

20 Essential Git Command-Line Tricks Every Developer Should Know

Git is a powerful version control system that every developer should master. Whether you’re a beginner or an experienced developer, knowing a few handy Git command-line tricks can save you time and improve your workflow. Here are 20 essential Git tips and tricks to boost your efficiency.

1. Undo the Last Commit (Without Losing Changes)

git reset --soft HEAD~1

If you made a commit but want to undo it while keeping your changes, this command resets the last commit but retains the modified files in your staging area.

This is useful when you realize you need to make more changes before committing.

If you also want to remove the changes from the staging area but keep them in your working directory, use,

git reset HEAD~1

2. Discard Unstaged Changes

git checkout -- <file>

Use this to discard local changes in a file before staging. Be careful, as this cannot be undone! If you want to discard all unstaged changes in your working directory, use,

git reset --hard HEAD

3. Delete a Local Branch

git branch -d branch-name

Removes a local branch safely if it’s already merged. If it’s not merged and you still want to delete it, use -D

git branch -D branch-name

4. Delete a Remote Branch

git push origin --delete branch-name

Deletes a branch from the remote repository, useful for cleaning up old feature branches. If you mistakenly deleted the branch and want to restore it, you can use

git checkout -b branch-name origin/branch-name

if it still exists remotely.

5. Rename a Local Branch

git branch -m old-name new-name

Useful when you want to rename a branch locally without affecting the remote repository. To update the remote reference after renaming, push the renamed branch and delete the old one,

git push origin -u new-name
git push origin --delete old-name

6. See the Commit History in a Compact Format

git log --oneline --graph --decorate --all

A clean and structured way to view Git history, showing branches and commits in a visual format. If you want to see a detailed history with diffs, use

git log -p

7. Stash Your Changes Temporarily

git stash

If you need to switch branches but don’t want to commit yet, stash your changes and retrieve them later with

git stash pop

To see all stashed changes

git stash list

8. Find the Author of a Line in a File

git blame file-name

Shows who made changes to each line in a file. Helpful for debugging or reviewing historical changes. If you want to ignore whitespace changes

git blame -w file-name

9. View a File from a Previous Commit

git show commit-hash:path/to/file

Useful for checking an older version of a file without switching branches. If you want to restore the file from an old commit

git checkout commit-hash -- path/to/file

10. Reset a File to the Last Committed Version

git checkout HEAD -- file-name

Restores the file to the last committed state, removing any local changes. If you want to reset all files

git reset --hard HEAD

11. Clone a Specific Branch

git clone -b branch-name --single-branch repository-url

Instead of cloning the entire repository, this fetches only the specified branch, saving time and space. If you want all branches but don’t want to check them out initially:

git clone --mirror repository-url

12. Change the Last Commit Message

git commit --amend -m "New message"

Use this to correct a typo in your last commit message before pushing. Be cautious—if you’ve already pushed, use

git push --force-with-lease

13. See the List of Tracked Files

git ls-files

Displays all files being tracked by Git, which is useful for auditing your repository. To see ignored files

git ls-files --others --ignored --exclude-standard

14. Check the Difference Between Two Branches

git diff branch-1..branch-2

Compares changes between two branches, helping you understand what has been modified. To see only file names that changed

git diff --name-only branch-1..branch-2

15. Add a Remote Repository

git remote add origin repository-url

Links a remote repository to your local project, enabling push and pull operations. To verify remote repositories

git remote -v

16. Remove a Remote Repository

git remote remove origin

Unlinks your repository from a remote source, useful when switching remotes.

17. View the Last Commit Details

git show HEAD

Shows detailed information about the most recent commit, including the changes made. To see only the commit message

git log -1 --pretty=%B

18. Check What’s Staged for Commit

git diff --staged

Displays changes that are staged for commit, helping you review before finalizing a commit.

19. Fetch and Rebase from a Remote Branch

git pull --rebase origin main

Combines fetching and rebasing in one step, keeping your branch up-to-date cleanly. If conflicts arise, resolve them manually and continue with

git rebase --continue

20. View All Git Aliases

git config --global --list | grep alias

If you’ve set up aliases, this command helps you see them all. Aliases can make your Git workflow faster by shortening common commands. For example

git config --global alias.co checkout

allows you to use git co instead of git checkout.

Try these tricks in your daily development to level up your Git skills!

Minimal Typing Practice Application in Python

Introduction

This is a Python-based single-file application designed for typing practice. It provides a simple interface to improve typing accuracy and speed. Over time, this minimal program has gradually increased my typing skill.

What I Learned from This Project

  • 2D Array Validation
    I first simply used a 1D array to store user input, but I noticed some issues. After implementing a 2D array, I understood why the 2D array was more appropriate for handling user inputs.
  • Tkinter
    I wanted to visually see and update correct, wrong, and incomplete typing inputs, but I didn’t know how to implement it in the terminal. So, I used a simple Tkinter gui window

Run This Program

It depends on the following applications:

  • Python 3
  • python3-tk

Installation Command on Debian-Based Systems

sudo apt install python3 python3-tk

Clone repository and run program

git clone https://github.com/github-CS-krishna/TerminalTyping
cd TerminalTyping
python3 terminalType.py

Links

For more details, refer to the README documentation on GitHub.

This will help you understand how to use it.

source code(github)

Learning Notes #61 – Undo a git pull

Today, i came across a blog on undo a git pull. In this blog, i have reiterated the blog in other words.

Mistakes happen. You run a git pull and suddenly find your repository in a mess. Maybe conflicts arose, or perhaps the changes merged from the remote branch aren’t what you expected.

Fortunately, Git’s reflog comes to the rescue, allowing you to undo a git pull and restore your repository to its previous state. Here’s how you can do it.

Understanding Reflog


Reflog is a powerful feature in Git that logs every update made to the tips of your branches and references. Even actions like resets or rebases leave traces in the reflog. This makes it an invaluable tool for troubleshooting and recovering from mistakes.

Whenever you perform a git pull, Git updates the branch pointer, and the reflog records this action. By examining the reflog, you can identify the exact state of your branch before the pull and revert to it if needed.

Step By Step Guide to UNDO a git pull

1. Check Your Current State Ensure you’re aware of the current state of your branch. If you have uncommitted changes, stash or commit them to avoid losing any work.


git stash
# or
git add . && git commit -m "Save changes before undoing pull"

2. Inspect the Reflog View the recent history of your branch using the reflog,


git reflog

This command will display a list of recent actions, showing commit hashes and descriptions. For example,


0a1b2c3 (HEAD -> main) HEAD@{0}: pull origin main: Fast-forward
4d5e6f7 HEAD@{1}: commit: Add new feature
8g9h0i1 HEAD@{2}: checkout: moving from feature-branch to main

3. Identify the Pre-Pull Commit Locate the commit hash of your branch’s state before the pull. In the above example, it’s 4d5e6f7, which corresponds to the commit made before the git pull.

4. Reset to the Previous Commit Use the git reset command to move your branch back to its earlier state,


git reset <commit-hash>

By default, it’s mixed so changes wont be removed but will be in staging.

The next time a pull operation goes awry, don’t panic—let the reflog guide you back to safety!

Problem Statements : Git & Github Session – St. Joseph’s GDG Meeting

List of problem statements enough to get your hands dirty on git. These are the list of commands that you mostly use in your development.

Problem 1

  1. Initialize a Repository.
  2. Setup user details globally.
  3. Setup project specific user details.
  4. Check Configuration – List the configurations.

Problem 2

  1. Add Specific files. Create two files app.js and style.css. User git add to stage only style.css . This allows selective addition of files to the staging area before committing.
  2. Stage all files except one.

Problem 3

  1. Commit with a message
  2. Amend a commit
  3. Commit without staging

Problem 4

  1. Create a Branch
  2. Create a new branch named feature/api to work on a feature independently without affecting the main branch.
  3. Delete a branch.
  4. Force delete a branch.
  5. Rename a branch.
  6. List all branches.

Problem 5

  1. Switch to a branch
  2. Switch to the main branch using git checkout.
  3. Create and switch to a branch
  4. Create a new branch named bugfix/001 and switch to it in a single command with git checkout -b.

Problem 6

  1. Start with a repository containing a file named project.txt
  2. Create two branches (feature-1 and feature-2) from the main branch.
  3. Make changes to project.txt in both branches.
  4. Attempt to merge feature-1 and feature-2 into the main branch.
  5. Resolve any merge conflicts and complete the merge process.

Problem 7

  1. View history in one-line format
  2. Graphical commit history
  3. Filter commits by Author
  4. Show changes in a commit

Problem 8

  1. Fetch updates from remote
  2. Fetch and Merge
  3. Fetch changes from the remote branch origin/main and merge them into your local main
  4. List remote references

Problem 9

  1. Create a stash
  2. Apply a stash
  3. Pop a stash
  4. View stash

Problem 10

  1. You need to undo the last commit but want to keep the changes staged for a new commit. What will you do ?

Problem 11

  1. You realize you staged some files for commit but want to unstage them while keeping the changes in your working directory. Which git command will allow you to unstage the files without losing any change ?

Problem 12

  1. You decide to completely discard all local changes and reset the repository to the state of the last commit. What git command should you run to discard all changes and reset your working directory ?

Kanchi Linux Users Group Monthly Meeting – Dec 08, 2024

Hi everyone,
KanchiLUG’s Monthly meet is scheduled as online meeting this week on Sunday, Dec 08, 2024 17:00 – 18:00 IST

Meeting link : https://meet.jit.si/KanchiLugMonthlyMeet

Can join with any browser or JitSi android app.
All the Discussions are in Tamil.

Talk Details

Talk 0:
Topic : my Elisp ‘load random theme’ function
Description : I wanted to randomly load a theme in Emacs during startup. After i search in online, I achieved this
functionality using Emacs Lisp. this my talk Duration : 10 minutes
Name : Krishna Subramaniyan
About :GNU/Linux and Emacs user 😉

Talk 1:
Topic : PDF generation using python
Description : To demo a python program which will generate a PDF output. Duration : 20 minutes
Name : Sethu
About : Member of KanchiLUG & Kaniyam IRC Channel

Talk 2:
Topic : distrobox – a wrapper on podman/docker
Description : Intro about the tool, why I had to use that and a demo Duration : 15 minutes
Name : Annamalai N
About : a GNU/Linux user

Talk 3:
Topic : Real Time Update Mechanisms (Polling, Long Polling, Server Sent Events)
Description : To demo Real Time Update Mechanisms with JS and Python Duration : 30 minutes
Name :Syed Jafer (parottasalna)
About : Developer. Currently teaching postgres at
https://t.me/parottasalna

After Talks : Q&A, General discussion

About KanchiLUG : Kanchi Linux Users Group [ KanchiLUG ] has been spreading awareness on Free/Open Source Software (F/OSS) in
Kanchipuram since November 2006.

Anyone can join! (Entry is free)
Everyone is welcome
Feel free to share this to your friends

Mailing list: kanchilug@freelists.org
Repository : https://gitlab.com/kanchilug
Twitter handle: @kanchilug
Kanchilug Blog : http://kanchilug.wordpress.com

To subscribe/unsubscribe kanchilug mailing list :
http://kanchilug.wordpress.com/join-mailing-list/

Introduction to PostgreSQL database – free online course in Tamil

Introduction to PostgreSQL database – free online course in Tamil

Monday, wednesday, Friday IST evening.

First class – 18-Nov-2024 7-8 PM IST

Syllabus: https://parottasalna.com/postgres-database-syllabus/

Trainer – Syed Jafer – contact.syedjafer@gmail.com

Get the meeting link here

Telegram Group – https://t.me/parottasalna
Whatsapp channel- https://whatsapp.com/channel/0029Vavu8mF2v1IpaPd9np0s Kaniyam Tech events Calendar – https://kaniyam.com/events/

Introduction to PostgreSQL database – free online course in Tamil

Introduction to PostgreSQL database – free online course in Tamil

Monday, wednesday, Friday IST evening.

First class – 18-Nov-2024 7-8 PM IST

Syllabus: https://parottasalna.com/postgres-database-syllabus/

Trainer – Syed Jafer – contact.syedjafer@gmail.com

Get the meeting link here

Telegram Group – https://t.me/parottasalna
Whatsapp channel- https://whatsapp.com/channel/0029Vavu8mF2v1IpaPd9np0s Kaniyam Tech events Calendar – https://kaniyam.com/events/

Basic Linux Commands

Hi folks , welcome to my blog. Here we are going to see some basic and important commands of linux.

One of the most distinctive features of Linux is its command-line interface (CLI). Knowing a few basic commands can unlock many possibilities in Linux.
Essential Commands
Here are some fundamental commands to get you started:
ls - Lists files and directories in the current directory.

ls

cd - Changes to a different directory.

cd /home/user/Documents

pwd - Prints the current working directory.

pwd

cp - Copies files or directories.

cp file1.txt /home/user/backup/

mv - Moves or renames files or directories.

mv file1.txt file2.txt

rm - Removes files or directories.

rm file1.txt

mkdir - Creates a new directory.

mkdir new_folder

touch - Creates a new empty file.

touch newfile.txt

cat - Displays the contents of a file.

cat file1.txt

nano or vim - Opens a file in the text editor.

nano file1.txt

chmod - Changes file permissions.

chmod 755 file1.txt

ps - Displays active processes.

ps

kill - Terminates a process.

kill [PID]

Each command is powerful on its own, and combining them enables you to manage your files and system effectively.We can see more about some basics and interesting things about linux in further upcoming blogs which I will be posting.

Follow for more and happy learning :)

Linux basics for beginners

Introduction:
Linux is one of the most powerful and widely-used operating systems in the world, found everywhere from mobile devices to high-powered servers. Known for its stability, security, and open-source nature, Linux is an essential skill for anyone interested in IT, programming, or system administration.
In this blog , we are going to see What is linux and Why choose linux.

1) What is linux
Linux is an open-source operating system that was first introduced by Linus Torvalds in 1991. Built on a Unix-based foundation, Linux is community-driven, meaning anyone can view, modify, and contribute to its code. This collaborative approach has led to the creation of various Linux distributions, or "distros," each tailored to different types of users and use cases. Some of the most popular Linux distributions are:

  • Ubuntu: Known for its user-friendly interface, great for beginners.
  • Fedora: A cutting-edge distro with the latest software versions, popular with developers.
  • CentOS: Stable and widely used in enterprise environments. Each distribution may look and function slightly differently, but they all share the same core Linux features.

2) Why choose linux
Linux is favored for many reasons, including its:

  1. Stability: Linux is well-known for running smoothly without crashing, even in demanding environments.
  2. Security: Its open-source nature allows the community to detect and fix vulnerabilities quickly, making it highly secure.
  3. Customizability: Users have complete control to modify and customize their system.
  4. Performance: Linux is efficient, allowing it to run on a wide range of devices, from servers to small IoT devices.

Conclusion
Learning Linux basics is the first step to becoming proficient in an operating system that powers much of the digital world. We can see more about some basics and interesting things about linux in further upcoming blogs which I will be posting.

Follow for more and happy learning :)

Installing Arch Linux in UEFI systems(windows)

This will be a very basic overview in what is to be done for installing Arch Linux. For more information check out Arch wiki installation guide.

The commands shown in this guide will be in italian(font).

Step 1: Downloading the required files and applications

I have downloaded a few applications to help ease the process for the installation. You can download them using the links below.

Rufus:
This helps in formatting the USB and converting the disc image file to a dd image file. I have used rufus, you can use other tools too. This only works on windows.
rufus link

BitTorrent
The download option in the wiki page suggests we use BitTorrent for downloading the disc image file.
BitTorrent for windows

Arch Linux torrent file
This is for downloading the Arch Linux Torrent File. The download link can be found in the website given below.
Arch Linux Download Page

Step 2: The bootable USB

You will need a USB of size at least 2GB and 4GB or above should be very comfortable to use.

First open the BitTorrent application or the web based version and upload the magnet link or the torrent file to start downloading the disc image file.

Then to prepare the USB:

  1. Launch the application to make the bootable USB like rufus.

2.In the device section select your USB and remember all the data in the drive will be lost after the process.

3.In boot selection, choose the disc image file that was downloaded through torrent.

4.In the target system select UEFI as we are using a UEFI system.

5.In the partition scheme make sure GPT is selected.

6.In file system select fat32 and 4096 bytes as cluster size.

7.When you click ready it will present you with 2 options, select the dd image file which is not the default option.

After the process is done the USB will not be readable to windows, so there is no need to panic if you cannot access the USB.

If you are using a dual boot make sure you have at least 30 GB of unallocated space.

I would recommend to turn off bitlocker settings as it could give rise to other challenges during the installation.

Then get into the UEFI Firmware settings of your system. One easy way is to:
1.Hold shift key while pressing to restart the computer
2.Go into Troubleshoot
3.Go into Advanced Settings
4.Select UEFI Firmware Settings
5.You will have to restart again but you will be in the required place.

Turn off secure boot state. It is usually in the security settings.

Select save changes and exit.

When you log back into your system ensure that secure boot state is off by going into system information.

Go back to UEFI Firmware settings by repeating the process.

In the boot priority section, give your USB device the highest priority. This is usually in the boot section. Then select save changes and exit.

Step 3: Preparing Arch Linux Installation

When all the above steps are done and the system restarts, you will be prompted with a few options. Select Arch Linux install medium and press 'Enter' to enter the installation environment. After this you will need to follow a series of steps.

1. Verifying you are in UEFI mode.

To do that type the command
cat /sys/firmware/efi/fw_platform_size

You should get the result as 32 or 64. If you get no result then you may not be using UEFI mode.

2. Connecting to the internet:

If you are using an ethernet cable then you don't have to worry as you might already be connected to internet.
Use the command
ping -c 4 google.com
or another website to ping from to check if you're connected to the internet.

To connect to wi-fi, type in the command
ip link

This should show you all the internet devices you have. Your wi-fi should typically be wlan0 or something like wlp3s0, which is your device name.

Then type the command
iwctl

This should get you into an interactive command line interface.
You can explore the options by using the command
help

My device name was wlan0 so I'm using wlan0 in the command I'm going to show if yours is different make the appropriate changes.

To connect to the wifi use the command
station wlan0 connect "Network Name"
where "Network Name" is the name of your network.

If you want to know the name of your network before doing this you can try the command
station wlan0 get-networks

To get out of the environment simply use the command
exit

After you exit, you can verify your connection with
ping -c 4 google.com

If it doesn't work, try the command
ping -c 4 8.8.8.8

If the above also doesn't work, the problem may lie with your network.

However if the second option works for you, the fix would be to manually change the DNS server you're using.
To do that, run the command
nano /etc/systemd/resolved.conf

In this file if the DNS part is commented using a #, remove the # and replace it with a DNS server you desire. For eg: 8.8.8.8

ctrl + x to save and exit

Now try pinging a website such as google.com again to make sure you're properly connected to the internet.

3. Set the proper time

When you connect to the internet you should have the proper time. To check you can use the command
timedatectl

4. Create the partitions for Arch Linux

To check what partitions you have, use the command
lsblk

This will list the partitions you have. It will be in the format /dev/sda or /dev/nvme0n1 or something else. Mine was /dev/nvme0n1 so I'll be using the same in the commands below.

To make the partitions, use the command
fdisk /dev/nvme0n1

This should bring you to a separate command line interface.

It will give you an introduction on what to do.

Now we will create the partitions.
To create a partition, use the command
n

It will show you what you want to number your partition and the default option. Click enter as it will automatically take the default option if you don't enter any value. Let's say mine is 1.

It will show you what sector you want the partition to start from and the default option. Click enter.

Then it will ask you where you want the sectors to end: type
+1g

1g will allot 1 GB to the partition you just created.

Then create another partition in the same way, let's say mine is sector number 2 this time and finally instead of
+1g use +4g

This will allot 4 GB to the second partition you just created.

Create another partition and this time leave the last sector to default so it can have the remaining space. Let's say this partition is number 3.

partition 1 - EFI system partition
partition 2 - Linux SWAP partition
partition 3 - Linux root partition

5. Prepare the created partitions for Arch Linux installation

Here, we are going to format the memory in the chosen partitions and make them the appropriate file systems.

For the EFI partition:
mkfs.fat -F 32 /dev/nvme0n1p1

This converts the 1 GB partition into a fat32 file system.

For SWAP partition:
mkswap /dev/nvme0n1p2

This converts the 4 GB partition into something that can be used as virtual RAM.

For root partition:
mkfs.ext4 /dev/nvme0n1p3

This converts the root partition into a file system that is called ext4.

6. Mounting the partitions

This is for setting a reference point to the partitions we just created.

For the EFI partition:
mount --mkdir /dev/nvme0n1p1 /mnt/boot

For the root partition:
mount /dev/nvme0n1p3 /mnt

For the swap partition:
swapon /dev/nvme0n1p2

Step 3: The Arch Linux Installation

1. Updating the mirrorlist (optional)

The mirrorlist is a list of mirror servers from which packages can be downloaded. Choosing the right mirror server could get you higher download speeds.

This step isn't required as the mirror list is automatically updated when connected to the internet but if you would like to manually do it, its in the file
/etc/pacman.d/mirrorlist

2. Installing base Linux kernel and firmware

To do this, use the command
pacstrap -K /mnt base linux linux-firmware

Step 4: Configuring Arch Linux system

1. generating fstab

The fstab is the file system table. It contains information on each of the file partitions and storage devices. It also contains information on how they should be mounted during boot.

To do it, use the command:
genfstab -U /mnt >> /mnt/etc/fstab

2. Chroot

Chroot is short for change root. It is used to directly interact with the Arch Linux partitions from the live environment in the USB.

To do it, use the command:
arch-chroot /mnt

3. Time

The timezone has 2 parts the region and the city. I am from India so my region is Asia and the city is Kolkata. Change yours appropriately to your needs.

The command:
ln -sf /usr/share/zoneinfo/Asia/Kolkata /etc/localtime

We can also set the time in hardware clock as UTC.
To do that:
hwclock --systohc

4. Installing some important tools

The system you have installed is a very basic system, so it doesn't have a lot of stuff. I'm recommending two very basic tools as they can be handy.

i) nano:
This is a text editor file so you can make changes to configuration files.
pacman -S nano

ii) iwd:
This is called iNet wireless daemon. I recommend this so that you can connect to wi-fi once you reboot to your actual arch system.
pacman -S iwd

5. Localization

This is for setting the keyboard layout and language. Go to the file /etc/locale.conf by using
nano /etc/locale.conf

I want to use the english language that is the default in most devices so for doing that you have to uncomment(remove the #) for the line that says
LANG=en_US.UTF-8

As there are a lot of lines you can search using ctrl+F.

Then ctrl+X to save and exit.

Then use the command
locale-gen

This command generates the locale you just uncommented.

6. Host and password

To create the host name, we should do it in the /etc/hostname file. Use
nano /etc/hostname

Then type in what your hostname would be.
ctrl + X to save and exit.

To set the password of your root user, use the command
passwd

7. Getting out of chroot and rebooting the system

To get out of chroot simply use
exit

Then to reboot the system use
reboot

Remove the installation medium(USB) as the device turns off.

Step 5: Enjoy Arch Linux

Arch Linux is one of the most minimal systems. So you can customize it to your liking. You can also install other desktop environments if you feel like it.

kanchilug – Monthly Meeting – Nov 10, 2024

Hi everyone,
KanchiLUG’s Monthly meet is scheduled as online meeting this week on Sunday, Nov 10, 2024 17:00 – 18:00 IST

Meeting link : https://meet.jit.si/KanchiLugMonthlyMeet

Can join with any browser or JitSi android app.
All the Discussions are in Tamil.

Talk Details

Talk 0:
Topic : Postgres Architecture
Description : In this talk, we will explore the architecture of postgres Duration : 30 mins
Name : Sethupandian
About : My name is Sethu and I work as a practice manager for an Insurance company in Canada. Back in India, I am from Salem. Completed my engineering in Electrical & Electronics, at Kongu Engineering College(2000-2004). Started my IT career in the year 2005 and worked in companies like Ramco Systems, Verizon, TCS, Cognizant before joining my current employer. I have always got an interest towards learning things that is fascinating. And through Payilagam and Muthu sir, I came to know about Kaniyam and KanchiLUG. I am happy to be part of this great initiative. I wish and hope I can contribute whatever possible from my side.

Talk 1:
Topic : Intro to GDB
Description : Based on my recent translation of Beej’s guide to Tamil on same. Duration : 20 mins
Name : Annamalai N
About : a GNU/Linux user interested in Embedded Systems. Final year engineering undergrad.

After Talks : Q&A, General discussion

About KanchiLUG : Kanchi Linux Users Group [ KanchiLUG ] has been spreading awareness on Free/Open Source Software (F/OSS) in
Kanchipuram since November 2006.

Anyone can join! (Entry is free)
Everyone is welcome
Feel free to share this to your friends

How to create Servlet and Deploy on Apache Tomcat 10.1 in Linux

I am going to explain about how to create servlet and Deploy on Apache Tomcat Server 10.1 manually in any Linux distributions.

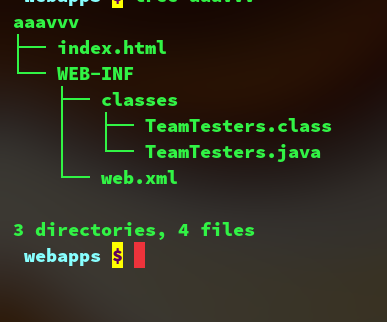
Directory Structure should be represented as below

directory structure to run servlets

You can keep ‘aaavvv’ folder as any name you want.

How to create Servlet on Apache Tomcat 10 in Linux

Step:1

Create a folder in /usr/share/tomcat10/webapps folder , In that folder create any folder name as you like, I create ‘myapps’ folder name as example.

cd /usr/share/tomcat10/webapps/;sudo mkdir myapps

Step:2

Go into myapps , then create ‘WEB-INF’ directory

cd myapps;sudo mkdir WEB-INF

Step:3

Go into WEB-INF, then create ‘classes’ directory

cd WEB-INF;sudo mkdir classes

Step:4

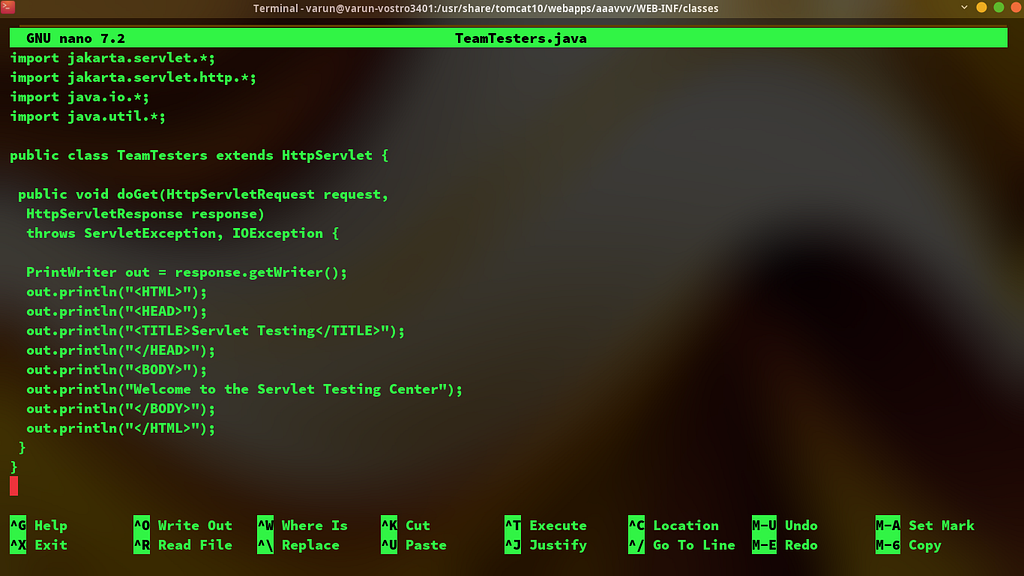
Go into classes directory, and create java file named ‘TeamTesters.java’ for this example, you can create any name you want.

cd classes;sudo nano TeamTesters.java

code for TeamTesters.java

Step:5

Run java program using javac command

sudo javac TeamTesters.java -cp /usr/share/tomcat10/lib/servlet-api.jar

here -cp represents classpath to run the program

Step:6

Go to backward directory (i.e., WEB-INF) and copy the web.xml file from ROOT directory present in the webapps folder present in tomcat10 folder

cd ..;sudo cp ../../ROOT/WEB-INF/web.xml web.xml;

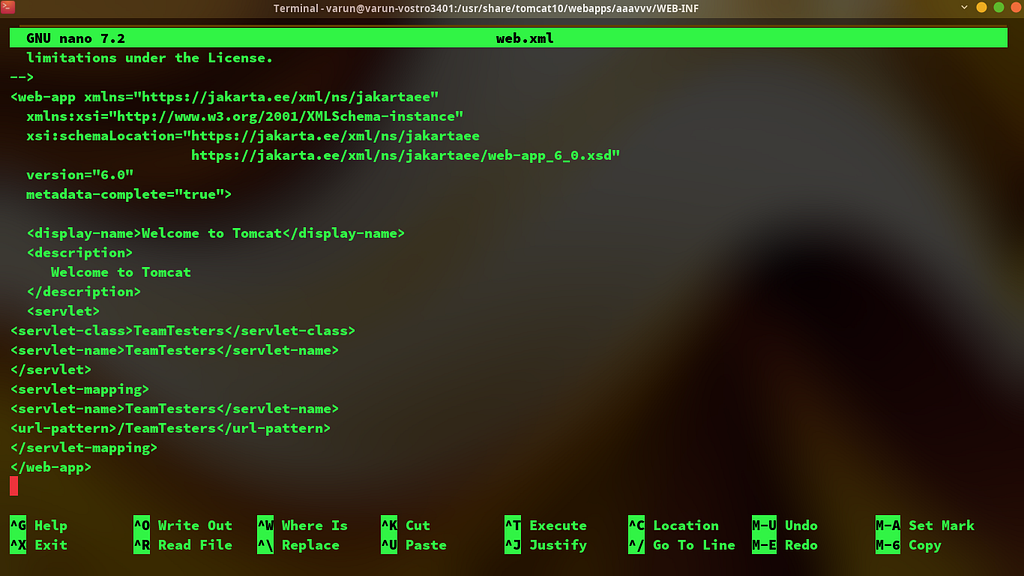
Then edit web.xml file by adding <servlet> and <servlet-mapping> tag inside <web-app> tag

sudo nano web.xml

<servlet> and <servlet-mapping> in web.xml file

Step:9

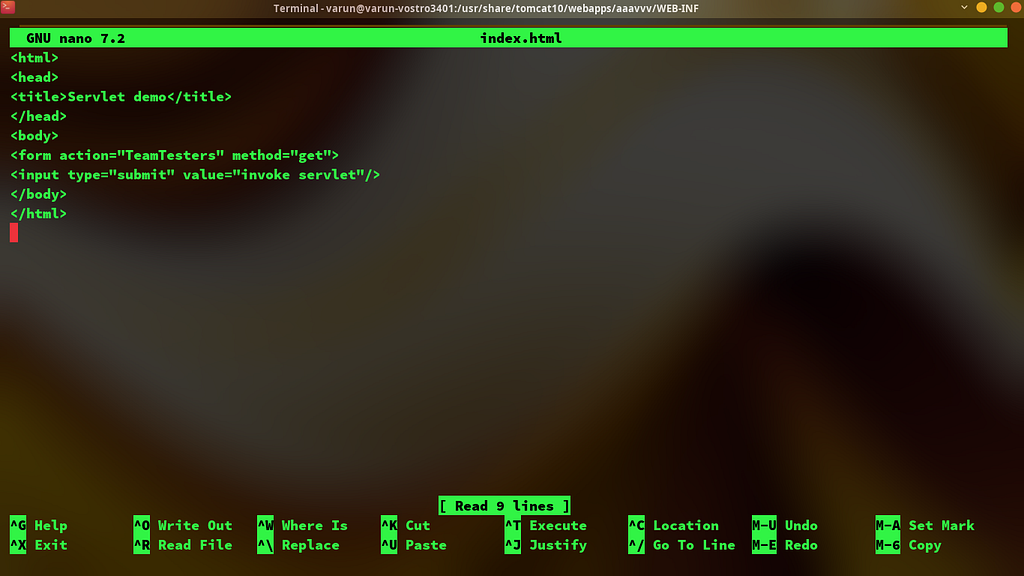
Goto backward directory , (i.e., aaavvv) then create index.html file

cd ..; sudo nano index.html

content in index.html

Step:10

goto browser and type,

http://localhost:8080/myapps

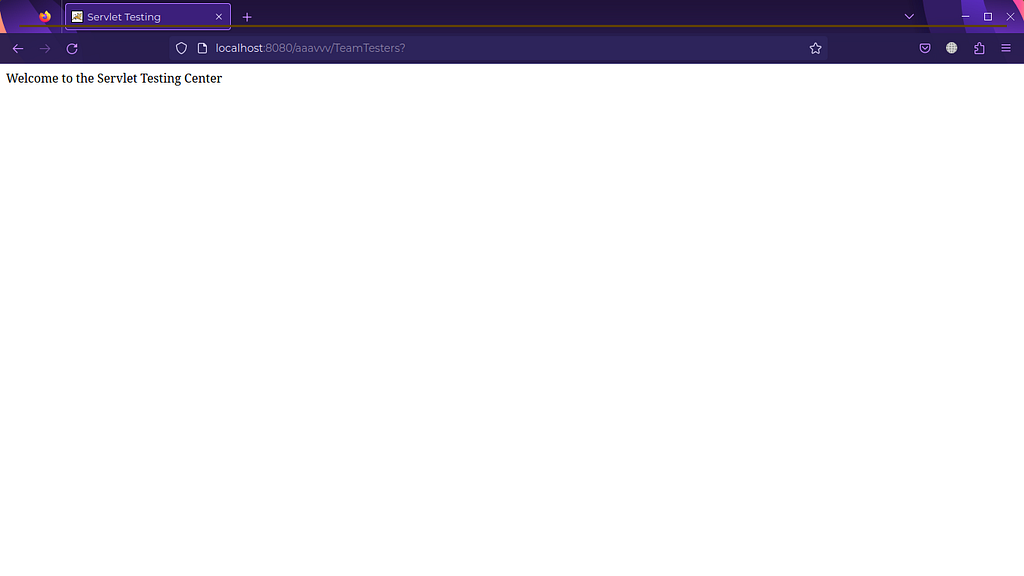
servlet running on browser
Statement printed on html page declared in java

Common Troubleshooting problems:

  1. make sure tomcat server and java latest version is installed on your system .
  2. check systemctl or service status in your Linux system to ensure that tomcat server is running.

Automate this stuff…

If you wanted to automate this stuff… checkout my github repository

GitHub - vishnumur777/ServletCreationJava


How to create Servlet and Deploy on Apache Tomcat 10.1 in Linux was originally published in Towards Dev on Medium, where people are continuing the conversation by highlighting and responding to this story.

A simple design calculator on linux command line

when we open terminal or Konsole in Linux we used to think by using many utilities why calculators was not there interactively in it ?

Now here is the solution for it just by cloning a repository from GitHub on your PC. Here is the GitHub link to clone it.

Just open your terminal and make a directory for safety purpose for that type,

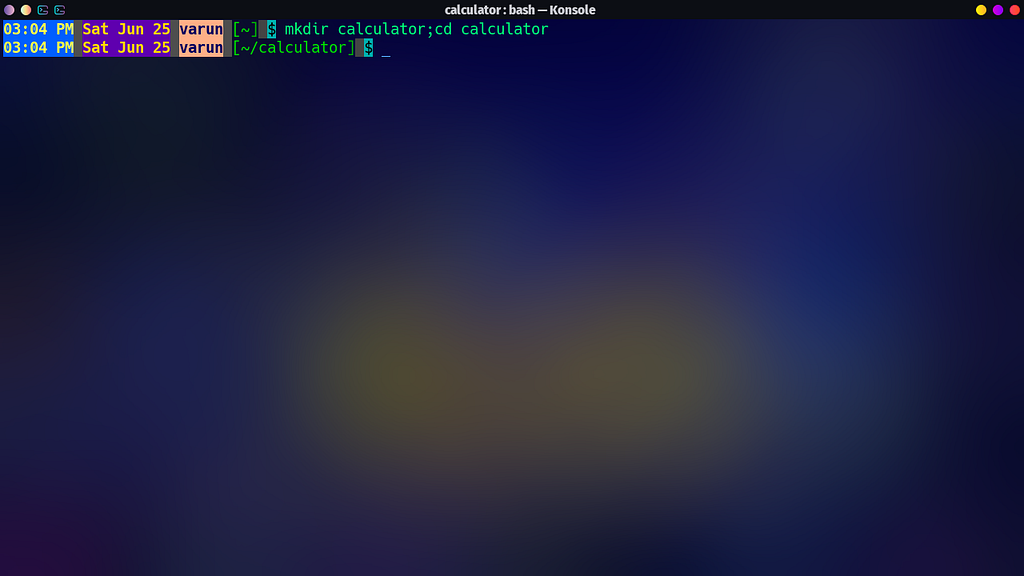
mkdir calculator;cd calculator

creating directory on my home directory and changing it to calculator

the above command explain about making and changing directory from home directory.

then type,

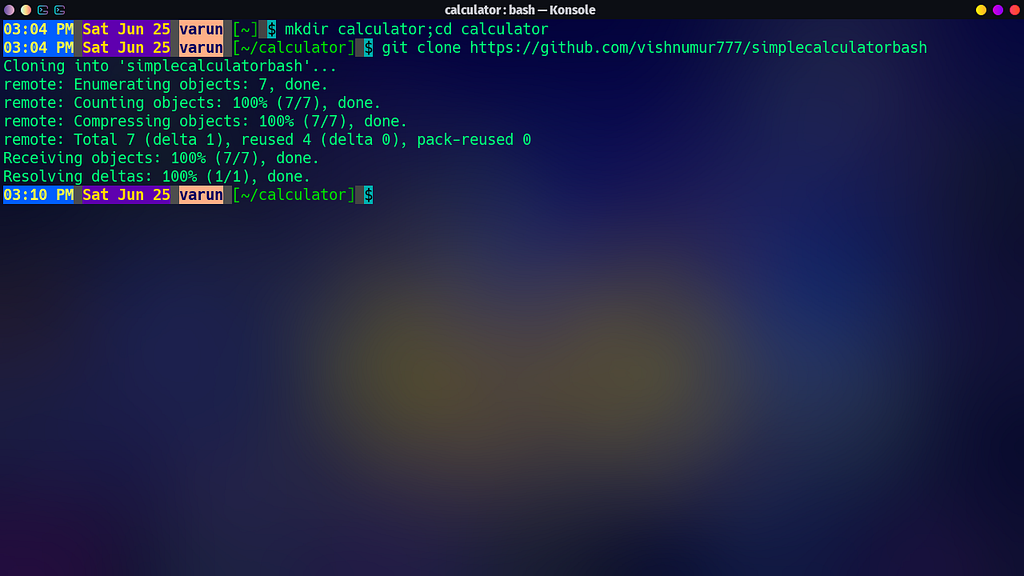
git clone https://github.com/vishnumur777/simplecalculatorbash

cloning repository through git command

this command will clone all the files present in the repository.

but please make sure that you have installed git on your PC.

Then change directory to simplecalculatorbash using

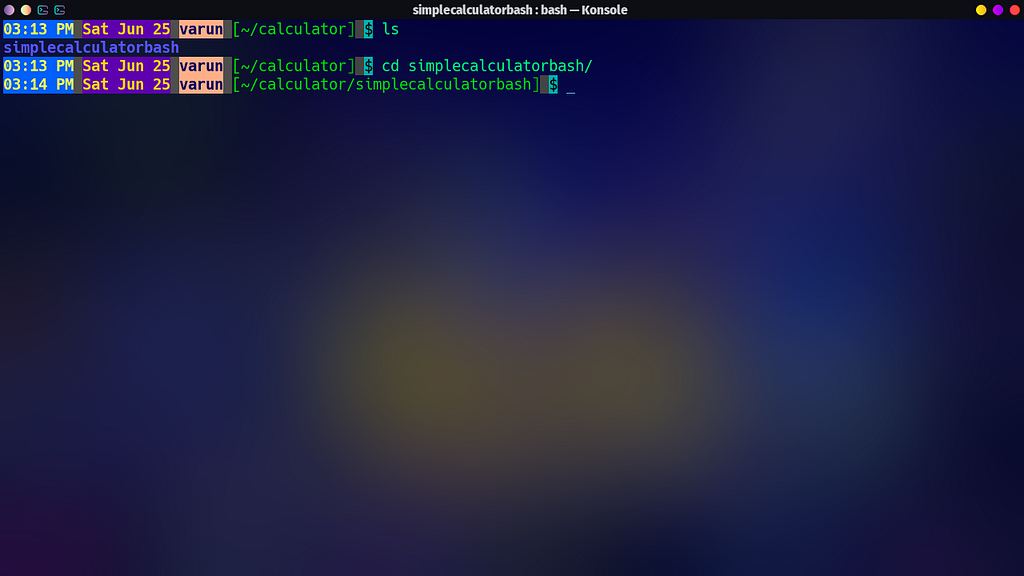
cd simplecalculatorbash/

changing directory to simplecalculatorbash

then type,

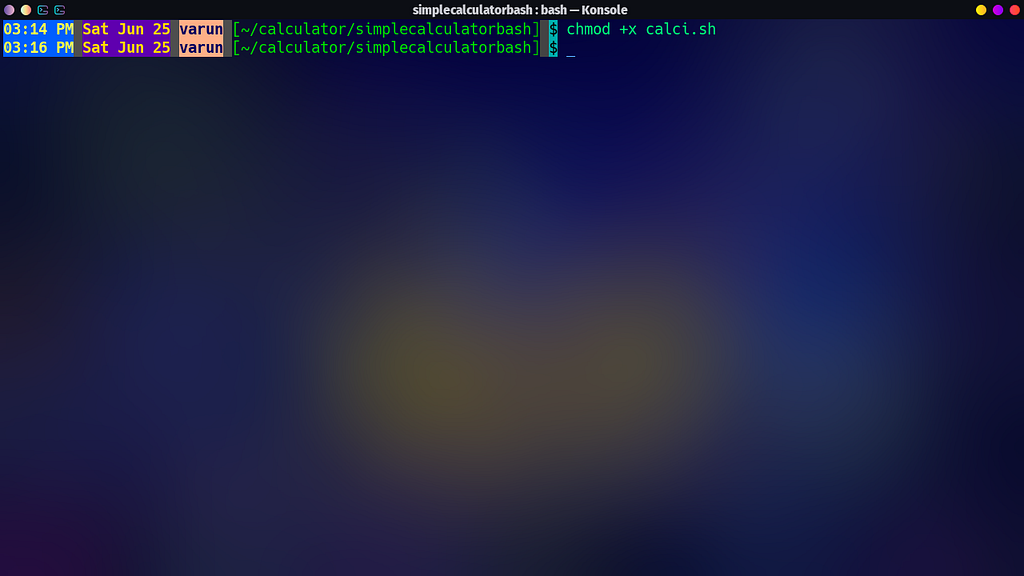
chmod +x calci.sh

modifying permissions to executables

this command changes the permission to run on user without depending on root . So that many PC cause this error that permission was denied while executing the file.

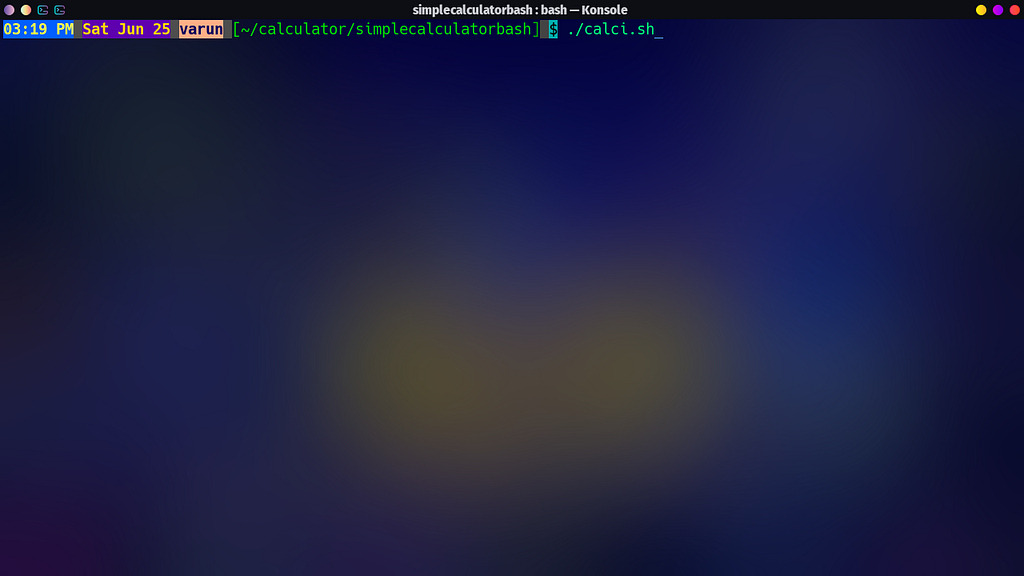
For execution run type,

./calci.sh

command to execute simplecalculator

and press enter key

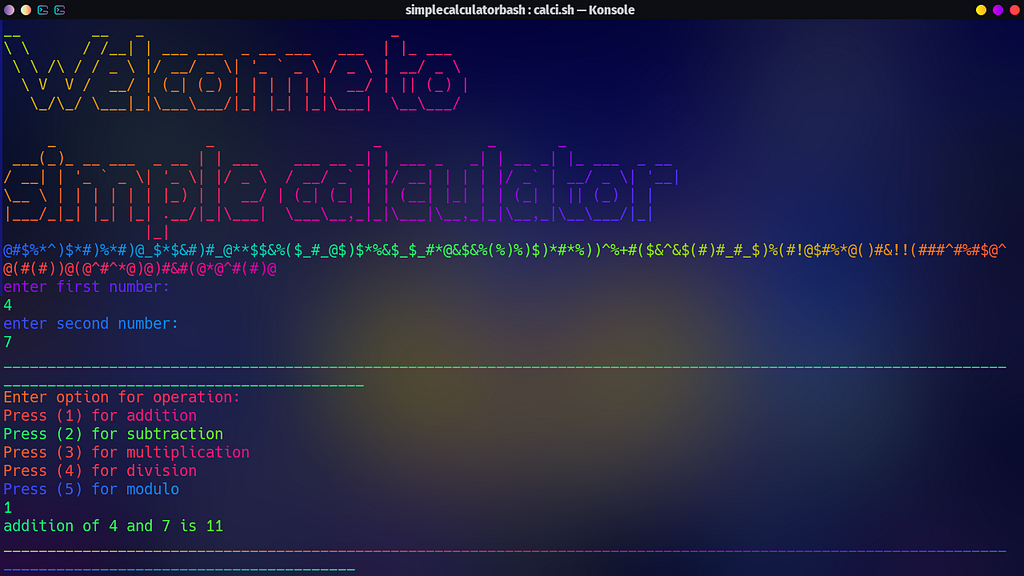
which will run very colourful calculator interactive prompt by installing dependencies which I posted on GitHub.

calculator performing addition of two numbers interactively

How to view manually installed packages in ubuntu

Hi all in the blog post we are going to list down the packages we installed manually.

why we need that information?
when we set up a fresh Linux Distro or migrate existing or converting Linux installation into a docker image that will very helpful to us

how we are going to get this thing done?
using the aptitude (high-level package manager command-line interface)

install aptitude first if not present in your system

sudo apt install aptitude 

wait a few seconds to complete installation after completing the installation run the following command to find the manually installed packages after the initial run of the

comm -23 <(aptitude search '~i !~M' -F '%p' | sed "s/ *$//" | sort -u) <(gzip -dc /var/log/installer/initial-status.gz | sed -n 's/^Package: //p' | sort -u)

Image description

Voila we did it!

❌