❌

Reading view

There are new articles available, click to refresh the page.

HuggingBuddy

Chrome App Link: https://chromewebstore.google.com/detail/huggingbuddy/hhkbebgakgkljpipmdblnabnoagemohb

If anyone would like to contribute more
GitHub Code: https://github.com/angu10/HuggingBuddy

Introducing HuggingBuddy: Your Friendly Companion for Reading Research Papers

Are you tired of feeling overwhelmed by complex research papers? Do you wish you had a friendly companion to help you understand the key ideas and insights? Look no further! Introducing HuggingBuddy, the user-friendly Chrome extension that simplifies the process of reading and understanding research papers from Hugging Face.

πŸ€— AI-Powered Summaries

HuggingBuddy harnesses the power of artificial intelligence to generate concise summaries of research papers. Say goodbye to hours of reading and hello to quick and easy understanding. With HuggingBuddy, you can grasp a paper's main ideas and contributions in just a few minutes.

❓ Interactive Q&A

Curious to learn more? HuggingBuddy has got you covered. The extension generates up to 5 relevant questions based on the paper's content, allowing you to explore and understand the research more deeply. Simply click on a question, and HuggingBuddy will provide a detailed answer using the advanced Gemini language model.

🎨 Customizable Reading Experience

We understand that everyone has different preferences when it comes to reading. That's why HuggingBuddy allows you to personalize your reading experience. Choose from various themes to suit your style and enable text-to-speech functionality to listen to the summaries and answers on the go.

🀝 Integration with Hugging Face

HuggingBuddy seamlessly integrates with the Hugging Face platform, giving you direct access to many research papers. No more searching through multiple websites or repositories. With HuggingBuddy, all the knowledge you need is just a click away.

🌟 Open Source and Community-Driven

HuggingBuddy is an open-source project licensed under the Apache License 2.0. We believe in the power of collaboration and encourage anyone to contribute to the project. Whether you're a developer, researcher, or enthusiast, you can help make HuggingBuddy better for everyone.

We welcome contributions in various forms, including:

  • πŸ› Bug reports and feature requests
  • πŸ’» Code contributions and pull requests
  • πŸ“š Documentation improvements
  • πŸ§ͺ Testing and feedback

By contributing to HuggingBuddy, you'll join a vibrant community of individuals passionate about making research more accessible and understandable. Together, we can create a powerful tool that benefits researchers, students, and anyone interested in exploring scientific knowledge.

πŸš€ Powered by Gemini API

HuggingBuddy leverages Google's cutting-edge Gemini API to generate summaries and provide interactive features. The Gemini API is a state-of-the-art language model that excels at natural language understanding and generation.

We are grateful to Google for making the Gemini API available and enabling us to build innovative tools like HuggingBuddy.

Ready to dive into the world of research papers with a friendly companion by your side? Install HuggingBuddy today and experience the joy of understanding complex ideas with ease. Happy reading! πŸ“–πŸ€—

How I Found Joy in Hugging Face's Model Selection!

Problem Statement

With a plethora of models available on Hugging Face, it can be overwhelming to evaluate and select the right model for your project. The challenge lies in navigating through the vast options and identifying a model that aligns with your specific requirements, including task suitability, licensing, documentation, limitations, and hardware constraints.

Step-by-Step Guidance

Step 1: Explore the Hugging Face Model Hub

Begin by visiting the Hugging Face Model Hub, which offers an extensive collection of pre-trained models. Here's an image showcasing the interface:

Hugging Face Model Landing Page

Step 2: Filter by Task

Narrow down your options by selecting the task you're interested in. For instance, if you're looking for a model for "Text generation", apply this filter to see relevant models.

List of Tasks Classifications

Step 3: Consider Licensing

If licensing is a concern, focus on models with open-source licenses like Apache-2.0 or MIT. These licenses allow you to download, modify, and use the models in your applications with fewer restrictions.

Step 4: Sort Models by Popularity

By default, models are sorted by trending status. However, sorting by the number of downloads can be more indicative of a model's reliability and popularity. For example, you might choose "distilbert/distilgpt2" based on its download count.

Licensing and Sorting on top Right

Step 5: Review Model Documentation

Examine the model's documentation to ensure it is comprehensive, easy to follow, and structured in a way that helps you get started without much hassle.

Step 6: Check Out of Scope Uses and Limitations

Understanding the model's limitations and out-of-scope uses is crucial to determine if it fits your use case. This information can often be found in the model's documentation or discussion forums.

Step 7: Assess Hardware Requirements

Consider the hardware requirements for running the model. For instance, "distilbert/distilgpt2" might require approximately 1059MB of memory for execution, considering the model size and the need for additional memory during processing.

Step 8: Research Published Papers

Investigate how many papers have been published based on the model. This can give you insights into the model's academic credibility and applications.

Model Size and Paper Publications

Step 9: Evaluate Model Performance

Use the πŸ€— Evaluate library to easily evaluate machine learning models and datasets. With a single line of code, you can access dozens of evaluation methods for different domains.

Step 10: Check Compatibility with Libraries

Ensure the model is compatible with the libraries you're using, such as TensorFlow, PyTorch, or FastAI. This compatibility is essential for seamless integration into your workflow.

Step 11: Test the Model

Before fully integrating the model into your project, conduct tests to see how it performs with your data. This can help you identify any unexpected behavior or adjustments that may be needed.

Step 12: Contribute to the Community

If you make improvements or find novel uses for the model, consider contributing back to the community by sharing your findings or enhancements.

Conclusion

While these steps reflect my personal approach to selecting models from Hugging Face, I encourage you to share your own methods and perspectives in the comments. It's always beneficial to learn from the diverse experiences of others in the community.

Exploring Thanos Kube Chaos - A Kubernetes Chaos Engineering Tool

Image description

Chaos engineering has become a crucial aspect of ensuring the resilience and reliability of applications and infrastructure, especially in the dynamic world of Kubernetes. In this blog post, we will dive into "Thanos Kube Chaos," an open-source tool designed for chaos engineering in Kubernetes environments. The project draws inspiration from Netflix Chaos Monkey and provides a set of features to simulate controlled failures and assess the robustness of your Kubernetes clusters.

Overview

Thanos Kube Chaos is a Python-based chaos engineering tool that leverages the Kubernetes Python client to interact with Kubernetes clusters. Its primary goal is to help users proactively identify vulnerabilities in their systems by inducing controlled failures and assessing the system's response. Let's explore some key aspects of this project.

The Importance of Project Thanos in Resilience Testing:

1. Engineering Team - Resilience Testing:

Need: Modern applications often run in complex and dynamic environments. Chaos engineering allows organizations to proactively identify weaknesses and points of failure in their systems.
Importance: Testing how systems respond to failures helps ensure that they can gracefully handle unexpected issues, improving overall system resilience.

2. Training Support/ Product Delivery Teams:

Need: Support teams need to be well-prepared to handle incidents and outages. Chaos engineering provides a controlled environment to simulate real-world failures.
Importance: Through simulated chaos experiments, support teams can become familiar with different failure scenarios, practice incident response, and develop confidence in managing unexpected events.

3. SRE Team - Identifying Vulnerabilities:

Need: Systems are susceptible to various failure modes, such as network issues, hardware failures, or service disruptions. Identifying vulnerabilities is crucial for preventing cascading failures.
Importance: Chaos experiments help uncover vulnerabilities in the system architecture, infrastructure, or application code, allowing teams to address these issues proactively.

Collaboration and Contribution

Thanos Kube Chaos is an open-source project, and collaboration is welcome! If you are passionate about chaos engineering, Kubernetes, or Python development, consider contributing to the project. You can find the project on GitHub: Thanos Kube Chaos

Features

1. List Pods
Thanos Kube Chaos allows users to retrieve the names of pods in specified namespaces. This feature is essential for understanding the current state of the cluster and identifying the target pods for chaos experiments.

2. List Running Pods
To focus on running instances, the tool provides a feature to retrieve the names of running pods in specified namespaces. This is particularly useful when targeting live instances for chaos experiments.

3. Delete Pod
Deleting a specific pod in a given namespace is a common chaos engineering scenario. Thanos Kube Chaos provides a straightforward method to induce this failure and observe the system's response.

4. Delete Random Running Pod
For more dynamic chaos, the tool allows users to delete a randomly selected running pod, optionally matching a regex pattern. This randomness adds an element of unpredictability to the chaos experiments.

5. Delete Services
Deleting all services in specified namespaces can simulate a scenario where critical services are temporarily unavailable. This helps evaluate the system's resilience to service disruptions.

6. Delete Nodes
Inducing node failures is a critical aspect of chaos engineering. Thanos Kube Chaos facilitates the deletion of specific nodes from the Kubernetes cluster to evaluate the system's ability to handle node failures.

7. Network Chaos Testing
Simulating network chaos by introducing latency to a specified network interface helps assess the impact of network issues on application performance. This feature allows users to evaluate how well their applications handle network disruptions.

8. Resource Limit Configuration
Setting resource limits (CPU and memory) for a specific pod in a given namespace allows users to evaluate the application's behavior under resource constraints. This can be crucial for identifying resource-related vulnerabilities.

9. Node Eviction
Triggering the eviction of a specific node from the cluster is another way to assess the system's response to node failures. Thanos Kube Chaos provides a method to simulate node evictions and observe the impact.

10. Execute Command in Pod
Running a command inside a specific pod in a given namespace is a versatile feature. It enables users to perform custom chaos experiments by executing specific commands within the targeted pods.

11. Simulate Disk I/O Chaos
Simulating high disk I/O for a specific pod by creating a test file helps assess the application's behavior under disk-related stress. This can be crucial for identifying potential disk I/O bottlenecks.

12. Retrieve Pod Volumes
Retrieving the volumes attached to a specific pod in a given namespace provides insights into the storage configuration of the targeted pod. Understanding pod volumes is essential for designing chaos experiments that involve storage-related scenarios.

13. Starve Pod Resources
Starving resources (CPU and memory) for a randomly selected running pod is a valuable chaos engineering scenario. This feature helps evaluate how well applications handle resource shortages and whether they gracefully degrade under such conditions.

Example and Code Availability

Explore practical examples and access the full source code of Thanos Kube Chaos on GitHub. Head over to the Thanos Kube Chaos GitHub Repository for detailed examples, and documentation, and to contribute to the project.

Feel free to clone the repository and experiment with the code to enhance your chaos engineering practices in Kubernetes.

Understanding Custom Functions in DuckDB

DuckDB's support for custom functions is a crucial feature that allows users to extend the database's capabilities by incorporating their logic and operations. Custom functions are user-defined functions (UDFs) that can be implemented in languages such as Python and then seamlessly integrated into DuckDB. This extensibility is invaluable when users encounter specific analytical challenges not addressed by the built-in functions. For instance, SQL often struggles to infer datetime formats, leading to the need for complex case-when statements. The parse_dates custom function showcased here, leveraging Pandas capabilities, becomes a powerful solution to overcome this limitation.

The parse_dates Function

The parse_dates function, in the provided Python code, is a practical example of a custom function designed to handle date parsing within DuckDB. This function leverages the popular Pandas library to parse dates based on user-defined formats. The flexibility of the function allows users to specify date formats and handles different scenarios gracefully, using Pandas' pd.to_datetime method.

def parse_dates(col, fmt):
    """
    Method to parse the dates based on the format provided,
    this will be created as a UDF in DuckDB
    """
    try:
        if fmt[0].lower() == "y":
            return pd.to_datetime(col, yearfirst=True, errors="coerce")
        if fmt[0].lower() == "m":
            return pd.to_datetime(col, dayfirst=True, errors="coerce")
    except (IndexError, ValueError):
        pass
    return None

This function is particularly useful in scenarios where the date formats in the dataset might vary, providing a flexible solution for date parsing within DuckDB.

Integrating parse_dates into DuckDB

The process of integrating the parse_dates function into DuckDB involves creating a corresponding function within the database. The create_function method checks whether the function already exists and, if not, registers it with DuckDB. The provided SQL query ensures that there are no duplicate entries before attempting to create the function.

def create_function(conn):
    """
    Create a function in DuckDB. Currently, it's hardcoded
    we can modify later based on the use case
    """
    function_check = """SELECT DISTINCT  function_name
                        FROM duckdb_functions()
                        WHERE lower(function_type) = 'scalar'
                        AND lower(function_name) in ('parse_dates')
                        ORDER BY function_name;"""

    function_check_output = conn.query(function_check)
    try:
        if not function_check_output:
            conn.create_function("parse_dates", parse_dates, [VARCHAR, VARCHAR], TIMESTAMP)
    except (duckdb.Error, ValueError) as error:
        raise ValueError(
            f"Failed to create function 'parse_dates': {str(error)}"
        ) from error

This step ensures that the custom function is available for use in DuckDB's SQL queries.

Unregistering the Custom Function

The unregister_function method allows users to remove the custom function from DuckDB. If, for any reason, users want to unregister the parse_dates function, this method facilitates the removal of the function from DuckDB.

def unregister_function(conn):
    """
    Unregister a function in DuckDB.
    """
    conn.remove_function("parse_dates")

This feature emphasizes the dynamic nature of DuckDB, allowing users to manage and tailor the set of available functions according to their evolving needs.

Conclusion

The integration of custom functions, such as the parse_dates example, exemplifies DuckDB's commitment to providing users with a customizable and extensible platform for data analysis. As users explore and create their custom functions, they gain the ability to enhance DuckDB's capabilities to address unique challenges in data analysis workflows. Custom functions not only open up new possibilities but also empower users to shape their analytical environment to suit their specific requirements, making DuckDB a versatile and user-friendly database for diverse analytical tasks.

Exploring TAPAS: Analyzing Clinical Trial Data with Transformers

Introduction:

Welcome to the world of Transformers, where cutting-edge natural language processing models are revolutionizing the way I interact with data. In this series of blogs, I will embark on a journey to explore and understand the capabilities of the TAPAS (Tabular Pre-trained Language Model) model, which is designed to extract valuable insights from tabular data. To kick things off, I'll delve into the basics of TAPAS and see it in action on a real-world dataset.

Understanding TAPAS:

TAPAS is a powerful language model developed by Google that specializes in processing tabular data. Unlike traditional models, TAPAS can handle structured data seamlessly, making it a game-changer for tasks involving tables and spreadsheets. With a token size of 512k, TAPAS can process large datasets efficiently, making it a valuable tool for data analysts and scientists.

My Dataset:

For this introductory exploration, I will work with a clinical trial dataset [Clinicaltrails.gov]. To start, I load the dataset and create a data frame containing the "label" column. This column contains information about gender distribution in clinical trials. I'll be using this data to ask questions and obtain insights.

from transformers import pipeline,TapasTokenizer, TapasForQuestionAnswering
import pandas as pd
import datasets

# Load the dataset (only once)
dataset = datasets.load_dataset("Kira-Asimov/gender_clinical_trial")

# Create the clinical_trials_data DataFrame with just the "label" column (only once)
clinical_trials_data = pd.DataFrame({
    "id": dataset["train"]["id"],
    "label": dataset["train"]["label"],
})

clinical_trials_data = clinical_trials_data.head(100)


Asking Questions with TAPAS:

The magic of TAPAS begins when I start asking questions about our data. In this example, I want to know how many records are in the dataset and how many of them are gender-specific (Male and Female). I construct queries like:

"How many records are in total?"
"How many 'Male' only gender studies are in total?"
"How many 'Female' only gender studies are in total?"

Using TAPAS to Answer Questions:

I utilize the "google/tapas-base-finetuned-wtq" model and its associated tokenizer to process our questions and tabular data. TAPAS tokenizes the data, extracts answers, and even performs aggregations when necessary.

counts = {}
answers = []

def TAPAS_model_learning(clinical_trials_data):
    model_name = "google/tapas-base-finetuned-wtq"
    model = TapasForQuestionAnswering.from_pretrained(model_name)
    tokenizer = TapasTokenizer.from_pretrained(model_name)


    queries = [
        "How many records are in total ?",
        "How many 'Male' only gender studies are in total ?",
        "How many 'Female' only gender studies are in total ?",
    ]

    for query in queries:
            model_name = "google/tapas-base-finetuned-wtq"
            model = TapasForQuestionAnswering.from_pretrained(model_name)
            tokenizer = TapasTokenizer.from_pretrained(model_name)
            # Tokenize the query and table
            inputs = tokenizer(table=clinical_trials_data, queries=query, padding="max_length", return_tensors="pt", truncation=True)

            # Get the model's output
            outputs = model(**inputs)
            predicted_answer_coordinates, predicted_aggregation_indices = tokenizer.convert_logits_to_predictions(
                inputs, outputs.logits.detach(), outputs.logits_aggregation.detach()
            )

            # Initialize variables to store answers for the current query
            current_answers = []

            # Count the number of cells in the answer coordinates
            count = 0
            for coordinates in predicted_answer_coordinates:
                count += len(coordinates)
                # Collect the cell values for the current answer
                cell_values = []
                for coordinate in coordinates:
                    cell_values.append(clinical_trials_data.iat[coordinate])

                current_answers.append(", ".join(cell_values))

            # Check if there are no matching cells for the query
            if count == 0:
                current_answers = ["No matching cells"]
            counts[query] = count
            answers.append(current_answers)
    return counts,answers

Evaluating TAPAS Performance:

Now, let's see how well TAPAS performs in answering our questions. I have expected answers for each question variation, and I calculate the error percentage to assess the model's accuracy.

# Prepare your variations of the same question and their expected answers
question_variations = {
    "How many records are in total ?": 100,
    "How many 'Male' only gender studies are in total ?": 3,
    "How many 'Female' only gender studies are in total ?":9,
}


# Use TAPAS to predict the answer based on your tabular data and the question
predicted_count,predicted_answer = TAPAS_model_learning(clinical_trials_data)
print(predicted_count)
# Check if any predicted answer matches the expected answer
for key,value in predicted_count.items():
    error = question_variations[key] - value


    # Calculate the accuracy percentage
    error_percentage = (error / question_variations[key]) * 100

    # Print the results
    print(f"{key}: Model Value: {value}, Excepted Value: {question_variations[key]}, Error Percentage: {error_percentage :.2f}%")

Results and Insights:

The output reveals how TAPAS handled our queries:

For the question "How many records are in total?", TAPAS predicted 69 records, with an error percentage of 31.00% compared to the expected value of 100 records.

For the question "How many 'Male' only gender studies are in total?", TAPAS correctly predicted 3 records, with a perfect match to the expected value.

For the question "How many 'Female' only gender studies are in total?", TAPAS predicted 2 records, with a significant error percentage of 77.78% compared to the expected value of 9 records.

Conclusion and Future Exploration:

In this first blog of our TAPAS exploration series, I introduced you to the model's capabilities and showcased its performance on a real dataset. I observed both accurate and less accurate predictions, highlighting the importance of understanding and fine-tuning the model for specific tasks.

In our future blogs, I will delve deeper into TAPAS, exploring its architecture, fine-tuning techniques, and strategies for improving its accuracy on tabular data. Stay tuned as I unlock the full potential of TAPAS for data analysis and insights.

Prioritizing Tasks with My Personal Eisenhower Matrix

In the midst of our busy daily lives, staying organized and efficient can be a real challenge. Whether you're a professional juggling numerous responsibilities or simply trying to strike a balance between work and personal life, finding a system to prioritize tasks effectively is crucial. One such system that has transformed the way I approach my daily routine is the Eisenhower Matrix.

My journey with the Eisenhower Matrix began on a flight to NJ for a customer meeting. During the flight, my boss/mentor shared some valuable advice, saying, "Angu, you should learn how to use your time effectively, understanding what tasks you should do and what tasks you can delegate to others." His words got me thinking about how I could improve my daily tasks and make the most out of my time.

It was during this moment of reflection that I stumbled upon the Eisenhower Matrix through a random search. Without hesitation, I started crafting my own Eisenhower Matrix right then and there, and I've been refining and utilizing it ever since. It has proven immensely valuable in enhancing my productivity and time management. Now, I want to share my personal Eisenhower Matrix with you in the hope that it can bring similar benefits to your life.

The Eisenhower Matrix: A Brief Overview
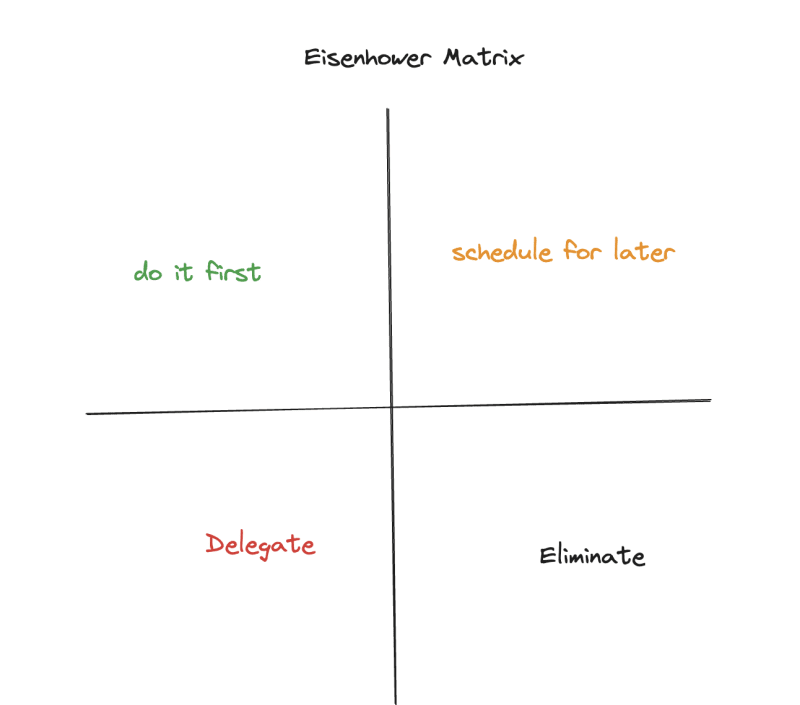
The Eisenhower Matrix, a task management technique, offers a systematic way to categorize and prioritize your tasks based on their urgency and importance. This matrix helps you determine which tasks to tackle immediately, schedule for later, delegate, or eliminate. In this article, we'll guide you through the process of setting up an Eisenhower Matrix and share valuable tips for effective task prioritization.

Urgent and Important (Do First):

  1. Team Daily Stand-up: This is the heartbeat of our team's coordination. Understanding where we stand on our deliveries is not just important but urgent to ensure we're on track.

  2. Critical Deliverable Tasks: Staying on top of critical deliverables is imperative to meet project deadlines and maintain our reputation for excellence.

  3. Support Ticket: Immediate attention to support tickets is crucial to provide timely assistance to our clients and maintain their satisfaction.

  4. JIRA Board: Keeping an eye on our project management board helps ensure that the number of bugs and re-open tickets remains under control.

  5. Internal and External Stakeholder Meetings: These meetings are essential for project progress and maintaining strong client relationships.

  6. Address Team Member Issues: As a team leader, addressing team member issues promptly is both urgent and important for team morale and productivity.

  7. Spending Time with Family and Friends: Quality time with loved ones is not just important but also urgent for maintaining personal well-being and healthy relationships.

Important but Not Urgent (Schedule):

  1. Strategic Planning: Allocating time for strategic planning ensures we have a clear path forward for long-term project success.

  2. Skill Development: Regularly scheduled skill development sessions help me stay ahead in my field and provide better guidance to my team.

  3. Relationship Building: Networking and relationship-building activities are vital for career growth and expanding our professional network.

  4. Personal Development: Setting aside time for personal development allows for self-improvement and growth, contributing to long-term success.

  5. Health and Wellness: Regularly scheduling time for exercise and health check-ups ensures I remain fit and energized to tackle daily challenges.

  6. Writing Blog: Allocating time for blog writing allows me to share insights and connect with a broader audience, contributing to my personal and professional growth.

Urgent but Not Important (Delegate):

  1. Onboarding: Delegating the onboarding process to HR or designated team members frees up my time to focus on other critical tasks.

  2. Non-Essential Meetings: Delegating attendance at non-essential meetings to team members ensures that my presence is reserved for meetings where my input is essential.

  3. Deployment and Operations: Assigning deployment and day-to-day operations tasks to capable team members allows me to concentrate on high-priority matters.

  4. Ordering Take-Out Food: Delegate the responsibility of selecting and ordering take-out food to other household members or colleagues, allowing me to save time and focus on more important tasks.

  5. Routine Development Tasks for New Joinees: Assign routine development tasks for new employees to team mentors or trainers to ensure a smooth onboarding process, allowing you to focus on higher-level guidance and leadership.

Not Urgent and Not Important (Eliminate):

  1. Excessive Social Media Usage and Web Browsing: Reducing non-work-related social media time helps eliminate distractions and increases productivity.

  2. Unnecessary Email Checking: Minimizing the frequency of checking non-essential emails prevents distractions and allows for more focused work.

  3. Unrelated Side Projects: Shelving or eliminating side projects that do not align with my goals prevents unnecessary diversions.

Conclusion

The Eisenhower Matrix has been helping in my daily routine. By categorizing tasks into these four quadrants, I've gained clarity on what needs my immediate attention, what can be scheduled for later, what can be delegated, and what should be eliminated altogether. This simple yet powerful matrix has not only increased my productivity but also reduced stress and improved my work-life balance.

I encourage you to create your own Eisenhower Matrix tailored to your unique responsibilities and goals. It's a versatile matrix that can help anyone take control of their time and focus on what truly matters. Remember, it's not about doing more; it's about doing the right things at the right time.

Boosting Performance and Memory Efficiency with PyArrow and Pandas for Clinical Trial Data

1. Introduction

In the world of data analysis and manipulation, efficiency and memory usage play crucial roles, especially when dealing with large datasets. Clinical trials generate vast amounts of data, making it imperative to employ tools that optimize both processing time and memory utilization. One such strategy involves combining the power of Pandas and PyArrow, two popular Python libraries for data manipulation and in-memory columnar storage, respectively.

In this blog, we'll delve into how PyArrow can be integrated with Pandas to enhance both processing speed and memory efficiency while analyzing a clinical trial dataset.

Create Dummy Clinical Dataset

Let's start by considering a sample clinical trial dataset, which consists of various attributes such as patient identifiers, demographic information, treatment details, medical measurements, and more. This dataset comprises meaningful columns that simulate the kind of data encountered in clinical trials. Here's how the dataset is generated using NumPy and Pandas:


import pandas as pd
import numpy as np

# Generating a sample dataset with 20 columns meaningful for clinical trials
np.random.seed(42)
num_rows = 100000
num_columns = 20

# Generating columns with meaningful names related to clinical trials
data = {
    'Patient_ID': np.arange(1, num_rows + 1),  # Unique identifier for each patient
    'Age': np.random.randint(18, 80, num_rows),  # Age of the patient
    'Sex': np.random.choice(['Male', 'Female'], num_rows),  # Gender of the patient
    'Treatment': np.random.choice(['Drug A', 'Drug B', 'Placebo'], num_rows),  # Treatment administered
    'Blood_Pressure': np.random.randint(80, 180, num_rows),  # Blood pressure reading
    'Cholesterol': np.random.randint(120, 300, num_rows),  # Cholesterol level
    'BMI': np.random.uniform(18, 40, num_rows),  # Body Mass Index
    'Heart_Rate': np.random.randint(60, 100, num_rows),  # Heart rate
    'Diabetes': np.random.choice(['Yes', 'No'], num_rows),  # Presence of diabetes
    'Smoker': np.random.choice(['Smoker', 'Non-Smoker'], num_rows),  # Smoking status
    'Family_History': np.random.choice(['Yes', 'No'], num_rows),  # Family history of conditions
    'Adverse_Event': np.random.choice(['Mild', 'Moderate', 'Severe', 'None'], num_rows),  # Adverse events experienced
    'Lab_Result_1': np.random.uniform(0, 10, num_rows),  # Laboratory result 1
    'Lab_Result_2': np.random.uniform(50, 150, num_rows),  # Laboratory result 2
    'Lab_Result_3': np.random.uniform(1, 20, num_rows),  # Laboratory result 3
    'Efficacy_Score': np.random.uniform(0, 100, num_rows),  # Efficacy score of treatment
    'Visit_1': np.random.choice(['Completed', 'Missed'], num_rows),  # Visit status
    'Visit_2': np.random.choice(['Completed', 'Missed'], num_rows),  # Visit status
    'Visit_3': np.random.choice(['Completed', 'Missed'], num_rows),  # Visit status
    'Follow_Up_Status': np.random.choice(['Ongoing', 'Completed'], num_rows)  # Follow-up status
}

df = pd.DataFrame(data)

# Display the first few rows of the DataFrame
df.head()


Integrating PyArrow with Pandas

To leverage the benefits of both Pandas and PyArrow, we'll first create a Pandas DataFrame from the clinical trial data, and then convert this DataFrame into a PyArrow Table. This step allows us to utilize the advanced memory layout optimization and columnar storage offered by PyArrow. Here's how it's done:


# Import required libraries
import pandas as pd
import pyarrow as pa

# Create pandas DataFrame from the clinical trial data
pandas_df = pd.DataFrame(df)

# Convert pandas DataFrame to pyarrow Table
pyarrow_table = pa.Table.from_pandas(pandas_df)


Measuring Memory Usage

One of the primary advantages of using PyArrow is its efficient memory utilization, particularly when working with large datasets. To visualize this benefit, we'll compare the memory usage of the Pandas DataFrame and the PyArrow Table:


# Calculate memory usage for Pandas DataFrame and PyArrow Table
pandas_memory_usage = pandas_df.memory_usage(deep=True).sum() / (1024 * 1024)
pyarrow_memory_usage = pyarrow_table.nbytes / (1024 * 1024)

# Create a memory usage comparison graph
plt.figure(figsize=(6, 4))
plt.bar(['Pandas', 'PyArrow'], [pandas_memory_usage, pyarrow_memory_usage], color=['blue', 'orange'])
plt.ylabel('Memory Usage (MB)')
plt.title('Memory Usage Comparison: Pandas vs. PyArrow')
plt.show()


Image description

The Benefits: Speed and Memory Efficiency

The integration of PyArrow with Pandas presents two significant benefits: improved processing speed and enhanced memory efficiency.

Processing Speed: PyArrow's columnar storage format optimizes data access and retrieval. This leads to faster query execution times, as the data of each column is stored together, reducing the amount of data read from memory. In scenarios like clinical trials, where complex analyses and querying are common, this acceleration in processing speed can significantly improve productivity.

Memory Efficiency: PyArrow employs highly efficient compression algorithms and storage techniques, which reduce the memory footprint of the dataset. This becomes increasingly crucial when working with large clinical trial datasets that might not fit entirely in memory. By minimizing memory usage, PyArrow allows for the manipulation of larger datasets without causing memory-related bottlenecks.

Conclusion

In this blog, I have explored how the integration of PyArrow with Pandas can lead to a substantial improvement in processing speed and memory efficiency when dealing with large clinical trial datasets. By capitalizing on PyArrow's columnar storage and advanced memory optimization techniques, analysts and researchers can perform complex analyses more swiftly and manage larger datasets without compromising memory limitations. The combined power of Pandas and PyArrow opens up new possibilities for insightful exploration and data-driven decision-making in the realm of clinical trials and beyond

Setting Up Pre-Commit Hooks in GitHub: Ensuring Code Quality and Consistency

Introduction:
Pre-commit hooks are a powerful tool that can help maintain code quality, enforce style guidelines, and prevent common mistakes in software development. In this blog post, we will explore how to set up pre-commit hooks for your entire team using GitHub. Specifically, we will discuss the process of setting up pre-commit hooks for popular tools such as Black, pre-commit-hooks, Prettier, and pylint.

Table of Contents:

1.What are Pre-Commit Hooks?
2.Benefits of Pre-Commit Hooks
3.Setting Up Pre-Commit Hooks in GitHub
a.Prerequisites
b.Configuring the pre-commit Configuration File
c.Installing and Initializing Pre-Commit
d.Adding Pre-Commit Hooks

  1. Commonly Used Pre-Commit Hooks a.Black b.pre-commit-hooks c.Prettier d.pylint
  2. Customizing Pre-Commit Hooks
  3. Running Pre-Commit Hooks
  4. Conclusion

Sure! Here are the installation steps and code snippets for each section in the table of contents:

1. What are Pre-Commit Hooks?

Pre-commit hooks are scripts or actions that are automatically executed before a commit is made to a version control system. They help enforce code quality standards and catch potential issues before they are committed.

2. Benefits of Pre-Commit Hooks

Using pre-commit hooks in your development workflow offers several benefits:

  • Ensuring code quality and consistency
  • Enforcing style guidelines and formatting standards
  • Preventing common mistakes or issues
  • Catching potential bugs or vulnerabilities early
  • Facilitating collaboration and reducing code review efforts

3. Setting Up Pre-Commit Hooks in GitHub

a. Prerequisites

  • Git installed on your system
  • A project directory set up with a Git repository

b. Configuring the pre-commit Configuration File

Create a file called .pre-commit-config.yaml in the root of your project directory. This file will contain the configuration for your Pre-Commit hooks.

c. Installing and Initializing Pre-Commit

pip install pre-commit
pre-commit init

d. Adding Pre-Commit Hooks

In the .pre-commit-config.yaml file, define the hooks you want to use. For example, to use the Black code formatter:

repos:
  - repo: https://github.com/psf/black
    rev: <version>
    hooks:
      - id: black

Replace <version> with the desired version of Black.

4. Commonly Used Pre-Commit Hooks

a. Black

Installation:

pip install black

Configuration in .pre-commit-config.yaml:

repos:
  - repo: https://github.com/psf/black
    rev: <version>
    hooks:
      - id: black

b. pre-commit-hooks

Installation:

pip install pre-commit-hooks

Configuration in .pre-commit-config.yaml:

repos:
  - repo: https://github.com/pre-commit/pre-commit-hooks
    rev: <version>
    hooks:
      - id: check-json

c. Prettier

Installation:

npm install --save-dev prettier

Configuration in .pre-commit-config.yaml:

repos:
  - repo: https://github.com/pre-commit/mirrors-prettier
    rev: <version>
    hooks:
      - id: prettier
    files: \.(json|markdown|md|yaml|yml)$

d. pylint

Installation:

pip install pylint

Configuration in .pre-commit-config.yaml:

repos:
  - repo: https://github.com/PyCQA/pylint
    rev: <version>
    hooks:
      - id: pylint
        name: pylint
        entry: pylint
        language: system
        types: [python]
        env:
          PYTHONPATH: "./"

5. Customizing Pre-Commit Hooks

You can customize pre-commit hooks by modifying the .pre-commit-config.yaml file. This includes specifying hook options, excluding files or directories, or defining additional hooks or scripts.

6. Running Pre-Commit Hooks

To run pre-commit hooks before a commit, simply make a commit using Git. The hooks will automatically be executed. To manually run the hooks without making a commit, use the command pre-commit run --all-files.

7. Conclusion

In this blog post, we have explored how to set up and use Pre-Commit hooks in GitHub. By following these steps and configuring the hooks, you can ensure code quality, enforce style guidelines, and catch potential issues early in your development workflow. Pre-Commit hooks offer numerous benefits and can greatly improve collaboration and code consistency within your team.

Granting Access to Read-Only Users and Refreshing Permissions Automatically: A Function-Based Solution

Problem Statement

We have a PostgreSQL database with multiple schemas and tables. Some users have read-only access to the database and and they relay on Devops/Support team to refresh their access to view any new schemas or tables added to the database. We need to provide a solution to allow read-only users to refresh their access so they can view new schemas and tables as they are added.

Named Read-only User Group

Function 1: Will create a user and create a read_only group not available. If the group is available, it will create the user and password, attach it to the read_only group, and add all existing schema read-only access.

CREATE EXTENSION IF NOT EXISTS pgcrypto;

CREATE or replace FUNCTION create_users_and_grant_access(users text[]) RETURNS void AS $$
DECLARE
    READONLY_GROUP text := 'readonly';
    password text;
    user_name text;
    schemata text;
BEGIN
    FOREACH user_name IN ARRAY users LOOP
        -- Check if the user already exists
        PERFORM 1 FROM pg_user WHERE usename = user_name;
        IF NOT FOUND THEN
            -- Generate a random password for the new user
            password := encode(gen_random_bytes(12), 'base64');


            -- Create the database user with the hashed password
            RAISE NOTICE 'Creating database user: %', user_name;
            RAISE NOTICE 'Password: %', password;
            EXECUTE format('CREATE USER %I WITH PASSWORD %L', user_name, password);

            -- Create the read-only group if it does not exist
            PERFORM 1 FROM pg_roles WHERE rolname = READONLY_GROUP;
            IF NOT FOUND THEN
                RAISE NOTICE 'Creating read-only group: %', READONLY_GROUP;
                EXECUTE format('CREATE ROLE %I', READONLY_GROUP);
            END IF;

            -- Add the user to the read-only group
            RAISE NOTICE 'Adding user to read-only group: %', READONLY_GROUP;
            EXECUTE format('GRANT %I TO %I', READONLY_GROUP, user_name);
        ELSE
            RAISE NOTICE 'User already exists: %', user_name;
        END IF;
    END LOOP;

    -- Grant read-only access to all schemas for the read-only group
    FOR schemata IN SELECT schema_name FROM information_schema.schemata WHERE schema_name NOT LIKE 'pg_%' AND schema_name != 'information_schema' LOOP
        -- Check if the read-only group already has access to the schema
        PERFORM 1 FROM information_schema.role_table_grants WHERE grantee = READONLY_GROUP AND table_schema = schemata;
        IF NOT FOUND THEN
            -- Grant read-only access to the schema for the read-only group
            RAISE NOTICE 'Granting read-only access to schema: %', schemata;
            EXECUTE format('GRANT USAGE ON SCHEMA %I TO %I', schemata, READONLY_GROUP);
            EXECUTE format('GRANT SELECT ON ALL TABLES IN SCHEMA %I TO %I', schemata, READONLY_GROUP);
            EXECUTE format('GRANT EXECUTE ON ALL FUNCTIONS IN SCHEMA %I TO %I', schemata, READONLY_GROUP);
        ELSE
            RAISE NOTICE 'Read-only access already granted to schema: %', schemata;
        END IF;
    END LOOP;
END;
$$ LANGUAGE plpgsql;

Function 2:

This function will enable users to refresh read_only permissions, so they don’t have to rely on DevOps

CREATE OR REPLACE FUNCTION grant_readonly_access(schematabe text DEFAULT NULL)
RETURNS void
SECURITY DEFINER
AS $$
DECLARE
  READONLY_GROUP text := 'readonly';
BEGIN
  IF schematabe IS NOT NULL THEN
    -- Grant read-only access to specified schema for the user and read-only group
    PERFORM 1 FROM information_schema.schemata WHERE schema_name = schematabe;
    IF FOUND THEN
      RAISE NOTICE 'Granting read-only access to schema: % for user: %', schematabe, READONLY_GROUP;
      EXECUTE format('GRANT USAGE ON SCHEMA %I TO %I', schematabe, readonly_group);
      EXECUTE format('GRANT SELECT ON ALL TABLES IN SCHEMA %I TO %I', schematabe, readonly_group);
      EXECUTE format('GRANT EXECUTE ON ALL FUNCTIONS IN SCHEMA %I TO %I', schematabe, readonly_group);
      EXECUTE format('GRANT USAGE ON SCHEMA %I TO %I', schematabe, READONLY_GROUP);
      EXECUTE format('GRANT SELECT ON ALL TABLES IN SCHEMA %I TO %I', schematabe, READONLY_GROUP);
      EXECUTE format('GRANT EXECUTE ON ALL FUNCTIONS IN SCHEMA %I TO %I', schematabe, READONLY_GROUP);
    ELSE
      RAISE EXCEPTION 'Schema not found: %', schematabe;
    END IF;
  ELSE
    -- Grant read-only access to all schemas for the user and read-only group
    FOR schematabe IN SELECT schema_name FROM information_schema.schemata WHERE schema_name NOT LIKE 'pg_%' AND schema_name != 'information_schema' LOOP
      -- Check if the read-only group already has access to the schema
      PERFORM 1 FROM information_schema.role_table_grants WHERE grantee = readonly_group AND table_schema = schematabe;
      IF NOT FOUND THEN
        -- Grant read-only access to the schema for the read-only group
        RAISE NOTICE 'Granting read-only access to schema: % for user: %', schematabe, READONLY_GROUP;
        EXECUTE format('GRANT USAGE ON SCHEMA %I TO %I', schematabe, readonly_group);
        EXECUTE format('GRANT SELECT ON ALL TABLES IN SCHEMA %I TO %I', schematabe, readonly_group);
        EXECUTE format('GRANT EXECUTE ON ALL FUNCTIONS IN SCHEMA %I TO %I', schematabe, readonly_group);
        EXECUTE format('GRANT USAGE ON SCHEMA %I TO %I', schematabe, READONLY_GROUP);
        EXECUTE format('GRANT SELECT ON ALL TABLES IN SCHEMA %I TO %I', schematabe, READONLY_GROUP);
        EXECUTE format('GRANT EXECUTE ON ALL FUNCTIONS IN SCHEMA %I TO %I', schematabe, READONLY_GROUP);
      ELSE
        RAISE NOTICE 'Read-only access already granted to schema: % for user: %', schematabe, READONLY_GROUP;
      END IF;
    END LOOP;
  END IF;
END;
$$ LANGUAGE plpgsql;
❌